
Use and Care Manual


17
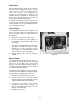
Thickness of Tenon Cut
To adjust the thickness of the tenon (male) cuts,
you will change the depth of the tracer pin
(Figure 22).
1. Disconnect machine from power source.
2. Loosen the locking handle on top the tracer
pin (Figure 22) by turning it counter
clockwise.
3. Insert a 5.5mm hex wrench into the end of
the adjustment screw (Figure 22) and turn
the adjustment screw as needed. To
decrease the thickness of the tenon cut, turn
the adjustment screw counterclockwise. To
increase the thickness of the tenon cut, turn
the adjustment screw clockwise.
4. Tighten locking handle.
Tightness of Mortise/Tenon Fit
A proper dovetail fit should be snug with no
gaps showing, but not overly tight as glue must
later fill the joints. If the cuts seem correct, but
the joint is simply too tight, or the joint is too
loose, proceed as follows.
1. Disconnect machine from power source.
2. Remove the dust hood from the front of the
machine.
3. You will notice the cutter, shown in Figure
23, is slightly off center of the spindle. The
spindle is eccentric and allows the cutter to
be turned to a different position on the
spindle.
The cutter is very sharp! Use
caution when working with or around it.
4. Loosen both set screws on the spindle
(Figure 23) by turning them counter-
clockwise with a 4mm hex wrench.
5. A scale is located just above the cutter, with
a plus (+) and minus (-) sign. Moving the
cutting edge of the cutter toward the plus (+)
side of the scale will increase the size of the
mortise cut and decrease the size of the
tenon cut. Moving the cutting edge of the
cutter toward the minus (-) side will
decrease the size of the mortise cut and
increase the size of the tenon cut.
6. With your fingers on the shank portion of the
cutter, carefully rotate the cutter toward the
plus (+) or minus (-) position as needed.
7. When satisfied with the adjustment, tighten
both set screws firmly.
8. Re-attach the dust hood.
Figure 22
Figure 23