
Operating Instructions Band Saws 2013 and 2415

14
During hard-wiring of the Band Saw, make sure
the fuses have been removed or the breakers
have been tripped in the circuit to which the
Band Saw will be connected. Place a warning
placard on the fuse holder or circuit breaker to
prevent it being turned on while the machine is
being wired.
Converting from 230 Volt to 460 Volt
(Three Phase Only)
To convert from 230 volt to 460 volt:
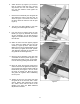
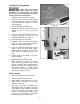
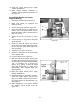
1. Remove the four Phillips head screws on
the switch plate (Figure 8) and tilt the switch
plate down. Then remove the hex nuts and
washers from the two screws at the center,
with an 8mm wrench. Pull the switch plate
off the screws and away from the switch
box. This will allow access to the switch box.
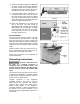
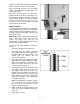
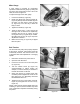
2. With the switch box tilted down, as shown in
Figure 9, loosen the screw at each end and
pull off the cover of the switch box.
3. In the switch box, change the position of the
fuse from the 230 volt position to the 460
volt position. See diagrams on pages 56
and 57. When finished, replace cover and
re-install switch plate.
4. Change the wiring in the junction box on the
Band Saw motor, in accordance with the
diagrams on pages 56 and 57.
5. If using a plug, install a proper UL/CSA
listed plug suitable for 460V operation.
IMPORTANT: Consult the diagrams on pages
56 and 57 for clarification of each of these
changes on 230V to 460V conversion.
Three-Phase Test Run
On the three-phase unit, after wiring has been
completed, you should check that the wires
have been connected properly:
1. Open lower front door of the Band Saw.
2. Connect machine to power source and
press the start button, shown in Figure 28,
for just an instant, then press the stop
button. (See “Operating Controls” on page
21 for further information on the control
buttons.)
3. The lower wheel should rotate clockwise as
viewed from the front of the machine. If the
rotation of the lower wheel is incorrect,
disconnect machine from power.
4. Switch any two of the three wires at "R,S,T"
(see “Electrical Connections”, pages 56 and
57) and re-connect machine to power
source.
Figure 8
Figure 9