EDGE SANDER Model 6108 Instruction Manual & Parts List M-0460222 (800) 274-6848 www.powermatic.
This manual has been prepared for the owner and operators of a Powermatic Model 6108 Edge Sander. Its purpose, aside from machine operation, is to promote safety through the use of accepted correct operating and maintenance procedures. Completely read the safety and maintenance instructions before operating or servicing the machine. To obtain maximum life and efficiency from your sander, and to aid in using the machine safely, read this manual thoroughly and follow all instructions carefully.
TABLE OF CONTENTS SAFETY: General Rules ...................................................................................................................... 4 Specific Rules ...................................................................................................................... 5 Decal Instruction .................................................................................................................. 5 SPECIFICATIONS .................................................................
SAFETY: General Rules 12. USE SAFETY GLASSES. Also use face or dust mask if cutting operation is dusty. As with all power tools there is a certain amount of hazard involved with the operation and use of the tool. Use the tool with the respect and caution demanded where safety precautions are concerned. This will considerably lessen the possibility of personal injury. When normal safety precautions are overlooked or completely ignored, personal injury to the operator can result. 13. SECURE WORK.
Your risk from these exposures varies, depending on how often you do this type of work. To reduce your exposure to these chemicals, work in a wellventilated area, and work with approved safety equipment, such as those dust masks that are specifically designed to filter out microscopic particles. SAFETY: Specific Rules 1. Before you turn on the machine, make sure everyone is clear of it. Keep hands away from abrasive belt. 2. Never remove safety guards during operation. 3.
RECEIVING THE SANDER Remove sander from its crate. Check for damage and ensure all parts are intact. Any damage should be reported immediately to your distributor and shipping agent. Before assembling, read the manual thoroughly, familiarizing yourself with correct assembly and maintenance procedures and proper safety precautions. Contents: 1 Sander 2 Work tables 1 Dust chute 1 Steel platen 1 Hardware bag containing 1 phillips screwdriver, 1 open-end wrench, 4 allen wrenches of the three power leads.
NOTE: Identify the sanding belt direction before you install the belt, because the belt's rotational direction must be the same as the machine. An arrow on the reverse side of the belt shows the proper direction and should match the arrow direction on the machine guard. If the belt has no arrow indicator, find the joint of the belt (where it is layered) and install it according to Figure 3. 6. Replace safety guard (B), close dust hood and re-tighten knobs (A). 7.
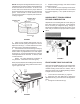
FIGURE 6 FIGURE 8 STEEL PLATEN ADJUSTMENT MOTOR/SANDING BELT ALIGNMENT The steel platen is located between the motor contact wheel and the idler pulley. The surface of the steel platen should protrude about 1/8"-1/4" past the motor contact wheel and the idler pulley in order to assure that the sanding belt will be in contact totally with the steel platen. Adjust as follows: The motor and sanding belt on the edge sander were factory aligned.
MAINTENANCE LUBRICATION CAUTION: Disconnect sander from power source before performing maintenance. Do not operate the sander until it is properly lubricated. All ball bearings are sealed for life and do not require lubrication. Apply a drop of light machine oil occasionally on the hinge of the tension mechanisms as shown in Figure 10. Service the machine every 6 weeks. FIGURE 10 SANDING BELT SELECTION Use the chart, Figure 11, for selecting an abrasive belt.
TROUBLE SHOOTING PROBLEM POSSIBLE CAUSE SOLUTION Sander will not start. 1. Fuse blown or circuit breaker tripped. 2. Cord damaged. 1. Replace fuse or reset circuit breaker. 2. Have cord replaced by qualified electrician. Overload kicks out frequently. 1. Extension cord too light or too long. 2. Excessive bite or feed pressure too great. 3. Motor not wired for correct voltage. 1. Replace with adequate size cord. 2. Allow sanding belt to cut freely do not force. 3.
TROUBLE SHOOTING PROBLEM (continued) POSSIBLE CAUSE SOLUTION Sanding belt glazes. 1. Sanding painted surface. 2. Wood is wet or gummy. 1. Use open-end grain/flint belt. 2. No cure. Use different stock. Work burns. 1. Wrong sanding belt surface. 3. Work held motionless. 1. Use coarser grit for stock removal. 2. Never force work into steel platen. 3. Keep work moving. Sanding marks on work. 1. Work held motionless. 1. Keep work moving. Sanding belt burns, clogs quickly on thickness sanding. 1.
PARTS LIST: Model 6108 Edge Sander NO. PART NO. DESCRIPTION NO. PART NO.
EXPLODED VIEW: Model 6108 Edge Sander 13
ELECTRICAL SCHEMATIC (6108 Edge Sander) 14
ELECTRICAL SCHEMATIC (6108 Edge Sander) 15
OPTIONAL ACCESSORIES 6294094 6294095 6294096 6294062 6294098 6294099 6294100 16 Abrasive Belt, 6" x 108", 40 Grit. Abrasive Belt, 6" x 108", 60 Grit. Abrasive Belt, 6" x 108", 80 Grit. Abrasive Belt, 6" x 108", 100 Grit. Abrasive Belt, 6" x 108", 120 Grit. Abrasive Belt, 6" x 108", 150 Grit. Abrasive Belt, 6" x 108", 200 Grit.
To order parts or reach our service department, please call our toll free number between 8:00 A.M. and 4:30 P.M. (CST), Monday through Friday. Having the Model Number and Serial Number of your machine available when you call will allow us to serve you quickly and accurately. Locating the stock number of the part(s) required from your parts manual will also expedite your order. Phone: (800) 274-6848 Fax: (800) 274-6840 If you are calling from Canada, please call 800-238-4746 E-mail: powermatic@wmhtoolgroup.
02/02 WMH Tool Group P.O. Box 1349 Auburn, WA 98071-1349 Phone: (800) 274-6848 Fax: (800) 274-6840 E-mail: powermatic@wmhtoolgroup.com Website: www.powermatic.