INSTRUCTION MANUAL 3500W Portable Generator Model # PS44 Have product questions or need technical support? Please feel free to contact us! Website: www.Amerisuninc.com Toll free: 1-800-791-9458 Mon-Fri 9-5 EST Email: support@amerisuninc.
CONTENTS Technical data…...………………………………………………………... Introduction………………………………………………………………. Safety information…….………………………………………………... General safety procedures ……....……………………………………… Important safety instructions……………………………………………. Knowing your generator………………………………………………… Generator preparation…………………………………………………... Step 1 Setup wheel kit…………………………………………. Step 2 Add oil…………………………………………………… Step 3 Add gasoline……………………………………………… Step 4 Ground the generator……………………………………. Starting the generator………....
INTRODUCTION Thank You for Purchasing a PowerSmart® Product. This manual provides information regarding the safe operation and maintenance of this product. Every effort has been made to ensure the accuracy of the information in this manual. PowerSmart® reserves the right to change this product and specifications at any time without prior notice. Please keep this manual available to all users during the entire life of the generator.
GENERAL SAFETY PROCEDURES For any questions regarding the hazard and safety notices listed in this manual or on the product, please call (800) 791-9458 Mon-Fri 9-5 EST before using the generator. DANGER: CARBON MONOXIDE Using a generator indoors CAN KILL YOU IN MINUTES. Generator exhaust contains carbon monoxide (CO). This is a poison gas you cannot see or smell. If you can smell the generator exhaust, you are breathing CO. But even if you cannot smell the exhaust, you could be breathing CO.
WARNING: This generator produces heat when running. Temperatures near exhaust can exceed 1500F (650 C). Do not touch hot surfaces. Pay attention to warning labels on the generator identifying hot parts of the machine. Allow generator to cool down after use before touching engine or areas of the generator that become hot during use. CAUTION: Misuse of this generator can damage it or shorten its life. Only use generator for its intended purposes. Operate only on dry, level surfaces.
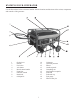
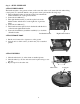
KNOWING YOUR GENERATOR Use the illustrations below to become familiar with the locations and functions of the various components and controls of this generator.
GENERATOR PREPARATION The following section describes steps necessary to prepare the generator for use. If after reading this section, you are unsure about how to perform any of the steps please call (800) 791-9458 Mon-Fri 9-5 EST for customer service. Failure to perform these steps properly can damage the generator or shorten its lifespan. Unpacking Unpack the generator and all its parts, and compare against the list below.
Step 1 – SETUP WHEEL KIT ATTACH THE HANDLE The handle attaches to the generator frame on the same side as the recoil starter (left side when facing control panel). To attach the handle to the generator frame, perform the following steps: 1. Take left handle bracket (6) and line up the hole in the handle bracket with the hole on the generator frame. 2. Secure the bolt M8x28 (7). 3. Take right handle bracket (8) and line up the holes in the handle bracket with the holes on the right side of generator frame.
Step 2 - ADD OIL The generator is shipped without oil. User must add the proper amount of oil before operating the generator for the first time. The oil capacity of the engine crankcase is 20 fl. oz. For general use (above 40° F), we recommend 30W, 4-stroke engine oil. ENGINE OIL RECOMMENDATIONS Select good quality detergent oil bearing the American Petroleum Institute (API) service classifications SJ, SL, or SM (synthetic oils may be used).
Step 3 - ADD GASOLINE WARNING: This generator may emit highly flammable and explosive gasoline vapors, which can cause severe burns or even death if ignited. A nearby open flame can lead to explosion even if not directly in contact with gasoline. Use fresh (within 30 days from purchase), lead-free gasoline with a minimum of 87 octane rating. Do not mix oil with gasoline. To add gasoline, follow these steps: 1. Make sure the generator is on a level surface. 2. Unscrew fuel cap and set aside.
STARTING THE GENERATOR Before starting the generator, make sure you have read and performed the steps in the “Generator Preparation” section of this manual. If you are unsure about how to perform any of the steps in this manual, please call (800) 791-9458 Mon-Fri 9-5 EST or email: support@amerisuninc.com for customer service. DANGER: CARBON MONOXIDE. Using a generator indoors CAN KILL YOU IN MINUTES. Generator exhaust contains carbon monoxide (CO). This is a poison gas you cannot see or smell.
STARTING THE ENGINE To start the generator, perform the following steps: 1. Unplug all electrical devices from the generator during ignition. Otherwise it will be difficult for the engine to start. 2. Check that the generator is properly grounded (Refer to “GROUND THE GENERATOR”). 3. Check the oil and fuel levels. 4. Turn the fuel valve to the “ON” position. 5. Move the choke lever to the “CLOSE” position. 6. Set the ON/OFF Switch to the “ON” position. 7.
USING THE GENERATOR WARNING: When this generator is used on a building’s wiring system, the generator must be installed by a qualified electrician and connected to a transfer switch as a separately derived system in accordance with the National Electrical Code, NFPA 70. The generator shall be connected to a transfer switch that switches all conductors other than the equipment grounding conductor. The frame of the generator shall be connected to an approved grounding electrode.
Tool or appliance Rated watts Additional surge watts Electric water heater (40 Gal) 4000 0 Hot plate 2500 0 Radial arm saw 2000 2000 Electric stove (each element) 1500-2800 0 Circular saw 1500 1500 Air compressor (1 HP) 1500 3000 Window air conditioner 1200 1800 Miter saw 1200 1200 Microwave 1000 0 Well water pump 1000 1000 Reciprocating saw 960 1040 Sump pump 800 1200 Refrigerator freezer 800 1200 Furnace blower 800 1300 Computer 800 0 Electric drill 600 900 Television 500 0 Deep freezer 500 500 Garage doo
MAINTENANCE Proper routine maintenance of the generator will help prolong the life of the machine. Please perform maintenance checks and operations according to the schedule in below chart.
ambient temperatures. It is also necessary to drain the oil from the crankcase if it has become contaminated with water or dirt. The oil capacity of the generator engine is 20 fl.oz. Add oil when the oil level is low. For proper type and weight of oil refer to “add oil” portion of the “Generator Preparation” section. To drain oil, follow these steps: 1. Place a container underneath the engine to catch oil as it drains. 2. Using a 10 mm hex wrench, unscrew the oil drain bolt.
FUEL VALVE CUP CLEANING The fuel valve cup is a small well underneath the fuel valve. It helps to trap dirt and water that may be in the fuel tank before it can enter the engine. To clean the fuel valve cup: 1. Turn the fuel valve to the “OFF” position. 2. Unscrew the fuel valve cup from the fuel valve using a wrench. Turn the valve toward you and unscrew. 3. Clean the cup of all sediments using a rag or brush. 4. Reinstall the fuel valve cup.
HIGH ALTITUDE OPERATION ABOVE 3000 FEET The fuel system on this generator may be influenced by operation at higher altitudes. Proper operation can be ensured by installing an altitude kit at altitudes higher than 3000 feet above sea level. At elevations above 8000 feet, the engine may experience decrease performance, even with the proper main jet. Operating this generator without the proper altitude kit installed may increase the engine’s emissions and decrease fuel economy and performance.
STORAGE & TRANSPORT PROCEDURES CAUTION: Never place any type of storage cover on the generator while it is still hot. If the generator is being stored for short periods of time (30 to 60 days), add stabilized fuel to the fuel tank until full. NOTE: Filling the tank reduces the amount of air in the tank and helps reduce deterioration of fuel. Run the engine for 2 – 3 minutes allowing stabilized fuel mixture to circulate through the carburetor.
EXPLODED VIEW AND PARTS LIST Engine exploded view 22
Engine parts list Altitude kit 23
Generator exploded view 24
Generator parts list Item 1 2 3 4 5 6 7 8 9 10 11 12 13 14 15 16 17 18 19 20 21 22 23 24 Stock # PS44-201 PS44-202 PS44-203 PS44-204 PS44-205 PS44-206 PS44-207 PS44-208 PS44-209 PS44-210 PS44-211 PS44-212 PS44-213 PS44-214 PS44-215 PS44-216 PS44-217 PS44-218 PS44-219 PS44-220 PS44-221 PS44-222 PS44-223 PS44-224 Description Fuel gauge Fuel tank cap Fuel filter Fuel tank Bolt M6x20 Washer Cushion Fuel valve Muffler gasket Washer Nut M8 Muffler assembly Alternator stand Muffler bracket Bolt M8x16 Terminal Al
TWO (2) YEARS LIMITED WARRANTY PowerSmart is committed to building tools that are dependable for years. Our warranties are consistent with our commitment and dedication to quality. TWO (2) YEARS LIMITED WARRANTY OF POWER SMART PRODUCTS FOR HOME USE. PowerSmart (“Seller") warrants to the original purchaser only, that all PowerSmart consumer power tools will be free from defects in material or workmanship for a period of two (2) years from date of purchase.