EN DRILL DRIVER OPERATOR MANUAL FR PERCEUSE À PERCUSSION À BALAIS MANUEL D’OPÉRATEUR ES TALADRO DE IMPACTO CON ESCOBILLAS MANUAL DEL OPERADOR DDG303
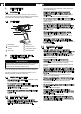
English 1 1.1 1.2 2 2.1 2.2 2.3 2.4 2.5 2.6 3 4 5 6 6.1 Description.................................... 4 6.2 6.3 6.4 6.5 Purpose...................................................... 4 Overview.................................................... 4 General power tool safety warnings........................................ 4 7 Work area safety........................................ 4 Electrical safety.......................................... 4 Personal safety........................................
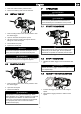
English EN 1 DESCRIPTION 1.1 PURPOSE • The machine is intended for driving in and loosening screws and bolts as well as for tightening and loosening nuts within the respective range of dimension. 1.2 • OVERVIEW • 1 7 6 5 2 4 • 3 • 1 Bit Storage 2 Forward / Reverse Switch 3 ON / OFF 2 4 5 6 7 LED Light Keyless Chuck 11 Position Clutch One Sided Bit 2.3 • GENERAL POWER TOOL SAFETY WARNINGS • WARNING Read all safety warnings and all instructions.
English 2.4 • • • • • • • • • • 2.6 • Do not force the power tool. Use the correct power tool for your application. The correct power tool will do the job better and safer at the rate for which it was designed. Do not use the power tool if the switch does not turn it on and off. Any power tool that cannot be controlled with the switch is dangerous and must be repaired.
English EN Symbol WARNING Explanation • • High speed • Switching On If the parts have damage, do not use the machine. If you do not have all the parts, do not operate the machine. If the parts are damaged or missing, speak to the service center. 1. Open the package. 2. Read the documentation in the box. Switching Off 3. Remove all the unassembled parts from the box. 4. Remove the machine from the box. 5. Discard the box and package in compliance with local regulations. Unlock 6.
English 7 1. Push and hold the battery release button. 2. Remove the battery pack from the machine. 6.4 EN OPERATION WARNING INSTALL THE BIT Always wear eye protection. WARNING Do not use any attachments or accessories not recommended by the manufacturer of this product. 7.1 START THE MACHINE 1. Push reversing button in the center position to lock the switch trigger. 2. Open or close the chuck jaws to a point. 3. Lift the front of the machine to keep the bit from falling out of the chuck jaws.
English EN 7.4 ADJUST THE REVERSING BUTTON NOTE The machine does not operate until the direction button is pushed fully to the left or right. The machine has the reversing button (forward/reverse lock) above the switch trigger to chang the direction of the bit. 7.5 • • • DRILL MATERIALS When drilling hard, smooth surfaces, use a center punch to mark the desired hole location. This can prevent the drill bit from slipping off-center as the hole is started.
English 8 MAINTENANCE 9 CAUTION Do not let brake fluids, gasoline, petroleum-based materials touch the plastic parts. Chemicals can cause damage to the plastic, and make the plastic unserviceable. CAUTION Do not use strong solvents or detergents on the plastic housing or components. WARNING 8.1 TECHNICAL DATA Voltage 20 V No Load Speed 0-650 RPM Clutch 10 Positions + Drill Torque 150 in.lb./17 N.m Weight without battery 0.81 kg/1.
English EN TRANSPORTATION CHARGES: Transportation charges for the movement of any power equipment unit or attachment are the responsibility of the purchaser. It is the purchaser’s responsibility to pay transportation charges for any part submitted for replacement under this warranty unless such return is requested in writing by Powerworks. Powerworks Tools P.O.
Français 1 1.1 1.2 2 2.1 2.2 2.3 2.4 2.5 2.6 3 4 5 6 Description.................................. 12 But............................................................ 12 Aperçu...................................................... 12 Avertissements généraux de sécurité des outils électriques..... 12 Sécurité de la zone de travail................... 12 Sécurité électrique....................................12 Sécurités des personnes..........................
Français FR 1 DESCRIPTION 1.1 BUT • étincelles qui peuvent enflammer la poussière ou les vapeurs. Tenez les enfants et les curieux à l'écart lorsque vous utilisez un outil électrique. Les distractions peuvent vous faire perdre le contrôle. Cet appareil est conçu pour visser et dévisser des vis et des boulons ainsi que pour serrer et desserrer des écrous dans leur gamme de dimension respective. 2.2 1.
Français brancher à la source d’alimentation et/ou le blocbatterie et quand vous soulevez ou transportez l'appareil. Transporter un outil électrique avec un • • • • doigt sur l’interrupteur ou le brancher sur une alimentation électrique alors que son interrupteur est en position marche favorise les accidents. Retirez les clefs de réglage et de serrage avant de mettre l’outil en marche.
Français FR • • • • • • • 4 non-intentionnelle du bouton marche/arrêt peut provoquer des blessures. La batterie fournie est partiellement chargée. Pour vous assurer de la pleine capacité de la batterie, chargez la complètement avec le chargeur avant la première utilisation. Lisez les instructions pour charger la batterie. Placez la mèche sur la vis/l'écrou uniquement lorsque l'appareil est éteint. Des mèches en rotation peuvent glisser de la vis.
Français 6.2 INSTALLEZ LE BLOC-BATTERIE 6.4 1. Poussez le bouton marche arrière vers la position centrale pour verrouiller le bouton marche/arrêt. AVERTISSEMENT • • • 2. Ouvrez ou fermez le mandrin en un point donné. 3. Tenez l'avant de l'appareil vers le haut pour que la mèche ne tombe pas du mandrin. Si le bloc-batterie ou le chargeur est endommagé, remplacez-le, au besoin. Arrêtez la machine et attendez que le moteur s'arrête avant d'installer ou de retirer le blocbatterie.
Français FR 7 UTILISATION 7.4 AVERTISSEMENT RÉGLEZ LE BOUTON MARCHE ARRIÈRE L'appareil a le bouton marche arrière (verrouillage avant/arrière) au-dessus de la gâchette marche/arrêt pour changer la direction de la mèche. Portez toujours des lunettes de protection. AVERTISSEMENT N'utilisez pas d'autres pièces ou d'accessoires non recommandés par le fabricant de ce produit. 7.
Français 8 REMARQUE L'appareil ne peut fonctionner qu'une fois que le bouton marche arrière est entièrement poussé vers la gauche ou la droite. 7.5 • • • ENTRETIEN ATTENTION Évitez que les liquides de freins, l'essence et les matériaux à base de pétrole ne viennent en contact avec les pièces en plastique. Les produits chimiques peuvent endommager le plastique et le rendre inutilisable.
Français FR 9 DONNÉES TECHNIQUES FRAIS DE TRANSPORT : Les frais de transport pour le déplacement de tout équipement motorisé ou accessoire sont à la charge de l'acheteur. Il incombe à l'acheteur de payer les frais de transport pour toute pièce retournée pour remplacement en vertu de la présente garantie, à moins qu'un tel retour soit demandé par écrit par Powerworks. Voltage 20 V Vitesse à vide 0-650 RPM Couplage 10 Positions + Perceuse Clé de serrage 150 in.lb./17 N.m Poids sans batterie 0.
Español 1 1.1 1.2 2 2.1 2.2 2.3 2.4 2.5 2.6 3 4 5 6 Descripción..................................20 Finalidad...................................................20 Perspectiva general..................................20 Advertencias generales de seguridad para herramientas eléctricas..................................... 20 Seguridad de la zona de trabajo.............. 20 Seguridad eléctrica...................................20 Seguridad personal..................................
Español ES 1 DESCRIPCIÓN 1.1 FINALIDAD • distracciones pueden hacer que pierda el control. 2.2 La máquina se ha diseñado para atornillar y aflojar tornillos y pernos, así como para apretar y aflojar tuercas dentro del intervalo correspondiente de dimensiones. 1.
Español • • • • interruptor o la conexión de herramientas eléctricas que tienen el interruptor activado fomenta los accidentes. Retire cualquier llave de ajuste antes de encender la herramienta eléctrica. Una llave que se quede fijada a una pieza giratoria de la herramienta eléctrica puede provocar lesiones personales. No se estire. Mantenga en todo momento una postura adecuada y el equilibrio. Esto permite un mejor control de la herramienta eléctrica en situaciones inesperadas.
Español • ES • • • • • • 4 interruptor de encendido/apagado puede provocar lesiones. La batería se suministra parcialmente cargada. Para garantizar la máxima capacidad de la batería, cargue totalmente la batería en el cargador de batería antes de utilizarla por primera vez. Lea las instrucciones de funcionamiento del cargador de la batería. Aplique la herramienta eléctrica al tornillo / la tuerca únicamente cuando esté apagada. Los insertos giratorios de la herramienta pueden deslizarse.
Español 6.2 INSTALACIÓN DE LA BATERÍA 1. Empuje el botón de inversión hacia la posición central para bloquear el gatillo interruptor. 2. Abra o cierre las mordazas del portabrocas a un punto. 3. Levante la parte delantera de la máquina para evitar que la broca se caiga de las mordazas del portabrocas. 4. Introduzca la broca en el punto. 5. Apriete las mordazas del portabrocas. NOTA Gire el cuerpo del portabrocas para cerrar las mordazas.
Español 7.1 PUESTA EN MARCHA DE LA MÁQUINA ES I O NOTA La máquina no puede funcionar hasta que el botón de inversión se empuja totalmente hacia la izquierda o la derecha. No utilice la máquina a bajas velocidades durante periodos prolongados de tiempo. 1. Pulse el gatillo interruptor para encender la máquina (I). 7.2 DETENCIÓN DE LA MÁQUINA 1. Suelte el gatillo interruptor para apagar la máquina (I). AVISO Suelte el gatillo interruptor y deje que el acoplamiento se detenga por completo. 7.
Español 7.5 • PERFORACIÓN DE MATERIALES PRECAUCIÓN No utilice disolventes o detergentes fuertes en la carcasa o los componentes de plástico. Cuando taladre sobre superficies duras o lisas, utilice un punzón para marcar el lugar donde desea taladrar el orificio. Esto puede evitar que la broca se salga del centro cuando se inicia el orificio. Al taladrar metales, utilice un aceite ligero en la broca para evitar que se sobrecaliente.
Español ES Embrague 10 posiciones + taladro Par 150 in.lb./17 N.m Peso sin batería 0.81 kg/1.79 lb Modelo de batería Serie BAP Modelo de cargador Serie CAP 10 COSTES DE TRANSPORTE: Los costes de transporte por el desplazamiento de cualquier unidad o accesorio de equipos eléctricos son responsabilidad del comprador.