Table of Contents Table of Contents Table of Contents .................................................................................................................... 2 Greetings ................................................................................................................................ 6 Copyright/Certifications/Trademarks/Exemptions................................................................... 7 Copyright........................................................................
Connecting an External Device........................................................................................ 24 Video Port / Audio Port ............................................................................................ 24 SPDIF ...................................................................................................................... 26 Connecting with OTG Cable.................................................................................... 27 Connecting mPack to a PC .....
Firmware Upgrade .................................................................................................................... 64 Auto Upgrade Using the PC Program .............................................................................. 64 Manual Upgrade through the Internet .............................................................................. 65 Manual Upgrade using the Installation CD....................................................................... 66 About/Company/Help........
Specifications .......................................................................................................................... 117 Customer Support................................................................................................................... 119 Warranty ................................................................................................................................. 121 Warranty Policy ...........................................................................
Greetings Greetings Thank you for purchasing the mPack P600, a mobile multimedia player manufactured by Power Quotient International (PQI). Using mPack P600, you can enjoy movies, music, pictures and e-books anywhere, anytime, through the ultra-sharp LCD screen designed for practical use, and high quality sound. This manual is provided for the proper use of the mPack P600 product.
Copyright/Certifications/Trademarks/Exemptions Copyright/Certifications/Trademarks/Exemptions Copyright Power Quotient International (PQI) owns the copyright of this manual. No part of this manual may be reproduced or transmitted in any form or by any means, whether electronic or mechanical, without the consent of PQI. Illegal use of any part of this manual will be punishable to the fullest extent of the law. Contents such as software, music and video are protected by copyright laws.
Precautions Precautions To avoid injuries and damage to property, please read the following precautions carefully and use the product accordingly. Precautions are classified into Danger, Caution and Notice according to their priorities. The company shall not be held liable for any injury or damage caused by failure to follow the precautions. If the user fails to follow the instructions below, personal injury, possibly fatal, Danger can be caused.
Danger Danger If the user fails to follow the instructions below, personal injury, possibly fatality may occur. Use only the AC adapter supplied with the product. Using any other AC adapter may cause electric shock or fire. Connect the AC adapter only to the certain wall outlet described on this manual. Connecting to a wall outlet with a different specification may cause electric shock or fire. Do not disassemble, or attempt to fix or modify the product.
Never plug in or remove the power plug from a wall outlet with wet hands. There is a danger of electric shock. Do not put the product beside a heater or in a microwave oven. There is a danger of explosion or fire, and it may cause deformation or malfunction of the product. If liquid gets into the product, turn the system off immediately, disconnect the power plug from the wall outlet, and contact your service center. There is a danger of electric shock or fire.
Caution Caution If the user fails to follow the instructions below, personal injury or damage to the product or property can be caused. Do not place mPack P600 close to magnets, TVs, monitors, speakers or hands free devices. The contents of the hard disk drive of the product may be deleted or the product may be damaged. Do not have cables exposed in walkways or high traffic areas. Users may trip over the cables or damage the product. Maintain a moderate volume when using earphones or headphones.
Notice Notice If the user fails to follow the instructions below, minor personal injury or damage to the product or property can be caused. Avoid placing heavy objects on the player. It may cause malfunction or damage to the product. Clean the product lightly with a soft dry cloth or towel. Never wipe with chemical solutions such as benzene, paint thinner or acetone.
Introduction Introduction mPack P600 is a hard disk type portable multimedia player developed by Power Quotient International(PQI). mPack P600 provides many additional advanced features that others in the portable multimedia player market may not support. This field is a rapidly growing. A clam shelled style 4-inch wide LCD screen with 16 million colors, 4W high power built-in speakers, 20/30GB of storage, and an easily removable battery. In addition, mPack P600 provides USB 2.
Features Features Movie Theater in My Hand – 16 : 9 Wide Screen The 4-inch wide color TFT LCD with 16 million colors in an aspect ratio of 16:9 shows lines of information on a single screen and provides realistic visual quality. Easy Handling of Large Data – 20GB, 30GB HDD A 20GB(HD020) or 30GB(HD030) 1.8 inch HDD has been adopted so as to provide enough space for large data.
Connection to External Speakers – SPDIF Support Connect to 5.1 surround sound speakers through an SPDIF interface and experience realistic sound as if you were in a movie theater or concert. Various Video / Audio Format Support Play various video You can play various video (MPEG1/2/4, Xvid) and audio files (mp3, wma, wav, m4a, ogg, ac3, aac). For Professional Photographers – Raw Image Support Raw image support is provided for professional photographers.
Contents Contents Please check if the following contents are included in the package. For an mPack P600 Professional, Professional sticker is put on the gift box. Check whether your player is mPack P600 Standard or Professional through it.
Additional Contents for P600 Professional Earphone Remote Control High-Quality Stereo IrDA Remote Control Earphone High-Quality Leather Bag SPDIF Cable Additional Contents for P600 Standard Stereo Earphone Note Carrying Pouch The package contents are subject to change without notice for the improvement of the performance and quality of the product.
Your Player Your Player Player Front View (1) (2) (3) (4) (5) (6) (7) (8) (9) (1) LCD (6) Play/Pause Button (2) ESC Button (7) POWER Button (3) MENU Button (9) USB OTG Button (4) Speaker (9) Operation LEDs (5) Navigation Button Note Turning the Power On / Off ● To turn the player off, press the POWER button for 1 to 2 seconds. ● Press the POWER button to turn the unit on, the RUN LED blinks green, turns to yellow and then blinks green again. Then the mPack logo appears on the LCD screen.
LEDs (3) (5) (1) (2) (4) Top View (6) (7) Ports (8) (9) (10) (11) (12) (1) USB OTG Button (7) Vent (2) USB LED (8) DC - 5V Adapter Port (3) RUN LED (9) USB 2.
Remote Control (1) (3) (5) (7) (1) Volume(+) Button (2) Volume (-) Button (3) 3D Sound Button (4) Previous Button (5) Next Button (2) (4) (6) Start/Pause/Stop Button (6) (7) Start/Pause/Stop Button IrDA Remote Control (1) (2) (3) (4) (6) (7) (5) (8) (9) (10) (11) (12) (1) ESC Button (7) Next Button (2) MENU Button (8) Start/Pause/Stop Button (3) SUBMENU Button (9) Volume (-) Button (4) POWER Button (10) Rewind Button(Zoom Out) (5) Previous Button (11) Fast Forward Button(Zoom In) (6
Connecting the Player Connecting Power Connecting the Adapter Connect the AC adapter to the DC-5V jack of the player and connect the AC adapter plug into a wall outlet. The input specifications for the AC adapter is 100~250V, 50~60Hz. The power output from the adapter is DC 5V, 2A. ● Note Notice ● If the battery is fully charged, the external CHG LED turns green. While the battery is being charged, the LED remains red. You can also view the battery charge status through the icon on the main body LCD.
Installing and Removing the Battery You can install the battery as in the following figure. You can remove the battery as in the following figure. Notice The Reset function of mPack is implemented by removing the battery. If you remove the battery without turning the player off, the contents saved on the hard disk drive may be damaged.
Connecting the Remote Control/Earphones Connecting the Remote Control and Earphones Connect the earphone remote control and the earphones and then connect the earphone remote control to the Audio port. Note The mPack P600 Standard is not supplied with an earphone remote control. Connecting the Earphone Connect the earphone to the Audio port. Note The earphones supplied with mPack P600 Professional and mPack P600 Standard are not the same.
Connecting an External Device Video Port / Audio Port Use these ports to connect an external device such as a TV or amplifier to watch video on a larger screen or to listen to music. You can make a video connection with the Composite or Component cable. Connecting with the Composite Cable Connect the Video Port of your player and the video input (VIDEO IN) port of an external device (e.g. TV, etc.) with the Composite cable.
Connecting with Component Cable Component cable is used when you want high quality of video and audio by connecting to the TV with Component (Y, Pb and Pr) signal input device. Connect the Video Port of your player and the video input (VIDEO[Y/Pb/Pr] IN) port of an external device (e.g. TV, etc.) with the Component cable. In this case, connect the Audio Port of your player and the audio input (AUDIO[L/R] IN) port of the external device (e.g. TV, etc.).
SPDIF Connect your player and an external device with a Component cable when the external device provides a digital audio input port such as 5.1 channel and you want higher audio quality. Connect the SPDIF Port of your player and the SPDIF (OPTICAL IN) port of the external device (e.g. 5.1 channel speaker) with the SPDIF cable. Notice Even if the size and shape of cables are the same, the function may be different. Therefore, use only the cables supplied with the product.
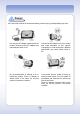
Connecting with OTG Cable Use OTG cable to connect a camera(camcorder) or card reader and download data. 1 Connect the OTG cable with the USB port of the camera(camcorder) or card reader. 2 Connect the OTG cable with the USB port of the mPack P600. 3 Press the button on the mPack P600. - The USB LED of the mPack P600 blinks green and the data saved in the camera, camcorder or card reader is copied into the mPack hard disk drive. 4 When the USB LED is off, separate the USB OTG cable.
Notice Even if the size and shape of cables are the same, the function may be different. Therefore, use only the cables supplied with the product. Otherwise, the product might be damaged. Connecting mPack to a PC You can connect your mPack P600 player and a computer for download or upload operations. Note 1 If the mPack player is connected to a computer when it is off, the player is automatically turned on.
Caution In the hard disk drive of the mPack, Video, Photo, Game, System, Backup, and Contents folders exist by default. Since all the folders are required for the proper operation of the mPack player, do not delete or rename the folders. Note The mPack player may not be recognized when it is connected if the operating system of the computer is Windows 98. In this case, install the device driver from the Installation CD which is supplied with the product.
Separating mPack from a PC You have to safely remove the player from the PC after completing data transmission via USB cable. Notice 1 If the player is disconnected from the computer without running Safely Remove Hardware, a file system error may occur on the hard disk drive of the player. In this case, check for disk error on the hard disk drive of the mPack P600 using the Check Disk function of the computer. If you use the player without checking for disk error, you may lose the data saved on the disk.
Installing PC Program Installing PC Program To use the media file download, address book and audio DB management, and firmware upgrade functions, install the mPack PC program with the Installation CD supplied with the product. 1 Insert the Installation CD into the CD-ROM drive of the PC. - The “mPack P600 CD Software” window appears. 2 Click the . - The “Installation of PQI mPack” window appears. 3 Click button.
5 When the installation is completed, click button. Removing PC Program 1 Select Start PQI All Programs Uninstall mPack-P600 PC Program on Windows Desktop. - The “mPack P600 PC program uninstall” confirmation message appears. 2 Click button to continue. - The mPack P600 PC program is removed. 3 When the uninstallation is completed, click button.
Installing Device Driver If your operating system is Windows 98, you have to additionally install a device driver. Note 1 If your operating system is Windows 2000 or Windows XP, the player is automatically recognized by the operating system, even if the device driver is not installed. Insert the Installation CD into the CD-ROM drive of the PC. - The “mPack P600 CD Software” window appears. 2 Click the . - The “InstallShield Wizard” appears. 3 Click button.
Installing Media Converter Program The Media Converter program converts media files of unsupported format into a supported format so that you can play the file on the mPack player. 1 Insert the Installation CD into the CD-ROM drive of the PC. - The “mPack P600 CD Software” window appears. 2 Click the . - The “Media Converter” Wizard appears. 3 Click button. - The License Agreement window appears. 4 Select ‘I accept the agreement’ and click button.
5 Enter the user name, company and serial number and click button. - The serial number is printed on the CD supplied with the product. 6 Select a folder to install the Media Converter into and click button. 7 Select a folder to save the program’s shortcut into and click button.
8 Confirm the settings made in Step 5~7 and click the button. - The Media Converter is automatically installed according to the settings of Step 5~7. 9 When the program installation is completed, click .
Removing Media Converter Program 1 Select Start All Programs Media Converter PQI Uninstall PQI Media Converter on Windows Desktop. - The “Media Converter program uninstall” confirmation message appears. 2 Click button. - The Media Converter Program is removed. 3 When the uninstallation is completed, click button.
Running Media Converter Running Media Converter Program The Media Converter program supports the following file formats. Video: AVI, MPG, MPEG, WMV, ASF, DAT, MOV, QT Audio: WAV, MP3, MPC, VOX, RAW, G726, OGG, G721, G723, MP2, WMA, G729 Photo: BMP, RLE, UPI, ICO, JPG, JPEG, JPE, PCD, PCX, PNG, PSD, TGA, TIF, TIFF, GIF Notice Even if you change the value of the “Final Converter Setting” of the Media Converter, the converted file cannot have higher value than its original file.
4 Add a video file to be converted by clicking the button. - Click button to delete only the files selected from the file list. - Click button to delete all the files in the file list. 5 Click button. 6 Set file format conversion options. ● Resolution: 320*240, 235*288, 420*272(wide), 640*480(VGA), 720*480, 800*576 ● Frames Per Second: 15, 20, 25, 29.
Converting an Audio File 1 Select Start PQI All Programs Media Converter Media Converter on Windows Desktop. 2 Click button. - The “Media Converter” window appears. 3 Click the
6 Set file format conversion options. ● Audio Channel: Mono, Stereo ● Audio Bitrate: 96, 128, 192, 256 ● Audio Sample Bitrate: 44100, 48000 ● Destination: Set a folder to save the converted file into. 7 Click the button. - Click the button to restore the defaults. 8 When the file conversion is completed, click the button.
Converting a Picture File 1 Select Start PQI All Programs Media Converter Media Converter on Windows Desktop. 2 Click button. - The “Media Converter” window appears. 3 Click the button. - The “Select Media” window appears. 4 Add a photo file to be converted by clicking the button. - Click button to delete only the files selected from the file list. - Click button to delete all the files in the file list. 5 Click button.
6 Set file format conversion options. Output Type: JPEG, BMP ● Resolution: 320*240*24, ● 640*480*24, 720*480*24, 800*600*24, 1024*768*24 ● Destination: Set a folder to save the converted file into. 7 Click the button. - Click the button to restore the defaults. 8 When the file conversion is completed, click the button.
Running the PC program Running the PC program You can use the media file download, address book and firmware upgrade functions with the mPack PC Program. Note 1 To run the PC Program, you have to connect the mPack P600 player to the PC in advance. It is recommended to connect the AC adapter to the mPack P600 player before connecting the player and the PC. Select Start PQI All Programs PQI mPack-P600 PC on Windows Desktop - The “PQI mPack-P600 PC Program” window appears.
Playlist Management Creating a Playlist 1 Click the icon from the toolbar. 2 Enter the playlist name in the Name input box. 3 Click button. - The new playlist is created. Adding a File to a Playlist 1 Select a music file to be added to the playlist from the library. 2 3 Click from the menu. Select . - The “Select Playlist” window appears. 4 Select a playlist to add the media file to. 5 Click
Renaming a Playlist 1 Select a playlist to rename. 2 Right-click over the selected playlist. 3 Select from the pop-up menu. 4 Enter a new playlist name in the Name input box. 5 Click button. - The playlist is renamed.
Deleting a Playlist 1 2 Select a playlist to be deleted. Click the icon from the toolbar. - The playlist deletion confirmation message appears. 3 Click button. - The selected playlist is deleted. Moving a Playlist Item Up 1 2 Select a music file to move up in a playlist. Click the icon from the toolbar - The selected music file is moved up in the playlist. Moving a Playlist Item Down 1 2 Select a music file to move down in a playlist.
DB Data Management Adding a Folder to Library 1 Click the from the menu. 2 Select . 3 Select a folder to be registered in the Select File window. 4 Click button. - The Copy confirmation message appears. 5 Click button. - The “Select Directory” window appears.
6 Select a directory of the mPack P600 to save the selected folder into and click button. - The selected folder is copied to the library. Note Since adding a directory to the library registers all music files and sub folders included in the specified directory, it may take a considerable time if a number of music files are included in the specified directory.
Adding a Media File to the Library 1 Click the from the menu. 2 Select . 3 Select a media file to be added to the library in the Select File window. 4 Click button. - The Copy confirmation message appears. 5 Click button. - The “Select Directory” window appears.
6 Select a directory to save the selected file into and click button. - The selected file is copied to the library. Audio Playback 1 Select a music file to be played from the DB. 2 Right-click over the selected music file. - The pop-up menu appears. 3 Select from the pop-up menu. - Music files are played through the Windows Media Player.
Editing Music File Information 1 Select a music file for which to edit the information. 2 Right-click over the selected file. 3 Select from the pop-up menu. - The detailed file information window appears. 4 Edit music file information. - To apply the change to all the files included in the same category of the Library, select the option. 5 Click button. - The changed information is saved. - Click the button to initialize all the information fields.
Viewing Music File Information 1 Select a music file for which to view the information. 2 Right-click over the selected file. 3 Select from the pop-up menu. - The detailed file information window appears. 4 Confirm the detailed music file information and click the button.
Deleting a Music File 1 Select a music file to be deleted from the library. 2 3 Right-click over the selected file. Select from the pop-up menu. - The deletion confirmation message appears. 4 Click button. - Deleting a file from the library does not actually delete the file from the hard disk drive.
File Browser Using the File Browser, you can download files from the PC to your mPack player or synchronize the PC and your mPack player. ● Notice 1 ● If you select Folder Synchronization when files are only in the PC, the files are copied to the mPack player. If you select Folder Synchronization when files are only in the mPack player, the files in the mPack player are deleted. Select folders for PC and mPack. - You can use the Copy, Move and Sync functions.
Direct File Download to the mPack Connect the PC and the mPack p600 with the USB cable. Using the Windows Explorer, directly download a file to the mPack P600 that is recognized as a removable disk on the PC. 1 Connect the PC and the mPack with the USB cable. - The mPack is recognized as a removable disk. 2 Launch the Windows Explorer. 3 Select a file to be sent to the mPack P600 and copy it into a folder in the mPack_P600 hard disk drive.
Address Book Management Module You can easily manage the mPack address book file using the PQI mPack-P600 PC Program. Contact Address Management Adding a New Contact Address 1 Select a group to add a new contact address to. 2 Right-click over the selected group. 3 Select from the pop-up menu. 4 5 Enter the address information. Click button. - The new address is added to the address book.
Editing Contact Address 1 Select an address to edit from the address list. 2 Right-click over the selected address. 3 Select from the pop-up menu. 4 Edit the address information. 5 Click button. - The changed address is saved.
Deleting a Contact Address 1 Select an address to be deleted from the address list. 2 Right-click over the selected address. 3 Select from the pop-up menu. - The contact address deletion confirmation message appears. 4 Click button to delete the address entry. - The selected address is deleted. - You cannot restore a deleted address.
Group Management Creating a New Group 1 Right-click over the group list. 2 Select from the pop-up menu. 3 Enter the name of the new group in the Name input box. 4 Click button. - The new group is created. Renaming a Group 1 Select a group to be renamed and right-click over the selected group name. 2 Select from the pop-up menu. 3 Enter the new name of the address group in the Name input box. 4 Click button. - The group is renamed.
Deleting a Group 1 Select a group to be deleted and right-click over the selected group name. 2 Select from the pop-up menu. - The group deletion confirmation message appears. 3 Click button to delete the group. - The selected group is deleted. - You cannot restore a deleted group.
Deleting an Address Group 1 Select an address group to be deleted and right-click over the selected group. 2 Select from the pop-up menu. - The “Removed entries can’t be restored” message appears. 3 Click button to delete the address group. - The selected address group is deleted. - You cannot restore a deleted address group.
PC program update PC program update When the PC Program is launched, it automatically checks if a new version of PC Program is available through the Internet. If a new version of PC Program is available, it downloads and updates the program. When the update is completed, the program automatically restarts.
Firmware Upgrade Firmware Upgrade You can improve the performance of mPack P600, correct problems and change the user interface language by upgrading the firmware. The default user interface language is English. Note To view the firmware version installed on your mPack, turn the power on and press the MENU button in the first screen. Then select About from the pop-up menu. Notice If firmware upgrade is terminated before it is completed, the player may be severely damaged.
6 When the firmware upgrade is completed, run Safely Remove Hardware and turn the mPack P600 on. - The mPack P600 upgrades its firmware using the installed firmware upgrade file. Note To upgrade the firmware automatically, the mPack should be connected to the PC with the USB cable. For more detailed information, refer to “Connecting mPack to a PC” on page 28. Manual Upgrade through the Internet 1 2 3 Visit PQI web site, which is www.pqi.com.tw.
Manual Upgrade using the Installation CD The Installation CD supplied with the product includes firmware upgrade files for each language. 1 Copy the firmware upgrade file for your preferred language from the Installation CD to the root directory of the mPack. - You can find the firmware upgrade file for your preferred language in the corresponding sub folders of ENG(English), KOR(Korean) and so on below the Firmware folder of the Installation CD. 2 Run Safely Remove Hardware and turn the mPack on.
About/Company/Help About/Company/Help 1 Press the
Play Functions Play Functions You can play a media file using the Browser, Audio, Video, Photo and Text menu. If you play a media file, the file is immediately played through the corresponding player. Play using the Browser 1 In the Main screen, select the icon by using the Left/Right direction key of the Navigation button and press the ▶|| button. - The sub folders and files are listed. 2 Select a file to be played and press the ▶|| button.
When you press the
Audio You can find a music file in the Audio folder, use the playlist function and play music files by Genres/Artists/Artists&Albums/Albums. 1 In the Main screen, select the
BROWSING When you select this menu, sub folders and files in the Audio folder are displayed. 1 In the Main screen, select the
When you press the
PLAYLIST Using this menu, you can create a new playlist with your favorite tracks, and manage existing playlists. 1 In the Main screen, select the
When you press the
When you press the
ALL AUDIO Using this menu, you can play all or some of the audio files registered to the Audio DB. 1 In the Main screen, select the
When you press the
GENRE/ARTIST/ARTIST & ALBUM/ALBUM You can select and play audio files by Genre / Artist / Artist & Album / Album. 1 In the Main screen, select the
Note ARTIST & ALBUM You have to select an artist first and then select one of the artist’s albums to find and play the corresponding audio files. Audio Player Audio files played by Audio Player. The functions of the Navigation button during playback are listed below. Item Description ▲ Press to turn the volume up. ▼ Press to turn the volume down. ◀ ▶ ▶|| MENU ESC Short Press to play the previous file. Long Press to rewind by Speed Control. Short Press to play the next file.
When you press the
Video You can find and play a find a video file in the Video folder. 1 In the Main screen, select the
Video File List All the video files and folders included in the Video folder are listed in the video file list. To play a video file saved in another folder, use the Browser. When you press the
Video Player A video file is played by Video Player. The functions of the Navigation button during playback are listed below. Item Description ▲ Press to turn the volume up. ▼ Press to turn the volume down. ◀ ▶ ▶|| MENU ESC Short Press to play the previous file. Long Press to rewind by Speed Control. Short Press to play the next file. Long Press to fast forward by Speed Control. Short Press to play a video file or pause the play. Long Press to exit the Video Player.
When you press the
Photo You can find and view pictures and manage them by creating albums. 1 In the Main screen, select the icon by using the Left/Right direction key of the Navigation button and press the ▶|| button. - All folders and files included in the Photo folder are listed. - Photo list appears. - The appearance of the photo list display is determined depending on the Thumbnail/FileList setting of Photo Setup. 2 Select a photo and press the ▶|| button. - The photo is displayed through the Photo Viewer.
Photo List All folders, files and albums included in the Photo folder are listed. Photo list is displayed differently depending on the Thumbnail/FileList setting in Photo Setup. Note To view a photo or album file in another folder, use the Browser function. The pop-up menus of the Photo Preview and Photo file list that appear when you press the
Select an album file from the photo file list and press the ▶|| button to display the pop-up menu. The following functions are provided by the pop-up menu. Item View Description You can view photo files in the album in full screen. You can view photo files in Slide Show. To exit Slide Show, press the Slide Show button or press the
Photo Viewer You can view a photo file through the Photo Viewer. When you press the
The functions of the Navigation button in Photo Viewer are listed below. Item Description ▲ Press to rotate the photo counterclockwise. ▼ Press to rotate the photo clockwise. ◀ Press to view the previous photo. ▶ Press to view the next photo. ▶|| MENU Short Press to zoom-in the photo. Long Press to zoom-out the photo. Short Press to open the pop-up menu. Long You can set BGM On/Off, control the volume and select a BGM. Press to exit the Photo Viewer.
Album Editor Using the Album Editor, you can create an album with your favorite photo files and manage your photo files by album. Photo preview and file information are displayed in the left pane, and the photo file list is displayed in the right pane. The upper pane (Folder Window) shows the list of photo files included in the folder, and the lower pane (Album Window) shows the list of photo files included in the album.
The functions of the Navigation button in Album Editor are listed below. Item Description Short ▲ Folder Window: Move up in the file list. Album Window: Move up in the file list. Folder Window: Move up in the file list. Long Album Window: Increase the slide delay time by 1 second. (Maximum 30 seconds) Short ▼ Folder Window: Move down in the file list. Album Window: Move down in the file list. Folder Window: Move down in the file list. Long Album Window: Decrease the slide delay time by 1 second.
Text You can view a text file such as lyrics through the Text Viewer. 1 In the Main screen, select the icon by using the Left/Right direction key of the Navigation button and press the ▶|| button. - The list of text files appears. 2 Select a text file from the text list and press the ▶|| button. - The file is displayed through the Text Viewer.
When you press the
▶ Press to move the cursor down by one page. ▶|| MENU Short Press to switch to Seek Mode. Long Press to exit the Text Viewer. Short Press to display the pop-up menu. Long Press to set BGM ON/OFF, adjust the volume or select a BGM. ESC Press to exit the Text Viewer. The functions of the Navigation button in the Text Viewer (Seek Mode) are listed below. Item ▲ ▼ ◀ ▶ ▶|| MENU ESC Description Short Press to move the cursor up by 100 lines.
Applications Applications GAME 1 In the Main screen, select the icon by using the Left/Right direction key of the Navigation button and press the ▶|| button. - The Application list appears. 2 Select and press the ▶|| button. - The Game list appears. 3 Select a game to play and press the ▶|| button. - The game is started. - To exit the game, press the button. Note Button functions differ for each game. The functions are explained before the game starts.
ADDRESS 참고 1 To manage the address book more easily, use the Address Book function of the application program installed on the PC. In the Main screen, select the icon by using the Left/Right direction key of the Navigation button and press the ▶|| button. - The Application list appears. 2 Select and press the ▶|| button. - The Address book group list appears. 3 Select a group and press the ▶|| button. - The addresses included in the group are displayed.
4 Select an address and press the ▶|| button. - Detailed information for the corresponding address is displayed. - To change the details, select an item to change and press the ▶|| button. 5 To change the details, select an item to change and press the ▶|| button. - Enter detailed information by using the screen keyboard. - Press the button to return to the address list screen. When you press the
You can delete a group. Deleting a group deletes all the addresses Delete included in the group, and you cannot restore deleted addresses. You can search for an address by name. Enter the name of the address to search for using the screen keyboard. ● Search All Group: Select to search for addresses from all address book groups. ● This Group: Select to search for addresses from the selected group.
CALCULATOR 1 In the Main screen, select the icon by using the Left/Right direction key of the Navigation button and press the ▶|| button. - The Application list appears. 2 Select and press the ▶|| button. - The Calculator screen appears. - To exit Calculator, press the button. - If you press the
CALENDAR 1 In the Main screen, select the icon by using the Left/Right direction key of the Navigation button and press the ▶|| button. - The Application list appears. 2 Select and press the ▶|| button. - The Calendar screen appears. 3 Press the ▶|| button. - Move to the Year, Month or Date item. - When the cursor is in the Year, Month or Date item, press the ◀/▶ buttons to move to another item.
CLOCK 1 In the Main screen, select the icon by using the Left/Right direction key of the Navigation button and press the ▶|| button. - The Application list appears. 2 Select and press the ▶|| button. - The Clock screen appears displaying the current time. 3 Press the
LESSON 1 In the Main screen, select the icon by using the Left/Right direction key of the Navigation button and press the ▶|| button. - The Application list appears. 2 Select and press the ▶|| button. - The Lesson list appears. 3 Select a lesson and press the ▶|| button. - The lesson is started. Note PQI is selling contents such as Chinese study for mPack users. For more information, refer to PQI web site, www.pqi.com.tw.
Setup Setup Audio Setup You can set audio settings such as Repeat, Random, Repeat Mode, Caption, Speed Control, BGM Play, Section Repeat and Audio Effects. 1 In the Main screen, select the icon by using the Left/Right direction key of the Navigation button and press the ▶|| button. - The Setup menu appears. 2 Select
The items in Audio Setup are described below. Item Description Repeat Random ● All: Select to repeat all the files. ● Single: Select to repeat the selected file only. ● Off: Select not to repeat audio files. ● Random: Select to play audio files in random order. ● Sequential: Select to play audio files in sequential order. You can set the method for constructing an Audio Player playlist. ● Repeat Mode This Folder: Select to construct a playlist with the files in the current folder only.
Video Setup 1 In the Main screen, select the icon by using the Left/Right direction key of the Navigation button and press the ▶|| button. - The Setup menu appears. 2 Select
The items in Video Setup are described below. Item Description ● Play All Files On: Select to play all the video files included in the Video folder in order. ● LCD Brightness LCD Contrast Off: Select to play one video file only. You can set the screen brightness value from 0 to 100 in units of 1. You can set the screen contrast value from 0 to 100 in units of 1. Speed Control Display Playtime You can set the search speed of the Video Player from 20 to 120 in units of 20.
Photo Setup 1 In the Main screen, select the icon by using the Left/Right direction key of the Navigation button and press the ▶|| button. - The Setup menu appears. 2 Select and press the ▶|| button. - The Photo Setup list appears. 3 Select an item to set up and press the ▶|| button 4 Set the value of the selected item by using the ▲/▼ buttons and press the ▶|| button. - The changed value is saved. - To cancel during setup, press the ◀ or the button.
The items in Photo Setup are described below. Item Display Mode Description To manage photo files by photo preview, select Thumbnail. To manage photo files by file list, select FileList. To create an album with only the files in the current folder, select This Repeat Mode Folder. To construct an album with the files in the current folder and all its sub folders, select All Folder.
System Setup 1 In the Main screen, select the icon by using the Left/Right direction key of the Navigation button and press the ▶|| button. - The Setup menu appears. 2 Select and press the ▶|| button. - The System Setup list appears. 3 Select an item to set up and press the ▶|| button. 4 Set the value of the selected item by using the ▲/▼ buttons and press the ▶|| button. - The changed value is saved. - To cancel during setup, press the ◀ or the button.
The items in Video Setup are described below. Item Language Firmware Version Format Hard Drive Set to Default Description You can select a user interface language from English, Japanese and so on. You can view the firmware version. You can format the hard disk drive. If you format the disk drive, you cannot restore the files and folders that were in the drive. You can reset all setup values to their factory settings. You cannot restore the original settings after reset.
Power Setup 1 In the Main screen, select the icon by using the Left/Right direction key of the Navigation button and press the ▶|| button. - The Setup menu appears. 2 Select and press the ▶|| button. - The Power Setup list appears. 3 Select an item to set up and press the ▶|| button. 4 Set the value of the selected item by using the ▲/▼ buttons and press the ▶|| button. - The changed value is saved. - To cancel during setup, press the ◀ or the button.
The items in Power Setup are described below. Item Timer On/Off Timer Time Description ● On: Select to turn the player off automatically after a specified time ● Off: Select to disable the Timer function You can set Timer Time. You can disable the Timer function or set the Timer Time from 1 minute to 5 hours. You can turn the player off automatically if there is no input for a Auto Power Off specified period of time.
Etc Setup 1 In the Main screen, select the icon by using the Left/Right direction key of the Navigation button and press the ▶|| button. - The Setup menu appears. 2 Select and press the ▶|| button. - The Etc Setup list appears. 3 Select an item to set up and press the ▶|| button. 4 Set the value of the selected item by using the ▲/▼ buttons and press the ▶|| button. - The changed value is saved. - To cancel during setup, press the ◀ or the button.
Troubleshooting Troubleshooting If the user disassembles the product when a problem occurs, the product will not be repaired free. Please check the following items first to resolve the problem. If the problem continues, visit PQI web site, www.pqi.com.tw, and request after-sales services. Q1. I cannot turn the power on by pressing the POWER button. A1. Check if the battery is installed. If so, check if the battery charge remaining is sufficient.
Q5. I cannot upgrade the firmware. A5. Please refer to FAQ at the website, www.pqi.com.tw, to solve any problems. If FAQ is not helpful, then please request A/S at the website, www.pqi.com.tw. Q6. A file in the mPack suddenly disappears, or the content of a file is corrupted. A6. This may occur when the file system of the mPack hard disk drive is damaged.
Q12. My system setting has been changed. A12. If you have upgraded the firmware or if the battery is completely discharged, some system environment variables may change. In this case, you have to restore the changed settings manually. For more information, refer to “Setup” on page 109. Q13. I cannot enter a key. A13. The mPack might be operating abnormally for a variety of reasons. If this occurs, turn the power off and turn it on again. Q14. The remote control does not work. A14.
Specifications Specifications Hardware HDD 1.
Software File Browser Create, Copy, Move, Delete, Rename, etc. for Folders and files. Video MPEG1/2/4, DivX3.11/4.x/5.x, Xvid Decoding MPEG2: MP@ML MPEG4: Advanced Simple profile Level 5 w/o GMC and QPEL Xvid: up to 720x576@30fps File Extension: avi, mpg, mp4, dat, vob, mod Function: Forward/Backward, Start/Stop/Pause, Caption on/off, Screen size normal/wide, Information, etc.
Customer Support Customer Support Please follow the procedures below when requesting PQI for after-sales service or repair. ● Contact the PQI customer service department. ● Have your proof of purchase and the product serial number, if any, ready when you contact the PQI customer service department. Acceptable forms for proof of purchase are your purchase receipt, invoice or the PQI warranty card signed and dated by the store. ● You may also download an RMA request form, fill it out and fax it back to us.
The Netherlands PQI Europe B.V. Helftheuvelweg 11, 5222 AV Den Bosch, The Netherlands Tel: +31-73-627-3555 Fax: +31-73-623-4033 www.pqieurope.com E-Mail: info@pqieurope.com Japan POWERGLOBAL iNDEX Co., Ltd. Segi Blvd. 7F 1-7-1 Iwamoto-Cho, Chiyoda-Ku, Tokyo 101-0032 Japan Tel: +81-3-5835-4545 Fax: +81-3-5835-4540 www.pg-index.com E-Mail: info@pg-index.com China Suzhou Tel: +86-512-6288-2999 Fax: +86-512-6288-3000 E-Mail: info@pqi.com.cn China Hong Kong Flat F, 4/F, Yeung Yiu Chung(NO.
Warranty Warranty Power Quotient International (PQI) and all its subsidiary companies value your business, and will always try to give you the very best service. Please note the following information and limitations when requesting assistance from the PQI customer service department. Warranty Policy PQI warrants that PQI brand products, under normal circumstances of usage, are free from defects in material and workmanship.
Warranty Procedure Please follow the procedures below when requesting PQI for after-sales service or repair. Contact the PQI customer service department. Have your proof of purchase and the product serial number, if any, ready when you contact the PQI customer service department. Acceptable forms for proof of purchase are your purchase receipt, invoice or the PQI warranty card signed and dated by the store.. ● You may also download an RMA request form, fill it out and fax it back to us.