Pentagon six Instructions for use. You're now the fortunate owner of a Pentagon six. This camera is simple to operate yet it is not a simple camera. Quite on the contrary. The Pentagon six occupies a unique position in the giant host of cameras. Its technical composition has been devised to meet the requirements of a select group of photographers, those were discriminate to the extreme. He who buys a Pentagon six camera is perfectly acquainted with his craft and knows how to handle camera.
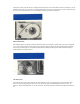
Important parts of the camera 1. Finder hood 2. Rapid wind lever 3. Disconnecting lever 4. Shutter Release 5. Winding lever for delayed action mechanism 6. Flash socket 7. Latch for camera back 8. Spool support 9. Knob for opening the finder hood 10.Frame finder (sports finder) 11.Knob for unlocking finder hood 12.Film type setting dial 13.Speed setting dial 14.Magnifying lens for focusing 15.Locking ring for shutter release 16.Film speed setting dial 17.Exposure counter 18.
Regarding the exterior of the camera: you unfold the two inner pages of the front and back covers and look at the camera itself in the same position as it is illustrated in the instructions for use. The most important parts are marked by numbers and explained alongside. The same numbers appear in the text, and the unfolded cover pages make it easy for you find the operating controls and procedures described.
The following abridged instructions are a summary of the most important sections of this instruction booklet. The sections deserve particular attention. Yet the knowledge acquired by reading them alone cannot compensate for the valuable information to be obtained by studying the complete instruction manual. 1. 2. 3. 4. Pull latch (7) is downward and open camera back. Exposure counter (17) jumps to starting point. Place film into left-hand spool chamber.
The exposure counter The exposure counter (17) jumps back to starting point when the camera back is opened and is automatically set when the camera back is closed. The shutter has to be released and cocked again four times, whereupon the mark for picture 1 will appear in the exposure counter. Do not let the winding lever jump back but move it back smoothly.
subsequent cocking of the shutter, the cocking mechanism advances to the next number. After the 12th and any case of roll film 220, after the 24'" exposure, the winding mechanism is locked. It is released again by means of disconnecting lever (3), so the rapid wind lever can be actuated again steadily and without interruption. Film reminder dials Film reminder dials (12) bearing symbols for black and white and color film, is mounted above the speed setting dial (13) is.
The Magnifier-Sportsfinder The Pentaprism The Pentaprism permits viewing the image at eye level. It is inserted in place of the finder hood. The prism reveals the reflex image enlarged approximate 2.5 times and with sides unreversed. Persons with faulty eyesight may insert a corrective lens into the eyepiece of the viewfinder to replace their spectacles. Pull the two lateral catches simultaneously towards the back and place the Pentaprism on the four connecting pins on top of the camera.
Focusing Focusing takes place with the mirror swung into viewing position, i.e. with the shutter wound up. Rotate focusing ring (22) on the lens mount until the image of the subject appears sharp on the field lens. Distance and definition may also be set by means of the scale on the lens mount, in which case the field lens serves only for determining picture composition. The depth of definition can be read in the focusing ring with the help of the depth of field scale (21).
The diaphragm The diaphragm is set by rotation of the diaphragm ring (his 20) on lens mount. The diaphragm numeral required for the exposure has to be brought to meet the red index mark. Lenses with automatic spring diaphragm allow for full aperture focusing. Not until the shutter is released, does the diaphragm close down to the preset aperture. To check the depth of field during focusing, you simply depress lever (19) on the lens mount.
Image field lenses 6 different image field lenses are available for the Pentagon Six (see also the instructions for using "close-up equipment for Pentagon 6"). The field lenses are exchanged as follows: remove the finder element from the camera and then loosen the screws on the three remaining springs with a screwdriver. Swinging the springs aside take out the spring ring, and tip the image lens out of the camera. Fixing any one of the other field lenses is performed in reverse order.
The rangefinder lens The rangefinder lens forms two-part images. These are moved towards or away from each other by rotation of focusing ring (22). If the outlines join precisely where the two sections meet, the images is in correct focus. This can be observed best on straight vertical lines. The focal plane shutter The focal-plane shutter of the Pentacon Six gives exposure speeds ranging from one second to 1/1,000 of a second and B (any desired length of time).
The exposure speeds may be set either before or after the shutter has been cocked. The speed shut setting dial (13) is rotatable in either direction. The desired exposure speeds figure must come to stand against the red triangle mark. The speed settings click in as a safeguard against unintentional displacement. The rapid wind lever The rapid wind lever serves not only to cock the shutter but simultaneously to transport the film.
Synchronization Synchronization with electronic flash and bulbs is effected by means of the X contact. The flash socket (6) is built into lower part of the camera front. Clockwise rotation of the milled ring on the flash socket keeps the flash plug locked in position. When inserting or removing the flash plug make sure that the red dot on the milled ring stands opposite the red dot of front of the flash socket.
Removing the film Remove the film after exposing the 12" frame (on film 120) or the 24'" frame (on film 220) and subsequently winding up the paper trailer.
until winding of the lever becomes noticeably easier. Do not advance the trailer by short rocking movements as were used when inserting the film (see page 3 and page 4)! Now open the camera, back, pull out the spool support and lock it. Tip the camera slightly, let the film spool full inch your hand and fasten the gumstrip to the paper trailer.
lever, which becomes visible on the left inside the opening, just far enough that it will not touch the camera body with shutter is cocked. Swing the lever back into operating position when lenses with automatic diaphragm are to be used.
One final hint with regard to setting up the camera on a flat service. A screw (index No. 223650), to be threaded into the tripod socket of the camera, may be used as a third supporting point.
Please read these instructions for use carefully since we can except no liability for damage caused by improper handling of camera.
We trust that you have followed our explanations carefully up to this last page. It will certainly not have escaped your notice what a variety of possibilities your Pentagon Six has to offer you. But you'll find its radius of action extending further still when once you take advantage the wide range of accessories. You will be able to benefit not only from an accessory program capable of meeting every requirement, but also from the ease and simplicity in handling these accessories.