
Installation Instructions


Multi-Piece Sectional Product
Installation Instructions
with these slots. The slots will allow the side wall panel to
slide about one inch to meet the back wall panel.
If the water control valve is located on one of the side
walls, it is important to dry trial t that panel rst. Carefully
measure and mark the location of the valve on the surface
of the side wall. Read the installation instructions provided
by the valve manufacturer. Carefully drill the valve hole(s).
Trial t the side wall panel to the shower pan. Wipe clean
the side ledge. This next step is a two person job.
Lift the side wall panel and set it on the ledge. Set the panel
so it is within one inch of the vertical back wall seam. Make
sure the pins in the pan index with the slots on the bottom
of the wall. Clear your ngers and slide the wall panel
toward the back wall. Make sure the alignment pins in the
back wall index into the holes on the side wall. See Figure
24
When seated, the seam should have a minimal gap of
1/8” or less. If not, push the end of the side panel until the
vertical seam closes. See Figure 25 When in place, check the
t of the valve hole. Adjust size and location if required.
When the t is good, lift the wall panel away. Complete
the valve installation and connection to hot and cold
water supply at this time. Also complete shower supply
connection. Strap pipes to framing if required. This is the last
access to the plumbing before the wall is permanently
installed.
Clean the side ledge and apply a continuous 3/8” bead of
100% RTV silicone caulking along the entire length of the
mating ledge of the shower pan. Apply the caulk completely
around each alignment pin.
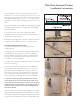
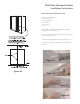
Clean and apply a continuous 3/8” bead of 100% RTV
silicone caulk along the entire length of the vertical
surface of the back wall where the side wall panel mates
to the back wall. Apply the caulk completely around each
alignment pin. See Figure 23
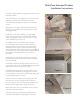
Lift the side wall and place it on the pan. Make sure
alignment pins on the pan and back wall line up. Clear
ngers and slide the wall into the installed position. See
Figure 25
Conrm t and level. Inspect that the grout lines on the
side wall match up with the grout lines on the back wall.
Using a grease pencil or china marker to make a short line
across the grout lines makes it easier to see if the grout
lines are in alignment.
Pre-drill mounting anges and attach to framing studs with
screws. Make sure wall panel remains level and plumb and
the seam is tight.
Repeat the procedures in Step 22 for opposite side wall.
24. Now that all wall panels are installed, remove the
protective cardboard from the oor and use a 2 foot level
to re-check the downward oor draft to the drain. Use the
same procedure as described in Step 18 of this manual.
25. Install the rubber caulking gasket around the drain pipe.
Trim the length of the pipe if necessary. Apply soap to the
caulking gasket to lubricate it. Place the caulking gasket on
the drain pipe and press it down into the drain assembly
until it seats. Snap the strainer plate onto the drain.
Pour water across the oor to conrm good draft to the
drain so the water drains completely with no puddling.
Make certain the drain does not leak.
Note: The manufacturer and supplier of this product is not
responsible for leaking drain conditions. Proper installation
of the drain tting and pipe is the installers responsibility.
Since there is minimal oor slope to the drain, it is
critical factory slope be maintained so the shower drains
well. To accomplish this, temporary bracing must be put in
place to assure the oor remains in the proper position as
the adhesive cures.
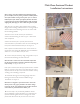
Before installing the bracing, place a padded piece of wood
on the top center of the threshold and directly on top of
the drain. Pad the wood with soft cloth or cardboard to
prevent damage to the nish.
Install temporary 2 x 4 stud bracing so they sit on top of
these wood pieces. Attach these studs to the room framing
above the shower, or pad to the ceiling. See Figure 26
26. Remove the temporary bracing after 72 hours. Place a
piece of cardboard in the shower to protect the nish.
Caulk all seams with white acrylic bathtub caulk.