
Installation Instructions


Shower Pans
Installation Instructions
Gelcoat & Solid Surface Bathware
For best results, please read and follow all directions
carefully.
1. Avoid exposure to weather. Product carton is not
waterproof. Carton exposed to rain or snow may result in
accumulated water penetrating the back laminates of the
shower pan and soak the glassed in reinforcement supports
causing bulges in the gelcoat surface.
2. Most handling damage is the result of impact blows to
the back of the berglass units.
3. Never drag this berglass product on any surface. Always
carry the pan or use a two wheel dolly.
Due to the size and weight of the product, installation is
easier if it is a two person operation.
4. Never drop the berglass shower pan from any height,
not even an inch or stress cracks are likely to occur.
5. Placing objects inside the unit can cause scratches or nicks
to the nished surface. Do not use the shower pan as a
trash receptical! Always place a drop cloth or cardboard on
the oor when working inside the shower.
6. Never clean berglass gelcoat surface with metal tools of
any kind, including razor blades.
PLANNING YOUR INSTALLATION
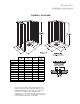
1. Review the Framing Diagrams in Figure 1. Modify existing
framing if required. For new construction, build framing
structure in accordance with product dimensions and notes
shown in the Framing Diagrams. The two wall Framing
Diagram is for the 6060 double entry shower pan only.
BRIEF OVERVIEW
Please read instructions before beginning the installation.
Note: Unit will not install properly if framing pocket is not
square and of proper size. The dimensions shown in the
FRAMING DIAGRAM is 1/4” larger than the size of the shower.
This product is manufactured to tight specications. The 1/4”
over sizing is for maneuvering and installation ease. If 1/4” over
is not reasonable, sizing closer to the product actual dimensions
is allowable.
When trial tting the shower, use a level to conrm the pan
is level and plumb. If any gaps are present between the
shower and framing, use furring strips to ll the gaps. A quality
installation of the shower pan is necessary to assure fabrication
of enclosure walls will result in a square and plumb nished
shower (Note: wall enclosure is provided by others).
2. The shower pan will be installed, leveled, and fastened
to the framing. It is essential the framing pocket be square
and plumb for the shower pan to install properly. The oor
also must have no voids or out of level conditions. If these
are present, they must be corrected before installation.
Floor leveling compound can be purchased at a local home
improvement store.
3. Develop a plan for structure and nished wall materials
to construct the shower wall enclosure before beginning the
installation of the shower pan.
4. If bolt on accessories such as grab bars or a seat may be
installed, plan to provide solid mounting supports for these
items. Wood secured between the framing studs will be
required to provide a mounting surface to install grab bars
and a seat.
5. Plan for the location of the shower water control valve.
Plan for routing the water supply lines to the
control valve installation location.
Tools/materials you might need for proper installation
• hammer
• drill with phillips screw bit
• 1/2” notched trowel
• 1/8” drill bit
• 1/4” carbide tipped drill bit
• center punch
• spatula
• auger mixing tool for drill
• caulking gun
• 4’ level
• 2’ level
• nails
• (50+) 1 1/4” wood screws
• solid wood flooring adhesive
• (2) one gallon buckets per shower
• two gallons of water - for mixing bedding
compound and water test around drain
• tube of 100% clear silicone caulking
• (3) 8’ 2x4s
• (1) 8” long 2x4
• (1) 24” long 2x4
• self-caulking shower drain fitting