
User guide


Model 4555 PanelIR
TM
User Manual Installation
Three Phase Wiring
Prepare heater unit for wiring
Remove electrical connection
“knock-outs”
Install high temperature wire
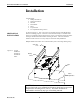
Wiring Power to Heater
1. Remove the three screws from each of the end covers on each end of the heater
using the Phillips screwdriver.
2. Carefully remove each of the end covers and set them aside so that they are not
damaged.
3. Remove the Bus Bars from the terminal blocks. Leave the jumper bars in place.
1. Using the hammer and punch, remove one circular “knock-out” from each end of
the top of the heater by placing the metal punch on the knock-out outline and
striking the punch with the hammer until the knock-out protrudes into the heater.
2. Using the pliers, remove both knock-out slugs from the heater body.
3. Discard the knock-out slugs.
1. On each end, use the tape measure to measure the distance from the center of each
terminal block to the point at which the supply power and the high temperature
wire are to be joined.
2. Include additional length to account for wire travel through the knock-out hole and
enough to perform adequate wire stripping prior to attachment to the heater and
power supply wiring.
3. Cut three lengths of high temperature wire corresponding to the measured lengths.
4. Strip the insulation from each end of each wire to expose the conductor material
(approximately ½”)
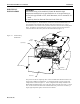
5. Feed one wire into the heater through one knock-out and two wires through the
other. Install the wires into the terminal blocks.
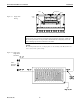
6. Jumper wires will need to be installed into the terminal blocks to complete the three
phase circuit (see Figure 3-5)
1. Attach the unconnected end of each high temperature wire to the power supply
wiring using appropriate wire joining techniques (as specified by local electrical
codes and standards).
Research, Inc.
15