
Manual


Model 4069 ProfileIR
TM
User Manual Maintenance
Research, Inc. 22
ROUTINE
MAINTENANCE
LAMP REMOVAL,
REPLACEMENT,
INSTALLATION:
Maintenance and
Trouble Shooting
The following bi-monthly routine maintenance is suggested:
1. Remove power connection to the system. Lock out power if possible. Carefully
vacuum any dust or dirt collecting within the enclosure. Use caution to not
disturb the wiring. Service more often in dust locations.
2. Clean the outside of the enclosure with glass cleaner and a soft cotton cloth as
necessary.
The T3-style lamps are installed into the Model 4069 when shipped from the factory.
The following procedure details the process to replace the lamps in the Model 4069
(reference Figure 6, 7, & 8):
Note:
Remove all power from the heater BEFORE attempting to install/replace the lamps.
Allow a minimum of ½-inch (12 mm) of slack in the lamp leads so that the leads are
not taut when inserted into the lamp terminal blocks.
Always take care to handle all lamps by the ceramic end seals and use clean cotton or
latex gloves to prevent contamination of the quartz lamp envelopes.
1. Remove quartz liner (see next section). Take this opportunity to clean the
liner.
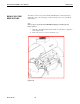
2. Remove end-cover screws (4 per end cover).
3. Remove end covers on both ends of the heater.
4. Remove end-reflector screws (2 per reflector)
5. Remove end reflectors on both ends.
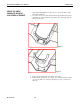
6. Carefully disengage lamp from clips (both ends).
7. Slide the end of the lamp through the rectangular cutout in the end casting
on one end of the heater through the rectangular cutout in the end casting of
the other end of the heater.
8. Position the lamp over the lamp clips so that the lighted portion of the lamp
is equally space in the reflector.
Note: Be sure that the Gas Fill Tip is facing away from the reflector
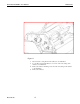
9. While holding the lamp on both ends by the ceramic end seals, with light
pressure push the lamp into the lamp clips. A slight twisting motion of the
lamp, while pushing the lamp into the clip, helps the lamp to seat properly.