R , Owner s Manual and Installation Guide
Introduction Thank you for choosing PrecisionPower audio equipment. At PrecisionPower , we proudly design and engineer the world's finest audio products. Our award winning products utilize innovative design and technology to consistently deliver Absolutely State of the Art performance, sound quality, reliability, and value. This PrecisionPower product reflects our commitment to offer you unparalleled versatility and quality for years of dependable service and listening enjoyment.
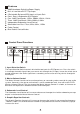
Features 20dB Headroom Switching Power Supply Built-in Low Noise Bi-FET Op-Amps 2 Selectable Balanced RCA Inputs w/ Input Gain Front, Rear, & Subwoofer RCA Outputs Four 18dB Front Bands; 125Hz, 500Hz, 3.5kHz, 12kHz Three 18dB Rear Bands; 50Hz, 600Hz, 6.3kHz Independent Subwoofer Level Control Selectable Low-Pass Filter; 32Hz, 64Hz, 125Hz Fader Control Blue Backlit Control Knobs Control Panel Functions 1.Input Selection Switch The Input Selection Switch controls which of the two inputs the E.DZ processes.
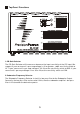
Top Panel Functions 1.CD Gain Selector The CD Gain Selector will increase or decrease the input sensitivity of the CD input. We suggest if your source unit's pre-amp voltage is 4V or greater, setthe sensitivity switch to HI. If your source unit's pre-amp voltage is 2V-4V,set the sensitivity switch to MID. If your source unit's pre-amp voltage is less than 2V,set the sensitivity switch to LOW. 2.
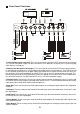
Rear Panel Functions 4 7 5 8 6 1.12V Constant Power Lead (red): This is the main power input for the E.DZ and must be connected to a (+)12V constant power supply. DO NOT connect this to a switched 12V source or the system may pop when the key is turned off. 2.Remote Turn-On Input Lead (orange): This is the input for turning on the E.DZ and system amplifiers. It should be connected to the (+)12V remote turn on output of the system head unit. The E.
Installation Instructions 1.Read this manual carefully and in its entirety before installing this equalizer. 2.Always disconnect the battery or remove the fuses for circuits you will be working on. 3.Check for clearance of any hazards such as wiring harnesses or heater core before mounting the equalizer to any panels in the vehicle. 4.Mount the equalizer in a location that is easy to access and won't be distracting to vehicle operation while making adjustments. 5.
Initial Settings 1.After completing unit installation, wire, and appropriate audio signal connections, power-up the source unit, play a familiar track, and set the volume level to approximately 75%. 2.Set all individual Graphic Equalizer Controls to 0dB. Master Volume Control and Subwoofer Level Control should be set to minimum, and fader set to even. 3.Press the Input Selection Switch to accept the input signal from the source unit or auxiliary source. 4.
Warranty LIMITED ONE-YEAR CONSUMER WARRANTY LIMITED TWO-YEAR CONSUMER WARRANTY WITH PURCHASE AND INSTALLATION BY A PRECISION POWER AUTHORIZED DEALER Precision Power promises to the original purchaser, to repair or replace this product with a new or refurbished unit (at Precision Power's sole and absolute discretion) should it prove to be defective in workmanship or material under normal use, for a period of *two-years from the date of purchase from the Precision Power authorized dealer, PROVIDED the product