GEN3 Powertrain Controller Transmission Control User’s Manual April 2005
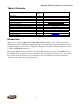
Bigstuff3 GEN3 Transmission Control Manual Table of Contents Chapter Hyperlink Page(s) Introduction System Contents System Installation Overview Transmission Harness Installation Transmission Wire Harness Connection Points System Configuration Shift Table Set-up Torque Converter Clutch (TCC) Table Set-up Line Pressure Table (LP) Set-up Dash Configure Dash Save Dash Pin-Out Definition 2 3 4 4 8 8 11 13 15 17 18 21 22 System_Install_Overview Trans_Harness_Install Connection_Points_Illustration Transmissi
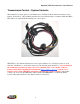
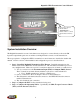
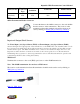
Bigstuff3 GEN3 Transmission Control Manual Transmission Control – System Contents The transmission control option is sold with this user’s manual and the standalone transmission wire harness, shown below. The remaining transmission control functionality is contained within the GEN3 ECU when it is ordered with the transmission control option. GEN3 ECU’s sold with the transmission control option will have two (2) header connectors one at each end of the ECU (vs.
Bigstuff3 GEN3 Transmission Control Manual The header connector will be marked “Transmission” to indicate where to connect the transmission harness to. System Installation Overview The BigStuff3 transmission control wire harness was designed to connect directly to the stock GM input and output shaft speed sensors and the stock 20-pin header connector on the transmission. The steps required to configure the GEN3’s transmission control feature are described in detail in this manual.
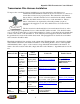
Bigstuff3 GEN3 Transmission Control Manual Transmission Wire Harness Installation To improve the overall wire harness installation process, the transmission wire harness was manufactured with identification labels at the end of each wire or connector to ensure that connections are properly made. The transmission wire harness has two halves; one half is intended to be located inside the vehicle, with the ECU, the other half connects to the sensors on the transmission.
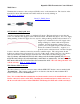
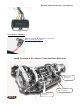
Bigstuff3 GEN3 Transmission Control Manual Wire Color Harness Label / Connector Type Transmission Valve Body N/A Fuse Label Definition Connect To Further Details Valve_Body_Fuse N/A N/A 20 Pin Transmission Header Connecter Connect the harness side 20-Pin connector to the stock 20-Pin header connector on the transmission. The location on the transmission where this termination should be made can be seen by clicking on Twenty_Pin_Connector_Connection.
Bigstuff3 GEN3 Transmission Control Manual TOSS Sensor Terminate this connector to the stock speed (TOSS) sensor on the transmission. The location on the transmission where this termination should be made can be seen by clicking on TOSS_Sensor_Connection. Back_To_TOSS_Sensor 12V Switched – (Single pink wire) A secure connection must be made to a switched 12V supply. The best and in most cases the only source of a switched 12V supply is at the vehicle fuse block.
Bigstuff3 GEN3 Transmission Control Manual Valve Body 15-Amp Fuse This fuse protects the transmission valve body.
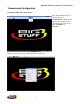
Bigstuff3 GEN3 Transmission Control Manual Transmission Configuration Configuring Shift, TCC & LP Tables From the main BigComm tool bar, left click on “Transmission”. Keep the left mouse button depressed and slide the mouse pointer down until “Configure” is highlighted. Release the left mouse button. The screen below will open.
Bigstuff3 GEN3 Transmission Control Manual The steps required to configure the GEN3 ECU to the transmission are described in the following paragraphs. Gearbox Type Select the appropriate transmission type. The GM 4L60E or 4L80E transmissions are the currently available transmission options. Select the transmission type installed in the vehicle. Gears Select the number of gears for the transmission being used.
Bigstuff3 GEN3 Transmission Control Manual Shift Time • Minimum Shift Time – The value inputted into this cell will be used by the ECU to determine the minimum time between successive up-shifts or down-shifts.
Bigstuff3 GEN3 Transmission Control Manual When the ECU is powered and the wheels are moving, an ellipse will appear in the “active” window representing the current vehicle speed and throttle position. When the ellipse moves above the green line, the transmission will up-shift to the next gear, when the ellipse moves below the red line the transmission will down-shift to the next gear. The window at the bottom of the table above represents first gear.
Bigstuff3 GEN3 Transmission Control Manual When the key board Shift key is depressed, “Edit Mode” is displayed in the gear position box. Cursor displaying MPH value for this shift point value. The blue background designates that the table is in “Edit Mode” The MPH associated with any shift point box will be displayed as the cursor moves from point to point along the red or green lines.
Bigstuff3 GEN3 Transmission Control Manual As you will notice, there are only two windows in the Torque Converter Clutch (TCC) table. This is because the converter is only allowed to “Lock-up” in third and fourth gear (with a four speed transmission) and fourth and fifth gear (with a five speed transmission). The “Active” window identification and the method for changing lock and unlock points, is the same as was outlined in the Shift_Tables section above.
Bigstuff3 GEN3 Transmission Control Manual When the key board SHIFT key is depressed, “Edit Mode” is displayed in the gear position box. The blue background designates that the table is in “Edit Mode” Left & Right Arrow Keys - When the “TCC” table is in “Edit Mode” (the table background will be blue), the left and right arrow keys can be used to scroll across the red and green lines in each window (gear).
Bigstuff3 GEN3 Transmission Control Manual The Y-Axis represents force Motor duty cycle from 0% to 100% The X-Axis represents % of throttle opening or position (TPS) from zero % to 100% The “Active” window is the term used to describe the window (gear) the transmission is operating in. The “Active” window will move up or down within the Line Pressure Table depending on which gear the transmission is operating in. The “Active” window will always be larger than the other inactive windows.
Bigstuff3 GEN3 Transmission Control Manual When the key board SHIFT key is depressed, “Edit Mode” is displayed in the gear position box. The blue background designates that the table is in “Edit Mode” Left & Right Arrow Keys - When the LP Table is in “Edit Mode” (the table background will be blue), the left and right arrow keys can be used to scroll across the green lines in each window (gear).
Bigstuff3 GEN3 Transmission Control Manual When the BigComm software is launched, it uses the “Default Dash” (which contains the 31 separate Dash’s) from the C: Program Files/BigStuff/BigComm folder. The “Default Dash” is actually a compilation of the 31 available Dash’s. The recommended way to configure the “Default Dash” is to configure each of the available dash’s, or most frequently used dash’s, to your liking and then save them as the “Default Dash”.
Bigstuff3 GEN3 Transmission Control Manual Left Click on the “Pick Dash” drop down screen. Pick a Dash drop down screen. The screen below will appear. This is the list of thirty-one (31) available Dashboards. Once configured, these Dashboards will show up at the bottom of the corresponding operating screens. After selecting a Dash to configure, “Signals” need to be selected and added to the Dash.
Bigstuff3 GEN3 Transmission Control Manual right side of the screen (Signals in the Dash). All Signals shown under “Signals in the Dash” will now appear at the bottom of the TCC screen when that screen is used to calibrate the TCC Table.
Bigstuff3 GEN3 Transmission Control Manual Save a Dash Again, the recommended way to configure the “Default Dash” is to configure each of available dash’s, or most frequently used dash’s, to your liking and then save them as the “Default Dash”. This way, every time you open the BigComm software, the dash’s will be open to the preferred configuration.
Bigstuff3 GEN3 Transmission Control Manual • A unique file name can also be assigned by typing the name in the “File Name” subwindow and clicking on Save.