
User's Manual


5
13. Next splice the black wire of the camera power cable to the reverse light’s negative (-)
wire or ground.
14. Replace t
he reverse light bulb, and then re-install the light socket. Secure all th
e
wi
res with cable ties or electrical ta
pe.
15. Re-attach
the negative battery cable to the ba
ttery.
Monitor Installation
When choosing a location to mount the monitor, make sure the
monitor is in an area that will not obstruct your vision while driving.
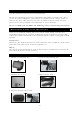
1. Before mounting the monitor, clean the mounting surface well.
2. Position the suction mount to the smooth surface which suit
s
your requirement.
3. Press the s
uction cap against the smooth surface and press the
lock down to attach and fix the mount to the su
rface.
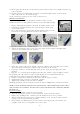
Snap i
n the monitor to the suction mount.
4. Adjust the mounting arms to suit your view angle to the monitor and tighten th
e
screws o
n the mount to fix the position.
5. Route the power cable to the vehicle’s cigarette lighter socket/12/24
V power outlet.
The cable must
not interfere with the safe oper
ation of the vehicle.
6. Insert the small 12 / 2
4Volt DC plug of the power cable into the right
side of the
monitor.
7. Plug the 12
/ 24 Volt cigarette lighter plug into the vehicle’s ciga
rette lighter socket.
To maximize the effectiveness of the suction
mount, it is recommended that the
application be performed under the following conditions:
• Surface temperature should be between 21 an
d 38 degrees Celsius.
• Application below 10 degrees should be avoided.
• Applicat
ion should not occur in direct sunlight.
Mounting should be protected from exposure to direct sunlight for a period of 24 hours.
NOTE: UNDER EXTREME BRIGHT LIGHT CONDITIONS, THE SCREEN IMAGE MAY TAKE A
FEW SECONDS TO STABLIZE. PLEASE WAIT UNTIL THE IMAGE HAS STABLIZED BEFORE
BACKING UP.
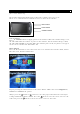
System testing
1. Reattach the vehicle’s negative battery cable.
2. Turn the ignition key to the accessory position, do not start the vehicl
e.
3. Engage
the parking brake, and then put the shifter in the reverse positi
on.
4. After testi
ng the unit and you are satisfied with the route you have chosen for the
cabling, you must permanently install it.
5. Route all wires behind interior panels or
under carpeting so they are hidden. Use
supplied cable ties to neatly gather any excess wire.