USA R Low Impact Climber with Pulse* *Several versions of this owner’s manual exist. This is a copy of the last version published. If the assembly instructions do not coincide with your 718e, please call Precor Customer Service.
USA R Thank you for purchasing the Precor 718e or 723e Low Impact Climber with Pulse. The pulse feature lets you view your pulse rate on the display when you use the Precor pulse detector (ear clip option) or the Precor Heart Rate Option. Low Impact Climber with Pulse The smooth, quiet motion of the stair arms lets you focus on your workout without the noise and distractions other climbing machines have.
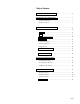
Table of Contents Unpacking the 718e Low Impact Climber . . .............................................. 4 Assembling the 718e Low Impact Climber . . . . . . . ................................... 6 Installation Requirements .................................................................... 6 Assembly Instructions ......................................................................... 6 Using the Precor 718e Low Impact Climber ..............................................
Unpacking the 718e Low Impact Climber All Precor products are thoroughly tested and inspected before shipment.
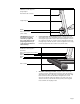
Diagram 2 718e Hardware kit B E F G A C H I D Open the hardware kit and identify the following items. Diagram 2 provides an overview of the kit’s contents. As you identify the contents of the kit, check them off below: (A) Two gaskets for frame base (B) Four frame-to-base bolts (C) Four large flat washers (D) Four lock nuts (E) Two small bolts (F) Two phillips-head screws (G) One 3/16" hex key (H) One 1/2" wrench (I) Two AA batteries If any items are missing, contact your authorized Precor dealer.
Assembling the 718e Low Impact Climber The information in this section provides instructions regarding the assembly of the 718e or 723e Low Impact Climber. You should carefully read and follow the instructions in this manual. If you do not assemble and use the climber according to the following guidelines, you could void the Precor limited warranty. Installation Requirements Follow these installation requirements when installing the climber: • Set up the 718e climber on a solid, flat surface.
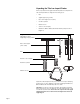
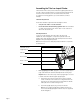
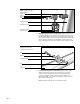
c. Remove a gasket (A) from the hardware kit. Align the upright support with the mounting holes in the base. Place the gasket between the upright support mount and base. d. Take two frame-to-base bolts (B) from the hardware kit and place a washer (C) on each. Insert the bolts through the upright support mount, gasket, and base. Make sure that the front mount is adjacent to the crossbar weld, but not on top of the weld. See Diagram 4. Attach a lock nut (D) to the opposite end of each bolt.
Diagram 5 Pull reed switch cable through upright support Rope Upright support Reed switch cable connector Reed switch cable 2. Feed Reed Switch Cable through Upright Support. (Diagram 5) Remove the bolts from the base column support (short column) and set them aside. The gasket should hang on the reed switch cable. Take the following steps to install the reed switch cable: a. Cut the wire tie from around the reed switch cable and gently pull the cable out of the roller guard.
Diagram 6 Attach base column support to upright support Reed switch cable connector Upright support R A 718e US Gasket Base column support (short column) CAUTION: Make sure you do not crimp the reed switch cable when you tighten the base column support onto the upright support because you could void the manufacturer’s limited warranty. 3. Secure Upper Frame Pieces Together.
Diagram 8 Attach resistance cylinder to upright support Upper axle Spacer Washer Bolt Upright support Adjustment portion 5 4 3 21 Resistance cylinder Indicator arrow 5. Attach Resistance Cylinders to Upright Support. (Diagram 8) Remove the bolt, washer and spacer from the upper axle using your fingers or the hex key (G) provided. With the indicator arrow facing toward the footpad, slide the top of the resistance cylinder onto the upper axle. Place the washer and spacer on the bolt.
Diagram 10 Attach resistance cylinder to stair arm Bolt Washer Resistance cylinder mount Bushing U-shaped mount Nut Stair arm a. Align the resistance cylinder with the holes in the U-shaped mount and slide the resistance cylinder into position. See Diagram 10. b. Insert the bolt through the U-shaped mount and resistance cylinder as shown in Diagram 10. Use the wrench to hold the nut in place while you tighten the bolt securely. c. Repeat step 6 to mount the other resistance cylinder.
Diagram 12 Install electronic console Electronic console Phillips-head screws Handrail console 8. CAUTION: Make sure you do not crimp the reed switch cable when you tighten the base column support onto the upright support because you could void the manufacturer’s limited warranty. Install Electronic Console. (Diagram 12) To attach the electronic console display to the handrail console, take the following steps: a.
Diagram 14 Location of magnet and reed switch Resistance cylinder Base column support Left-hand stair arm Magnet Reed switch Gap 1/8" to 1/4" (.05 to .1 centimeters) USA R 10. Check Operation of Electronics. (Diagram 14) Make sure that the spacing between the magnet on the left stair arm and the reed switch on the rear short column is correct. If the spacing is incorrect, the electronic console display will not operate properly.
Diagram 16 Install the guide rope Pulley Finger guard Stair arm Right stair arm mount Guide rope c. Loop the rope over the pulley (through the finger guard on both sides of the pulley) and down into the left stair arm mount. See Diagram 16. d. Pull the rope taunt and mark the rope where it meets the stair arm mount. See Diagram 17. Diagram 17 Mark the guide rope Guide rope Pencil or pen mark Left stair arm mount CAUTION: Do not stand on the stair arms while performing these steps.
Diagram 18 Measure the distance of the resistance cylinders from the mounts 1/4" to 1/2" Adjustment knob Resistance cylinder mount 5 g. 4 3 2 1 Press the right footpad down onto the rear crossbar. Let the left stair arm move up into its highest position (away from the rear crossbar). Check the distance between the top of the resistance cylinder on the left stair arm and the upper axle. It should be between 1/4 to 1/2 inches (.1 to .2 centimeters). See Diagram 18.
Using the Precor 718e Low Impact Climber In addition to providing an excellent cardiovascular workout, one of the advantages of the 718e climber is that it is simple to use. With very little time or practice, you can learn how to use it effectively.
ODOMETER X 100—indicates the total number of steps accumulated on the climber over time, up to 999,900. This display appears with the TOTAL STEPS display. Use the odometer to track the amount of “mileage” your climber has on it. Note that you need to multiply the number that appears by 100. TIME—functions like a stopwatch, giving you total exercise time per session, up to 59 minutes and 59 seconds. The TIME display starts or stops automatically when you start or stop a workout.
Setting the Resistance Level CAUTION: Do not adjust the resistance cylinders after extended continuous use because they can heat up to the point of being uncomfortable to touch. Before using the 718e climber, you need to adjust the resistance level. Resistance, which is related to your body weight and your step height during the workout, determines your cadence (the number of steps you can take per minute).
Setting a Pacer Setting a pace tempo provides motivation and helps you to maintain your exercise intensity. To set a pacer, press the PACER key until the bar graph highlights the desired step rate. The bar graph provides incremental markings every 15 steps (15, 30, 45..., to 150). If you bypass the mark that you want to set, continue to press the PACER key. It will cycle around to zero and you can start over. Note that the pacer stops blinking when you maintain or exceed the pacer’s step rate.
Pausing Your Workout Since the climber has an automatic auto-pause feature, you can pause during your workout to answer the telephone or take a short rest. To pause your workout, simply stop stepping on the climber. Five minutes after you stop exercising the electronics unique screen-saver feature turns off the display and saves your position. When you resume your workout and step on to the climber, the displays continue from the point you left off and provide an accurate readout of your total workout time.
Diagram 22 Working out on the 718e 2. After you have set the resistance level at a low setting and finished any desired pre-workout stretching, step onto the climber. Make sure that your weight is balanced and your hands and feet are positioned securely. Refer to How to Use the 718e Climber. 3. Start your workout by taking steps 4 to 8 inches in height, at a cadence that will allow your heart rate to reach your training zone within 5 minutes. See Diagram 22.
Sample Exercise Routines CAUTION: Before beginning any fitness program, you should have a complete physical examination by your physician. For a good upper body workout, set the resistance cylinders at a moderate level—between the markings 4 and 6 and take the following steps: CAUTION: Make sure that both cylinders are set at the same resistance to ensure a smooth, balanced feel during your workout. 1. Stand erect with your feet placed firmly on the stair arm footpads. 2.
General Aerobic Training Information A workout on the Precor 718e climber provides excellent and efficient cardiovascular conditioning, while strengthening and toning the thighs, calves, and hips. The darkened areas in Diagram 23 indicate the muscles improved. Diagram 23 Muscles exercised during a stair climber workout. 1 1 1. 2. 3. 4. 5. 6. 7. 8. 9. 10. 11. 12. 13. 14. 15. 16.
Diagram 24 Heart rate training zones HEART RATE TRAINING ZONE 190 185 190 180 175 180 170 165 170 160 YOUR HEART RATE 160 152 150 155 148 150 144 145 140 130 120 140 136 140 132 135 128 REC 124 OMM 120 110 END 117 114 ED T 110 100 107 RAI 124 NIN 104 120 116 112 G ZO 101 90 NE 98 94 91 MAX. HEART RATE 108 88 80 70 20 25 30 35 40 45 50 YOUR AGE 55 60 65 70 80% OF MAX. HEART RATE 65% OF MAX.
Once you locate your pulse, look at a watch or a clock with a second hand and count the beats for six seconds. Multiply that number by 10 to determine the total number of beats per minute. For example, if you count 14 beats over six seconds, the total number of beats per minute is 140. Compare the total number of beats with your training zone as identified in Diagram 24. If necessary, increase or decrease your activity level to bring your heart rate into your training zone.
Maintenance and Troubleshooting The 718e climber requires very little maintenance. The only maintenance you need to do periodically is to clean the climber. You will also need to change the batteries when they wear down. Instructions for these procedures are provided in this section. If you encounter problems with the climber, refer to Troubleshooting Tips in this section for help. Cleaning the Climber CAUTION: Abrasive cleaners or polishes will damage the surface finish.
Troubleshooting Tips Check the chart below to see if your problem is listed. If the following information does not solve a particular problem, call your authorized Precor dealer. See Obtaining Service in this section for information Problem Solution Electronics, no display • Replace batteries. See instructions on the previous page. • Clean battery connections. Electronics, no stroke count • Reed switch to magnet spacing is incorrect.
Precor Incorporated P.O. Box 3004 Bothell, WA USA 98041-3004 USA R Precor is a registered trademark of Precor Incorporated. © 1988 Precor Incorporated, Rd. 1989. Specifications subject to change without notice. 1-800-4-PRECOR NOTICE: Precor is widely recognized for its innovative, award winning designs of exercise equipment. Precor aggressively seeks U.S. and foreign patents for both the mechanical construction and the visual aspects of its product design.