S3.
Important Safety Instructions Before beginning any fitness program, see your physician for a complete physical examination. Il est conseillé de subir un examen médical complet avant d’entreprendre tout programme d’exercise. Si vous avez des étourdissements ou des faiblesses, arrêtez les exercices immédiatement. When using exercise equipment, basic precautions should always be taken, including the following: • • • Read all instructions before using the Multi-Hip Option equipment.
S3.15 Multi-Hip Option Assembly Instructions Table of Contents Important Safety Instructions ....................................................................... 2 Personal Safety During Assembly ........................................................................................... 2 Obtaining Service .................................................................................................................... 2 Table of Contents 1 2 Before You Begin .......................................
S3.15 Multi-Hip Option Assembly Instructions 1 Before You Begin Thank you for purchasing the Multi-Hip Option. This option will add a new dimension to your strengthtraining regimen. For proper installation, please read this guide thoroughly and follow the assembly instructions. S3.15 Unpacking the Equipment The Multi-Hip Option is carefully tested and inspected before shipment. Precor Strength ships the unit in several pieces that require assembly. Ask for assistance during the assembly process.
S3.15 Multi-Hip Option Assembly Instructions 2 Installation Requirements • Follow these installation requirements when assembling the unit: Preparations You must review and follow the instructions in this guide. If you do not assemble and use the Multi-Hip Option according to the following guidelines, you could void the Precor Limited Warranty. • Fill out and mail the warranty registration card. • Set up the Multi-Hip Option on a solid, flat surface.
S3.15 Multi-Hip Option Assembly Instructions 3 Assembly Instructions Assembly of the Multi-Hip Option takes professional installers about ¹⁄₂ hour to complete. If this is the first time you have assembled this type of equipment, plan on significantly more time. Selector Hub Professional installers are highly recommended! However, if you acquire the appropriate tools, obtain assistance, and follow the assembly steps sequentially, the process will take time, but is fairly easy.
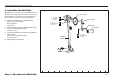
S3.15 Multi-Hip Option Assembly Instructions 1. Attach the Multi-Hip to the S3.15 Important: Most fasteners are fitted to the frame or pulley, you will need to disassemble the fasteners before proceeding with each step. 2 - 2¹⁄₄" bolts 2 - washers A. Attach the Multi-Hip Base to the S3.15 Rear Crossbar using three 1¼-inch hex head bolts three flat washers three spring washers three locknuts B B. Position the Crossbrace against the S3.15 Main Base and place it on top of the Multi-Hip flange.
S3.15 Multi-Hip Option Assembly Instructions 2. Assemble the Multi-Hip Important: The orientation of the Handlebar fasteners, the Roller Arm, and the Selector Stem is critical for the proper alignment of the Selector Hub. Assemble the parts with the orientation shown in the illustration. Selector Hub A. Attach the Handlebar to the Multi-Hip using two 2½-inch hex head bolts four flat washers two locknuts.
S3.15 Multi-Hip Option Assembly Instructions 3. Install the Multi-Hip Cable Pulley assemblies A. Feed the tab end of the Multi-Hip Cable 130194 between the two 3½-inch pulleys on the Multi-Hip Upright and attach the cable to the Selector Hub using one shaft two e-clips B. Remove the lower 3¹⁄₂-inch pulley on the Multi-Hip Upright. Feed the cable around it and reattach it using one 4-inch hex head bolt two shoulder spacers one locknut C. Remove the 3¹⁄₂-inch pulley from its pulley bracket.
S3.15 Multi-Hip Option Assembly Instructions 4. Attach the Multi-Hip Cable to the S3.15 A. Attach the end of the Multi-Hip Cable to the S3.15 Cable using one 1-inch hex head bolt one locknut B. Wrench tighten the locknut, but do not bend the flanges. C. Position the Pivoting Bracket to align the cables. If necessary, loosen the fastener securing the Pivoting Bracket to the Main Base. Retighten the fastener after aligning the cables. This completes the assembly of the Multi-Hip Option.
Precor Residential Equipment Limited Warranty PLEASE READ THESE WARRANTY TERMS AND CONDITIONS CAREFULLY BEFORE USING YOUR PRECOR INCORPORATED PRODUCT. BY USING THE EQUIPMENT, YOU ARE CONSENTING TO BE BOUND BY THE FOLLOWING WARRANTY TERMS AND CONDITIONS. Limited Warranty. Precor Incorporated warrants all new Precor products to be free from defects in materials and manufacture for the warranty period set forth below. The warranty period commences on the invoice date of original purchase.
RET. Precor Incorporated 20031 142nd Avenue NE PO Box 7202 Woodinville, WA 98072-4002 PLACE STAMP HERE Thank You and Welcome to Precor To allow us to serve you better, please take a few moments to complete and return your warranty registration. YOU MAY ALSO REGISTER ONLINE AT www.precor.com/warranty If you have questions or need additional information, contact your local dealer or call Precor Customer Support at 800-347-4404. Fold along dotted line and tape closed before mailing.
Month Day Year Last Name Zip Code Apt./Suite: The serial number is located on the shipping box and on the product.
S3.15 Multi-Hip Option Specifications Length: 32 inches (81 cm) Height: 46 inches (115 cm) Width: 30 inches (75 cm) Shipping weight: 51 lb (23 kg) Precor Incorporated 20031 142nd Avenue NE P.O. Box 7202 Woodinville, WA USA 98072-4002 Precor is a registered trademark of Precor Incorporated. Specifications subject to change without notice. Copyright 2006 Precor Incorporated. www.precor.com NOTICE: Precor is widely recognized for its innovative, award winning designs of exercise equipment.