8511446-Covers.
Contents Using Your Gateway Flat Panel Monitor . . . . . . . . . . . . . . . . . . . . . . . . . . . . . . . . . . . . . . .1 Connecting the monitor . . . . . . . . . . . . . . . . . . . . . . . . . . . . . . . . . . . . . . . . . . . . . . . . . 2 Setting up the optional stand . . . . . . . . . . . . . . . . . . . . . . . . . . . . . . . . . . . . . . . . . . . 4 Attaching the USB stand . . . . . . . . . . . . . . . . . . . . . . . . . . . . . . . . . . . . . . . . . . . . .
Contents ii www.gateway.
Using Your Gateway Flat Panel Monitor • Connecting the monitor • Setting up the optional stand • Setting up the optional speaker bar • Starting the monitor • Adjusting monitor settings • Windows controls • Power management • Maintaining • Troubleshooting • Specifications 1
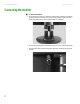
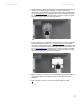
Connecting the monitor www.gateway.com Connecting the monitor To connect the monitor: 1 Place the monitor base on a table top, then slide the monitor neck down onto the base until it clicks into place. You may need to press the two buttons on the base to let the monitor slide on smoothly. 2 Position your computer and the monitor so you can reach the back of each. 3 Connect the power cord to the power connector under the back of the display.
www.gateway.com Connecting the monitor 4 Connect the blue right-angle VGA video cable to the blue video connector under the back of the display. Although a standard VGA cable is acceptable, we recommend using the right-angle cable (available in the U.S. at www.gateway.com), especially for use with the optional speaker bar. The right-angle cable’s thumbscrews are easier to tighten, and the cord does not get in the way of the speaker bar.
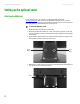
Setting up the optional stand www.gateway.com Setting up the optional stand Attaching the USB stand In the United States, you can buy an adjustable USB stand from www.gateway.com. The stand can be adjusted for height, tilt, and screen rotation. When connected to your computer’s USB port, you can connect up to four USB devices to the USB 2.0 ports on the stand. To attach the adjustable stand: 1 Make sure that the monitor is turned off. 2 Place the monitor face-down on a soft, non-marring surface.
www.gateway.com Setting up the optional stand 5 Place the hinge cover over the hinge. The hinge cover came with your optional stand. 6 Attach the hinge cover using the screw you removed from the original neck hinge. 7 Remove the four small screws from the back of the LCD panel. Do not discard the four screws. Screw Screw Screw Screw 8 Slide the adjustable stand’s neck onto the base.
Setting up the optional stand www.gateway.com 9 Tighten the thumbscrew with your fingers (or a flat screwdriver) under the base to secure the neck into place. Thumbscrew 10 With the stand facing you, press the mounting bracket lever to the left and hold it, then remove the bracket from the stand. 11 Attach the bracket to the LCD panel using the four screws you removed previously.
www.gateway.com Setting up the optional stand 12 Slide the neck’s bracket slot onto the bracket’s mounting tab. 13 Press the bracket lever to the right and hold it, then lower the neck into place and release the lever.
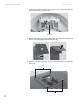
Setting up the optional stand www.gateway.com Adjusting monitor height tension The stand is factory adjusted to maintain the height for your monitor. However, if it does not stay in place when you let go, you need to change the stand’s height tension. You also need to adjust the stand if the amounts of force required to raise and lower the monitor are not equal. To adjust your monitor’s height tension: 1 Press the screwdriver access hole cap from below the base to remove it from the base.
www.gateway.com Setting up the optional stand 4 Adjust the height tension screw so the raising and lowering forces are equal. After the forces are equalized, turn the tension screw clockwise two to four turns to slightly decrease the lifting tension. 5 For optimum viewing, adjust the height so the top of the monitor is about 1 inch (2.54 cm) below eye level.
Setting up the optional stand www.gateway.com Screen distance from user The screen should first be placed at arm’s length from the user, then adjusted back and forth to suit individual preference. Connecting the USB hub The optional USB stand has a built-in, 4-port, USB 2.0 hub. To use these USB connectors, you need to connect the hub to power and to your computer.
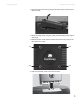
www.gateway.com Setting up the optional speaker bar Setting up the optional speaker bar Power/Volume control Kensington lock slot Power indicator Headphone jack Microphone jack Headphone jack Bass port Bass port Installing the speaker bar To install the speaker bar: Tips & Tricks When using the speaker bar with a DVI connection, we recommend that you use the right-angle DVI cable so the speaker bar does not obstruct the cable. 1 Tilt the screen back, then center the speaker bar below the screen.
Starting the monitor www.gateway.com 6 Turn on the speaker bar by rotating the power/volume knob clockwise. Starting the monitor To start the monitor: Important The appearance of your monitor may vary from that shown. 1 Press the power button on the front of monitor. The power LED on the power button turns on. 2 Turn on your computer. After your computer is running, the power LED on the monitor’s power button should be blue. Allow about 10 seconds for the display image to appear.
www.gateway.com Adjusting monitor settings Important 4 After you see the Windows desktop, press the Auto button on the right When adjusting the monitor settings, always press the Auto button before entering the OSD. This will automatically adjust the display image to the ideal settings for the current screen resolution. side of the monitor to automatically adjust your display image to the ideal settings. 5 Use the on-screen display (OSD) to adjust other monitor settings.
Adjusting monitor settings www.gateway.com On-screen display options Adjusting OSD settings To adjust the OSD settings: Tips & Tricks While the OSD is active, on-screen labels appear next to the buttons to help you identify them. 1 Press the Auto button. The display image is automatically adjusted to the ideal settings for your current screen resolution. 2 Press the Menu button. The OSD menu opens.
www.gateway.com Adjusting monitor settings OSD Menu Description Picture menu Brightness—Adjusts the amount of light in the darkest portion of the picture. Use the lowest brightness setting you are comfortable with to maximize the life of the monitor backlights. You may need to readjust brightness after the monitor warms up. Contrast—Adjusts the level of white between the lightest and darkest portions of an image. Gamma—Customizes the gamma level.
Windows controls www.gateway.com Windows controls Color depth, screen resolution, and screen fonts are three of the most basic monitor settings you may need to change. Adjusting the color depth Color depth is the number of colors your video card uses. Most images look best displayed with the maximum number of colors available. Windows lets you choose from several color depth settings for the monitor. We recommend that you use the 32-bit True Color setting or the highest setting available at all times.
www.gateway.com Windows controls Adjusting the screen resolution You can change the screen resolution to a size you prefer. For example, you can increase the resolution to fit more icons on your desktop, or you can decrease the resolution to make reading and identifying objects on the monitor easier. The higher the resolution, the smaller individual components of the screen (such as icons and menu bars) appear.
Windows controls www.gateway.com 3 Click the Appearance tab. 4 Click the Effects button. The Effects dialog box opens. 5 Click to select the Use the following method to smooth the edges of screen type check box. 6 Click the arrow to open the list, then click ClearType. 7 Click OK, then click OK again.
www.gateway.com Windows controls EzTune software When installed onto your computer, EzTune™ software lets you control many of the monitor settings from your computer. With EzTune, you can: ■ ■ ■ ■ Change the orientation of the image (landscape to portrait) by just rotating the screen (requires the optional height-adjustable stand available in the U.S. at www.gateway.
Windows controls www.gateway.com While using portrait mode: ■ ■ ■ Full-screen video may display incorrectly or be slow. Video games or other full-screen applications may not be fully compatible. Some programs are not able to recognize and adapt to your monitor’s portrait mode. If you experience problems with a program while using portrait mode, switch to landscape mode and restart the program. Video modes Your monitor supports several video modes.
www.gateway.com Power management Power management ENERGY STAR As an ENERGY STAR® Partner, Gateway has determined that this product meets the ENERGY STAR guidelines for energy efficiency. This monitor complies with the EPA’s International ENERGY STAR Program, which is a program designed to encourage manufacturers of computer equipment to build circuitry into their products to reduce energy consumption during time of non-use.
Maintaining www.gateway.com Maintaining To keep the monitor in optimal working order: ■ ■ ■ ■ Caution Do not use any type of abrasive pad or glass cleaner. You will permanently scratch the screen. ■ Do not block the ventilation holes. Do not expose the monitor to rain or use near water. Keep the monitor away from radiators or heat vents. Keep the monitor out of direct sunlight. To clean the monitor, use a soft cloth slightly moistened with water only. Wipe the cabinet, screen, and controls.
www.gateway.com Troubleshooting No picture ■ ■ ■ ■ ■ ■ Press the Input button to make sure that you have selected the correct video source. Make sure that the power cord is connected correctly to both the back of the monitor and the wall outlet. For more information about connecting the power cord, see “Connecting the monitor” on page 2. Make sure that the video cable is connected securely to the back of the monitor and computer.
Troubleshooting www.gateway.com The monitor has pixels that are always dark or too bright ■ This condition is normal and inherent in the TFT technology used in active-matrix LCD screens. Gateway’s inspection standards keep these to a minimum. If you feel these pixels are unacceptably numerous or dense on your display, contact Gateway Customer Care to identify whether a repair or replacement is justified based on the number of pixels affected.
www.gateway.com Specifications Specifications Specifications are subject to change without notice or obligation. Many products for Gateway and its subsidiaries are custom engineered by our suppliers to Gateway specifications and may vary from similarly marketed products. Panel size 19 inches (diagonal) Panel type Pixel resolution Pixel pitch 19-inch viewable TFT with anti-glare coating 1440 × 900 (native) 0.0112 × 0.0112 inches (0.2835 mm × 0.
Specifications 26 www.gateway.
Safety, Regulatory, and Legal Information • Important safety information • Environmental information • Regulatory compliance statements • Notices 27
Important safety information www.gateway.com Important safety information Warning Always follow these instructions to help guard against personal injury and damage to your Gateway product. Your Gateway product is designed and tested to meet the latest standards for safety of information technology equipment. However, to ensure safe use of this product, it is important that the safety instructions marked on the product and in the documentation are followed.
www.gateway.com Environmental information Environmental information Recycling Mercury Warning Hg Lamp(s) inside this product contain mercury and must be recycled or disposed of according to local, state, or federal laws. The product you have purchased contains extracted natural resources that have been used in the manufacturing process. This product may contain substances known to be hazardous to the environment or to human health.
Regulatory compliance statements www.gateway.com Regulatory compliance statements United States of America Federal Communications Commission (FCC) Unintentional emitter per FCC Part 15 This device has been tested and found to comply with the limits for a Class B digital device, pursuant to Part 15 of the FCC rules. These limits are designed to provide reasonable protection against harmful interference in a residential installation.
www.gateway.com Notices Notices © 2006 Gateway, Inc. All rights reserved. Gateway, Inc. 7565 Irvine Center Drive Irvine, CA 92618 USA All Rights Reserved This publication is protected by copyright and all rights are reserved. No part of it may be reproduced or transmitted by any means or in any form, without prior consent in writing from Gateway. The information in this manual has been carefully checked and is believed to be accurate. However, changes are made periodically.
Notices 32 www.gateway.
8511446-Covers.