
User Manual
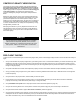


CENTER OF GRAVITY VERIFICATION
21
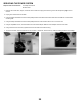
The FlexJet TV has a Center of Gravity (CG) range located from
the forward edge of the plastic wing bolt tab to trailing edge of
the plastic wing bolt tab. CG is measured by lifting the completed
airplane upright, with all components installed and the landing gear
in the down position. This location was determined from
numerous test flights by designer and TopGun Champion David
Ribbe.
Setting the center of gravity is one of the most important steps for
success, particularly with a new airplane. The FlexJet TV is a high-
performance airplane that can exceed speeds of 100mph. This
makes it a very enjoyable aircraft to fly, but if the CG is not within an
acceptable range, it will make the aircraft difficult, if not impossible
to control. The desired CG can usually be accomplished by moving
the flight battery forward or aft.
After flying the FlexJet TV you may adjust the CG further aft. It is
safe and effective to fly the FlexJet TV at ANY CG that allows the
nosewheel to stay on the ground. Even if the plane falls to the tail
when lifted slightly!
NOTICE
The CG measurement should be made with the completed
airframe with all components (batteries, servos, receiver,
linkages, hardware, etc.) installed and the landing gear in the
down position. Failure to do so will result in an inaccurate
measurement.
PRE-FLIGHT CHECKS
To help ensure a successful first flight, as well as many flights after, perform a few simple pre-flight checks to ensure the aircraft is ready for
flight.
1.
2.
3.
4.
5.
6.
7.
8.
9.
Verify control surfaces are properly hinged and in good working order. Pinch a control surface between your thumb and fore-finger, and
stabilize the wing with your other hand. Give the control surface a firm pull away from the wing. The control surface should not come
unhinged from the wing. Be sure to avoid over-stressing the part, as an aggressive pull may cause the surface to come unhinged even
though it is hinged properly.
Verify that all hardware and all other aircraft parts are properly secured. This includes hardware and parts installed by the factory.
Verify your battery is fully charged and in good condition. Avoid using batteries with swollen cells, or batteries that do not charge back
to their full capacity.
Verify the CG is in the proper location, and the battery is secured in place.
Ensure the Aura is on and functioning properly. Power on your transmitter, followed by the aircraft. Ensure the Aura is calibrated
properly and receiving a valid radio source (solid orange + solid green LEDs).
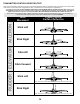
Verify transmitter stick inputs result in the proper control surface movements (reference page 19).
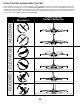
Verify Thrust Vectoring Nozzle is in correct position at center stick (reference page 18), and moves freely in all directions.
Verify aircraft movement results in proper Aura sensor corrections (reference page 20).
Verify the motor and ESC function properly. Point the aircraft in a safe direction, and away from any objects or limbs that could become
entangled in the fan unit. Hold the aircraft firmly so that you are behind the aircraft. Smoothly advance the throttle to full and back to
idle. Listen and watch for any odd or unusual behavior from the motor and ESC.
CG RANGE