
Specifications


GB-AVSTOR4
Page 10 Visit the Premier Mounts website at www.mounts.com Installation Instructions
1
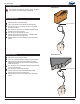
/16˝ Braided
Cable To Ceiling
Attachment
Quick Lock
®
Adjust the
1
/16˝ braided cable tension, but do not
overtighten.
When adjusting the tension of the weight-bearing
side of the Quick Lock, the
1
/16˝ braided cable must
be pulled through the Quick Lock until the desired
tension is attained.
¯
When you have the desired tension, pull the
1
/16˝
braided cable through the other side of the Quick
Lock.
Once the tension has been adjusted, be sure that
there is a minimum of 6” of excess
1
/16˝ braided cable
on the non-weight bearing side of the Quick Lock.
°
Use cable cutters to remove any remaining
1
/16˝
braided cable (optional).
6” Excess
1
/16˝ Braided Cable
Step 2
It is recommended that the following steps be
performed by two people.
Lift the ceiling box from the exposed ceiling
framework until the ceiling box’s outer lip rests
against the bottom of the ceiling framework
(Figure 1).
Ceiling Framework
Figure 1
Figure 2
Figure 3
24” x 48” Ceiling Tile
Opening
24” T-Bar Frame
Figure 4
The replacement 2’ x 2’
ceiling tile goes here.
If you installing the GB-AVSTOR4 through a
24” x 48” ceiling tile opening, attach a 24” T-bar
frame (commercially available) in the 24” x 48”ceiling
tile frame for support and place a 2’ x 2’ ceiling tile
adjacent to the GB-AVSTOR4 (Figures 3 and 4).