
Installation instructions


Page 2 Visit Premier Mounts website at http://www.mounts.com Installation Instructions
GB-MS2
Step 8
Step 7
Follow the rest of the instructions in the CTM-MS2 manual (starting on
page 8) to attach the mounting brackets and extension brackets to the
at-panel and wall plate.
•
If you are using the horizontal support brackets, attach the
at-panel mounting hardware to the horizontal support brackets
instead of the mounting brackets (Figure 1).
•
If you are not using horizontal support brackets, attach the at-panel
mounting hardware directly to the extension brackets instead of the
mounting brackets (Figure 2).
The at-panel mounting hardware is included with the CTM-MS2.
Once the at-panel is hung, route cables and electrical wiring through the
openings in the CTM-MS2 and media box.
Front view of CTM-MS2 and GB-MS2 with
horizontal support brackets
Figure 1
Figure 2
Flat-Panel
Flat-Panel
Flat-panel mounting pattern
smaller than width of media box.
CTM-MS2 not shown.
Flat-panel mounting pattern
wider than media box.
CTM-MS2 not shown.
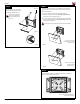
Step 6
Use four (4) M8 nylon nuts to attach
two (2) horizontal support brackets to
the extension brackets (Figure 1).
Insert the nuts on the pegs
that are on the backs of the
horizontal support brackets
(Figure 2).
M8 nylon nut
Figure 1
Figure 2
Screws are not to scale.