INSTALLATION MANUAL Polaris™ Universal Projector Mount Model: MAG Premier Mounts 3130 E. Miraloma Avenue Anaheim, CA 92806 Phone: (800) 368-9700 Fax: (800) 832-4888 mounts@mounts.com www.mounts.
MAG Table of Contents Parts List .............................................................................................................................................................- 3 Installation Tools ................................................................................................................................................- 3 Features .............................................................................................................................................
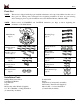
MAG Parts List NOTE: This mount is shipped with all proper installation hardware and components. Make sure that none of these parts are missing and/or damaged before beginning installation. If there are parts missing and/or damaged, please stop the installation and contact Premier Mounts (800-368-9700). NOTE: Please review all WARNING and CAUTION statements (see Page 8) before beginning the installation of the MAG Mount.
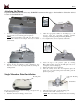
MAG Features Congratulations on the purchase of your new Premier Mounts Polaris™ Universal Projector Mount. The projector mount can be configured for ceiling installations. The Polaris™ features our exclusive MagnaGuide™ Technology which assists the installer for quicker installation times and peace of mind.
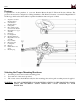
MAG Attaching the Mount Unpack the MAG Mount and review any WARNING statements that apply to the installation. Select the desired location for the MAG Mount. 1. Locate the mounting points on the bottom of the projector (see arrows above for mounting point recognition). NOTE: Projector mounting points will vary. The projector used in this manual is an example, and may not match yours exactly. 2.
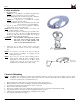
MAG Ceiling Installation 1. Mounting Surfaces NOTE: Use a 1/8” drill bit to pre-drill the mounting holes before securing the wood screws (supplied). Wood studs: Where denoted with the letter ‘A’, mark these locations for wood stud installation. NOTE: Use a masonry bit to pre-drill the mounting holes in the concrete surface. Concrete surface: Where denoted with the letter ‘B’, mark these locations for concrete installation. 2.
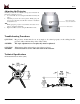
MAG Adjusting the Projector After the projector has been installed, the projector must then be adjusted. To adjust the projector: 1. Loosen the M5 set screw using the M5 Allen wrench (both sides). 2. Adjust the projector to the correct position. Firmly grasp the projector in both hands, and tilt either forward or backward to adjust the level. -ORFirmly grasp the projector in both hands and rotate side to side for orientation adjustment. 3. Tighten both M5 set screws using the M5 Allen wrench.
MAG Warranty Limited Lifetime Warranty All Premier Mounts products carry a limited lifetime warranty from ship date against defects in materials and workmanship. Premier Mounts is not liable for improper installation that results in damage to mounts, adapters, display equipment or personal injury. Any modification to the existing mount will void the manufacturers’ warranty. DISCLAIMER OF WARRANTY.