
Use and Care Guide


INSTALLATION INSTRUCTIONS
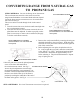
TO LIGHT TOP PILOTS (Standing Pilot Canadian Model
Ranges Only)
1. Be sure the surface burner control knobs are in the “OFF” position.
2. Remove the grates and tray inserts (if any) and remove the cook top.
See Page 11.
3. Locate the pilot ports and light each of them with a match. Replace
the cook top, tray inserts (if any), and grates.
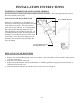
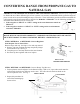
NOTE: PILOT SHOULD BE 3/8” HIGH. IF THE PILOT IS TOO
HIGH OR LOW, YOU CAN ADJUST IN THE
FOLLOWING MANNER:
1. Locate the pilot adjustment screw. It can be
found by following the pilot line back from the
pilot to the gas supply pipe.
2. To adjust, use a blade-type screwdriver.
Turn the pilot adjustment screw until the pilot
is 3/8” high. Do not reduce the flame to less than
3/8” or pilot outage may occur. A larger than re-commended pilot flame may generate soot (carbon
black ) on the bottom of your cook top.
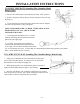
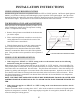
TO LIGHT OVEN PILOT (Standing Pilot Canadian Range Models Only)
1. Fully press in and hold the oven control knob to allow pilot
gas to flow to the pilot burner. It will take 30 to 60 seconds to
bleed all the air out of the pilot supply line.
2. While pressing in the oven control knob, place a lit match or
lighter under the pilot burner to light it. See drawing.
3. Once the pilot burner is lit, continue to hold in the oven control
knob for at least 10 seconds. If the flame extinguishes when the oven
control knob is released, repeat the above procedure.
21