LMV Video Wall Flat-Panel Framing System INSTALLATION INSTRUCTIONS 9541-000-001-00
LMV Contents Weight Limit............................................................................................................................................................... 2 Warning Statements.................................................................................................................................................. 2 Installation Tools...........................................................................................................................................
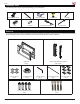
LMV Installation Tools The following tools may be required depending on your installation. Electronic Stud Finder Pencil Protective Eyewear ½˝ Socket Level 1/4˝ Drill Bit Portable Drill Socket Wrench Phillips Head Screwdriver Parts List Your Premier Mounts product is shipped with all proper installation hardware and components. If there are parts missing and/or damaged, please stop the installation and contact Premier Mounts at (800)-368-9700.
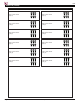
LMV Parts List (cont’d) Mounting Hardware Page 4 M4 x 12mm Screw (Qty 6) M6 x 12mm Screw (Qty 6) M4 x 16mm Screw (Qty 6) M6 x 16mm Screw (Qty 6) M4 x 25mm Screw (Qty 6) M6 x 25mm Screw (Qty 6) M5 x 12mm Screw (Qty 6) M8 x 12mm Screw (Qty 6) M5 x 16mm Screw (Qty 6) M8 x 16mm Screw (Qty 6) M5 x 25mm Screw (Qty 6) M8 x 25mm Screw (Qty 6) Visit the Premier Mounts website at http://www.mounts.
LMV Features The LMV Video Wall Flat-Panel Framing System is a customizable video wall mounting system featuring multi-monitor stacking, open design, custom spacers and scissor mount extension. It has an extending scissor mount for easy installation, cable management and servicing. Once the first frame is level, all other frames integrate and instantly level to each other for faster installation. Spacers are custom designed for specific flat-panels.
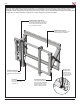
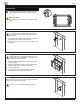
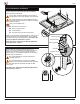
LMV Installing the Wall Plate Introduction Directional Mounting Arrow The Directional Mounting Arrow stamped into the LMV wall plate indicates which edge is the top. Mounting Safety Two people are recommended to install the wall plate. Step 1 You must secure the wall plate to two (2) wall studs with four (4) lag bolts (2 lag bolts for each stud found). 1) Use a stud finder to determine the exact center of wall studs in the vicinity of the wall plate.
LMV Installing the Wall Plate (cont’d) Step 4 1) Place the wall plate against the wall and align it with the pilot hole. 2) Insert one (1) 5/16˝ x 3˝ lag bolt and one (1) 5/16˝ washer into the upper right pilot hole. 3) Use a socket wrench and a ½˝ socket to tighten the lag bolt. Do not overtighten the lag bolt. Step 5 1) Level the wall plate. 2) Use a pencil to mark the remaining four (4) mounting locations along the center of each wall stud.
LMV Installing OPTIONAL Model Specific Spacers LMV’s dedicated flat-panel spacers are engineered with the knowledge that aligning each flat-panel on a large wall is time consuming and costly.These model-specific spacers are available for most flat-panels, which significantly reduces the installation time. (Contact Premier Mounts for model specific spacers.) Step 1 This spacer is shown for illustration purposes only. Your spacer may look different depending on the display model you are installing.
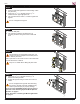
LMV Installing the Mounting Brackets Selecting the Mounting Hardware 1) Insert a small straw or toothpick into the threaded inserts found on the back of the flat-panel. 2) Use a pencil to mark the depth of the threaded insert on the small straw or toothpick. 3) Mark the straw or toothpick 1/8” above the depth of the threaded insert, as shown in Figure 1.
LMV Installing the Mounting Bracket (cont’d) Universal Washer Installation Premier Mounts’ Universal Washers are designed to accommodate the various M4, M5, M6 and M8 hole sizes required by flat-panels. M8 M5, M6 M4 Do not place excessive pressure on the back of the flat-panel, as this may damage your flat-panel. The Universal Washer must be installed between the head of the mounting screw and the mounting bracket as shown.
LMV Installing the Mounting Brackets (cont’d) Attaching the Mounting Brackets to the Flat-Panel This section presumes that you have read and understood thes "Selecting the Proper Mounting Hardware" section. 1) Place your flat-panel screen-side down on a soft, flat surface. 2) Identify the number and location of the thread inserts on the back of your flat-panel. 3) Aligning the holes on each mounting bracket with the thread inserts on the back of your flat-panel.
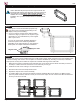
LMV Locking Safety Screw Installation The locking safety screws keep the flat-panel from being accidently dislodged from the LMV. 1) Locate the pre-installed security locking safety screw at the bottom of each of the mounting brackets. 2) Use the Allen key (supplied) to tighten the locking safety screw. Pre-installed Security Locking Safety Screw (1 per Bracket) Do not overtighten the locking safety screws. Proceed to the “Post-Installation Adjustments” below.
LMV Post-Installation Adjustments (cont'd) Tilt Left Left Control Right Control Tilt Right Left Control Right Control Tilt Up Left Control Right Control Tilt Down (from tilted-up position) Left Control Installation Instructions Right Control Visit the Premier Mounts website at http://www.mounts.
Post-Installation Adjustments (cont'd) LMV Level Up Left Control Right Control Level Down (from leveled up position) Left Control Right Control Rotate Left Left Control Right Control Rotate Right Left Control Page 14 Right Control Visit the Premier Mounts website at http://www.mounts.
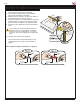
LMV flay Maintenance and Servicing 1) Push evenly in the front of the LMV to release the spring locks (Figure 1). 2) Slowly pull the front of the LMV to extend the scissor arms (Figure 2). 3) Loosen the locking safety screws on both mounting brackets. 4) Tilt up the bottom of the flat-panel, then set their kickstands against the bottom tubing of the mount (Figures 2 & 3). You can now reach behind the flat-panel for maintenance and servicing or replacement.
LMV vvvvv Technical Specifications All measurements are in inches [millimeters]. 337.90 13.303 337.90 13.303 337.90 337.90 13.303 13.303 734.03 28.899 734.03 28.899 734.03 734.03 28.899 28.899 Top View Side View 127 Open Position 5.000 Front View Page 16 495.30495.30 19.50019.500 495.30 495.30 19.500 19.500 Open Back 490.32490.32 19.30419.304 127 5.000 127 127 5.000 5.000 490.32 490.32 19.304 19.304 726.28 28.594 726.28 28.594 684.23 726.28 726.28 684.23 26.938 28.594 28.594 26.938 600 684.
LMV Warranty PREMIER MOUNTS LIMITED LIFETIME WARRANTY What and Who is Covered by this Limited Warranty and for How Long Premier Mounts warrants this product to be free from defects in material and workmanship for the lifetime of the original owner of this product. The limited warranty is valid only for the original purchaser of the product. What Premier Mounts Will Do At the sole option of Premier Mounts, Premier Mounts will repair or replace any product or product part that is defective.