
Specifications


LMV
Installation Instructions Visit the Premier Mounts website at http://www.mounts.com Page 15
ay
Maintenance and Servicing
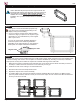
1) Push evenly in the front of the LMV to release the
spring locks (Figure 1).
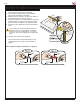
2) Slowly pull the front of the LMV to extend the scissor
arms (Figure 2).
3) Loosen the locking safety screws on both mounting
brackets.
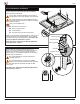
4) Tilt up the bottom of the at-panel, then set their
kickstands against the bottom tubing of the mount
(Figures 2 & 3).
You can now reach behind the at-panel for
maintenance and servicing or replacement. After
servicing, make sure the spring locks are locked
again in the mount's closed position.
Figure 3
Figure 1
Spring Lock
(one on each side
behind the bottom
mounting rail)
Figure 2