
Specifications


LMV
Page 8 Visit the Premier Mounts website at http://www.mounts.com Installation Instructions
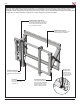
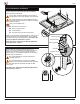
Installing OPTIONAL Model Specic Spacers
LMV’s dedicated at-panel spacers are engineered with the
knowledge that aligning each at-panel on a large wall is time
consuming and costly.These model-specic spacers are
available for most at-panels, which signicantly reduces the
installation time. (Contact Premier Mounts for model specic
spacers.)
This spacer is shown for illustration purposes only.
Your spacer may look different depending on the
display model you are installing.
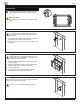
1) Once your LMV is mounted in the desired location
and is level, align your spacer to the top left or right
(depending on your install direction) corner register
tabs of your mount.
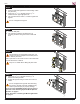
You may use commercially available hardware to
secure the spacer to the wall during installation
(depending on the wall material). You may utilize the
same spacer for multiple LMV/LMVF installations.
Step 1
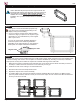
Multiple LMV mounts can be installed using one model specic spacer. Simply repeat step one when installing each
of the surrounding LMV mounts. Use one spacer for each 2x2 installation by mounting it to the wall, or utilize the
same spacer as many times needed to complete an unlimited LMV large matrix video wall.
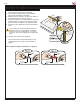
1. Make sure the spacer is plumb and level and mark each corner where the LMV will be mounted (or secure to
the wall). It is best to start from the bottom corner and work your way up.
2. Install the second mount working in a horizontal direction.
3. Ensure that the mount remains plumb and level.
4. Repeat this step for each mount horizontally
5. To install multiple rows, place spacer between previously installed LMVs on the bottom row. Make sure the
spacer is plumb and level, mark the corners (or secure to the wall) to be sure of where the LMV should be and
secure your mount to the wall.
Step 2
Register Tabs
Register Tabs
Start