CREATING POSITIVE CUSTOMER EXPERIENCES INSTALLATION INSTRUCTIONS PDS-PLUS Versatile Projector Mount Model: PDS-PLUS/PDS-PLUS-W NORTH AMERICA 3130 East Miraloma Avenue Anaheim, CA 92806 USA USA and Canada Phone: 1.800.368.9700 Fax: 1.800.832.4888 Other Locations Phone: (001).714.632.7100 Fax: (001).714.632.
PDS-PLUS/PDS-PLUS-W Contents Weight Limit...................................................................................................................................................................... 2 Warning Statements......................................................................................................................................................... 2 Installation Tools.............................................................................................................
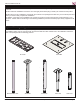
PDS-PLUS/PDS-PLUS-W Installation Tools The following tools may be required depending upon your particular installation. They are not included. M3 Security Allen Wrench (Supplied) Power Drill Pencil Phillips Tip Screwdriver Protective Eyewear 2 1 M5 Security Allen Wrench (Supplied) Ladder Masonry Drill Bit ⅛˝ Wood Drill Bit Tape Measure Parts List Make sure your Premier Mounts product has the following hardware and components before beginning installation.
PDS-PLUS/PDS-PLUS-W Features Congratulations on the purchase of your new Premier Mounts PDS-PLUS/PDS-PLUS-W Versatile Projector Mount. The PDS-PLUS works together with our exciting new PDS Base Box. The PDS-PLUS/PDS-PLUS-W has multiple mounting configurations to fit a variety of projectors. The PDS-PLUS/PDS-PLUS-W is truly the most VERSATILE projector mount on the market today.
PDS-PLUS/PDS-PLUS-W Introduction Your PDS-PLUS/PDS-PLUS-W mount may be secured to either a single ceiling stud or a solid surface ceiling, such as concrete. Please read these installation instructions once thoroughly before attempting to install your Premier Mounts product. Please take a minute to familiarize yourself with the contents of the package and make sure you have all the parts and tools you need to safely complete the installation.
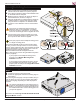
PDS-PLUS/PDS-PLUS-W Installing the PDS-PLUS/PDS-PLUS-W Unpack the PDS-PLUS/PDS-PLUS-W Mount and familiarize yourself with the components. Please take time before you install the PDS-PLUS/PDS-PLUS-W to determine the location of where the PDS-PLUS/PDS-PLUS-W will be mounted. Ceiling Installation - Pipe Step 1 After the pipe has been properly secured to the ceiling structure, thread the base box to the lower portion of the pipe.
PDS-PLUS/PDS-PLUS-W Step 1 Separate the Upper Bridge from the Base Box by removing the six (6) M6 x 12mm Phillips head screws (three on each side). M6 x 8mm Set Screw or Security Set Screw Upper Bridge Step 2 Use the appropriate slot openings for single ®® wood stud mounting, depending on your ceiling configuration. The adjustable channel slots on the upper bridge plate will allow you to fine tune the final orientation of the projector.
PDS-PLUS/PDS-PLUS-W Ceiling Installation - Solid Surface The PDS-PLUS/PDS-PLUS-W can be mounted to a ceiling with a minimum 6” thickness. Concrete wedge anchors must be used for concrete installation. It is recommended that ¼” wedge anchors be used. A concrete bit must be used to drill the pilot hole. The concrete wedge anchors and concrete drill bit are commercially available. Begin by placing the upper bridge into position against the ceiling, keeping it level.
PDS-PLUS/PDS-PLUS-W Attaching the Projector Plate Selecting the Mounting Hardware Insert a small straw or toothpick into the threaded ®® ¯¯ °° ±± inserts found on the bottom or top of the projector. Use a pencil to mark the depth of the threaded insert on the small straw or toothpick. Mark the straw or toothpick 1/8” above the depth of the threaded insert, as shown in Figure 1.
PDS-PLUS/PDS-PLUS-W Step 2 Only attach to the projector manufacturer’s specified mounting points on the projector chasis with a minimum three mounting legs. Please follow all safety instructions specified by the projector manufacturer as well as the safety instructions outlined in this manual. Depending on your application, the long mounting legs and the short mounting legs may be used together.
PDS-PLUS/PDS-PLUS-W Step 4 Identify the projector’s approximate front-to-back ®® center of gravity. Place your hands on each side of the projector and gently lift it an inch from the surface on which it is resting. Carefully adjust your grip on the projector until it seems balanced from front-to-back. Mentally note the apparent center of gravity. Identify the projector’s approximate side-to-side center of gravity.
PDS-PLUS/PDS-PLUS-W Step 7 Attach the Projector Plate (if not already attached) to each of the mounting legs by inserting and tightening one (1) M6 x 12mm screw through the Projector Plate into the M6 square nut on each of the mounting legs. Do not overtighten the M6 x 12mm screws. ®® Insert one (1) Barrel Cap into the end of each leveling barrel (except the security leveling barrel). Proceed to the “Attaching the PDS-PLUS/PDS-PLUS-W Base” section.
PDS-PLUS/PDS-PLUS-W Attaching the PDS-PLUS/PDS-PLUS-W Base Step 1 Place one (1) nylon washer and one (1) ¼″ flat washer over the hinge pin. ®® Insert and tighten one (1) M6 x 12mm screw. ¯¯ Repeat and for the opposite hinge pin. You can use either the standard hardware or LockIt™ security hardware. Replace eight (8) M6 x 12mm screws and one (1) M6 x 8mm set screw. Step 2 Raise the projector (with the mounting bracket ®® attached) and hook the projector bracket over the hinge pins.
PDS-PLUS/PDS-PLUS-W Base Box Adjustment You can adjust the roll of the projector by loosening the three (3) front and rear M6 x 12mm screws. Do not fully loosen the screws, as the mount may drop. ®® Set the desired roll and then tighten the screws. First ¯¯ °° tighten the center screws and work your way to the outside screws, making any final adjustments prior to tightening the last two screws.
PDS-PLUS/PDS-PLUS-W Technical Specifications All measurements are in inches [millimeters]. Installation Instructions Visit the Premier Mounts website at http://www.mounts.
PDS-PLUS/PDS-PLUS-W Warranty PREMIER MOUNTS LIMITED LIFETIME WARRANTY What and Who is Covered by this Limited Warranty and for How Long Premier Mounts warrants this product to be free from defects in material and workmanship for the lifetime of the original owner of this product. The limited warranty is valid only for the original purchaser of the product. What Premier Mounts Will Do At the sole option of Premier Mounts, Premier Mounts will repair or replace any product or product part that is defective.