
Specifications


PDS-PLUS/PDS-PLUS-W
Page 14 Visit the Premier Mounts website at http://www.mounts.com Installation Instructions
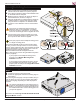
Base Box Adjustment
You can adjust the roll of the projector by loosening
the three (3) front and rear M6 x 12mm screws.
Do not fully loosen the screws, as the mount may
drop.
®
Set the desired roll and then tighten the screws. First
tighten the center screws and work your way to the
outside screws, making any nal adjustments prior to
tightening the last two screws.
¯
You can adjust the tilt of the projector by loosening
the two (2) M6 x 12mm screws on each side of the
Base Box.
°
Set the desired tilt and then tighten the screws,
making any nal adjustments prior to tightening the
last two screws.
If your projector is not holding the tilt, install the
four (4) external tooth washers on the four (4) M6 x
12mm Phillips head screws w/ Integrated Washers.
±
Once all adjustments have been made, tighten all
hardware.
Securing the PDS-PLUS/PDS-PLUS-W Projector Mount
Your PDS-PLUS/PDS-PLUS-W Projector Mount includes one (1) Security Leveling Barrel which can provide additional
theft deterrence for your projector.
Shown below are two examples of how you can use the security leveling barrel to make your projector installation more
secure: the PCB-CSL1 Security Cable (sold separately) or padlock (combination or keyed; sold separately). Follow the
instructions below to install and secure the security leveling barrel.
If you choose to install the security leveling barrel, please follow the instructions outlined below.
Determine which leveling barrel will be removed.
®
Remove the mounting screw.
¯
Remove the leveling barrel by turning the leveling barrel counter-clockwise.
°
Thread in the security leveling barrel clockwise.
±
Insert and tighten the mounting screw.
²
Attach theft deterrent device (PCB-CSL1 or padlock) through the hole that is on the security leveling barrel.
Padlock
(Combination or Keyed)
PCB-CSL1