
Specifications


PDS-PLUS/PDS-PLUS-W
Installation Instructions Visit the Premier Mounts website at http://www.mounts.com Page 9
Attaching the Projector Plate
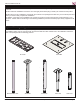
Selecting the Mounting Hardware
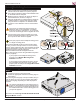
Insert a small straw or toothpick into the threaded
inserts found on the bottom or top of the projector.
®
Use a pencil to mark the depth of the threaded insert
on the small straw or toothpick.
¯
Mark the straw or toothpick 1/8” above the depth of
the threaded insert, as shown in Figure 1.
°
Insert the small straw or toothpick into the remaining
threaded inserts to compare and verify their depth
using the straw or toothpick’s 1/8” allowance mark.
±
Locate the correct diameter screw for the threaded
insert.
If the screw you selected is longer than the 1/8”
allowance mark on the small straw or toothpick,
as shown in Figure 2 and Figure 3, do not use this
screw. The screw length must not bypass the mark.
²
Test each size of the screws provided. The correct
screws should thread easily into the mounting point
and not pull out when tension is applied.
Does your projector have multiple mounting points
or a single mounting point?
The PDS-PLUS/PDS-PLUS-W comes with the option
of using Lock-It™ Security Screws. To use the security
screws, simply replace the M6 x 12mm Phillips Pan head
screws with the M6 x 12mm security screws. Once the
hardware has been changed, adjust the
PDS-PLUS/PDS-PLUS-W and tighten down the
M6 x 12mm security screws using the M5 Security Allen
wrench (supplied).
If your projector has multiple mounting points,
proceed to the “Multiple Mounting Point
Installation” section.
If your projector has a single mount point, remove
the pre-installed mounting legs on the universal
projector plate and skip to the “Single Mount Point
Installation” section.
Multiple Mounting Point Installation
Step 1
Locate the projector’s mounting points.
®
Position an appropriate number of mounting legs on
the projector.
The four long mounting legs come pre-installed, but you
can use three (3) or four (4) long mounting legs and/or
short mounting legs, depending on what the projector
requires.
The number and placement of mounting points on
projectors varies between projector manufacturers.
Refer to you projector’s technical specications for
the number and location of the mounting points on
your specic projector.
Proceed to the “Securing the PDS-PLUS/PDS-PLUS-W
Projector Mount” section.
Small Straw or Toothpick
Small Straw
or Toothpick
Small Straw
or Toothpick
Marking the 1/8”
Allowance
Depth Plus 1/8” Allowance
Mark
Depth Plus 1/8” Allowance
Mark