INSTRUCTION MANUAL PORTABLE DVD PLAYER WITH 7" TFT DISPLAY & TV RECEIVER SX-4007TVD DEAR CUSTOMER In order to achieve the best performance of your product, please read this instruction manual carefully before using, and keep it for future reference. If you need extra support, please write to info@premiermundo.
CAUTION RISK OF ELECTRIC SHOCK, DO NOT OPEN Caution: To reduce the risk of electric shock do not open this device, there are not serviceable parts for customers. Please refer any maintenance or repair to qualified personnel. This sign means the existence of dangerous voltage at the inside of the unit, which states a risk of electric shock. This sign means that there are important instructions of operation and handling in the manual that comes with this device.
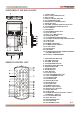
OVERVIEW OF THE DVD PLAYER: 1. TV ANT JACK 2. DISC COVER OPEN BUTTON 3. DISC COVER 4. DVD/TV & SETUP BUTTON 5. PLAY/PAUSE BUTTON 6. PREVIOUS & F_BWD BUTTON 7. AUDIO BUTTON 8. VOLUME- & NAVIGATION LEFT BUTTON 9. CH-/NAVIGATION DOWN BUTTON 10. TFT SCREEN 11. SPEAKERS 12. DVD/USB/CARD BUTTON 13. STOP BUTTON 14. NEXT & F_FWD BUTTON 15. DISPLAY BUTTON 16. CH+/NAVIGATION UP BUTTON 17. VOLUME+ & NAVIGATION RIGHT BUTTON 18. OK BUTTON 19. DC IN JACK 20. SD/MMC CARD SLOT 21. POWER ON/OFF SWITCH 22. AV OUT JACK 23.
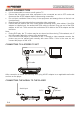
BASIC CONNECTION It is recommended to connect a multi-system TV. Ensure that this player and other equipment to be connected are set to OFF mode and disconnect the AC/DC adapter before commencing connection. y Do not block ventilation holes of any of the equipment and arrange them so that air can circulate freely. y Read through the instructions before connecting other equipment. y Ensure that you observe the color coding when connecting audio, video cables.
1. When this player is connect to the outdoor aerial, make sure that the TV programme is available from the signal tower. 2. The quality of video is depend on the signal strength. 3. When this player is connect to the outdoor aerial, in avoid that the huge buildings or obstacle would block the signal. Note: In some areas the indoor aerial terminal may different, if the terminal is not fitted to your player, a connector is available for you to connect between CATV and player.
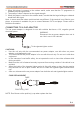
CHARGE THE BUILT-IN BATTERY The player is with a rechargeable lithium battery. Before using the battery, please make sure it is charged. If not, charge it first. Slide the power switch to OFF position and then connect one end of the supplied adapter to the wall outlet and the other end to the unit for charging the builtin battery. The charge current is 720mA, it takes about 2 hours to charge the battery fully.
STEP PLAY During playback, press STEP button to play one frame, each time the STEP button is pressed, the player will play a corresponding frame; to resume normal play, press PLAY/PAUSE button. MUTE PLAY During playback, press MUTE button to shut the audio output off. To resume the normal play, press MUTE button again.
1/16 speed. Press REPEAT 1/ALL button during playback, it will repeat play a track or all tracks, or press REPEAT A-B button to repeat play the sections between two specific points(A-B). Note: Repeat features for VCD Disc will only work in PBC off mode. Pressing AUDIO button during VCD disc play will change audio output mode. PROGRAM PLAY(UP TO 20 MEMORIES) 1. Press PROGRAM during playback to display the program menu. 2.
KODAK PICTURE CD/JPEG CD OPERATIONS 1. PLAY MODES Press REPEAT1/ALL button to change play mode. During playback, press STOP button to stop picture playback. 2. SKIP TO NEXT/PREVIOUS PICTURE Press NEXT button to skip to the next picture or PREVIOUS button to the previous picture. 3. PICTURE ROTATIONS Press RIGHT and LEFT navigation buttons to rotate the picture Clockwise and counter clockwise respectively. 4. PICTURE FLIPS Press UP NAVIGATION button to flip the picture vertically.
INITIAL SETTINGS Initial settings page is for you to make your preferred settings up for your player. Once the initial settings are done they are retained in the CPU of the player until otherwise modified. COMMON PROCEDURES FOR INITIAL SETTINGS 1. Press SETUP button. 2. Use the navigation buttons to select the item you want to modify, press OK button to confirm, setting page with further setting items displayed shows on the TV screen. Again use navigation buttons to make changes.
4. SYSTEM SETUP (DVD ONLY) Please follow the below steps to enter the System Page: First, power on the unit with the disc tray is empty or the disc door is opened, then press SETUP button and enter the System Page by pressing NAVIGATION buttons. Or during playback, press STOP button twice, and then press SETUP button to enter system setup page. 4.1 TV TYPE - it is used to select the TV mode. Please select this option as per your TV set. 4.2 AUDIO - select preferred audio language.
TROUBLESHOOTING If your DVD player does not seem to be functioning properly, check the items below before you contact an authorized service center. Symptom Check Power does not turn on or y Make sure the AC/DC adapter is securely plugged into an suddenly turns off. AC outlet. y Turn the power off and then back on. No picture or sound y Check that the A/V cables are securely connected. y Check that the disc is a DVD, DVD-RW or AUDIO CD. y Do not use a disc that has scratches or dirt.