
Installation Instructions


Starting, Lapping, and Nailing Siding
Corner Installation
Installing J-Trim
5
Once the starter strip is installed you can install the outside
corner pieces. Install a corner piece at all outside corner
locations. The outside corner piece should run form the eave
to 1/2'' past the bottom of the starter strip previously installed.
When cutting the corner pieces, you can use a 12'' snips or
a hack saw with a metal cutting blade (It is not recommended
to cut the corners with a power saw).
When trimming out inside corners, use two J-channels at a right
angle. Place a strip of tape mastic where the two J-channels
come together to seal the joint.
It’s now time to start installing your siding. At this
point it is easiest to complete one wall at a time.
Begin by locking the first piece into the bottom of
the starter strip. The siding has slats cut into the
top to let you know where the nails will go. It is best
to locate the studs on your house and only place
the nails where there is a wall stud. The siding has
a removable tape measure printed on it to help you
locate where the studs are as you work down the
wall. Remember to remove this tape as you
install the siding. If you don’t remove the tape
during installation it may be difficult to remove it
once the sun has had a chance to bake it on.
The siding pieces have been manufactured with a 1/2'' notch in each end for lapping purposes. Each piece
that you install will be lapped 1/2'' to compensate for expansion and contraction.
When nailing the siding make sure you do not put the nails in too tight as this will cause some buckling to
occur. When it comes to siding, it is better to be a little too loose than it is to be too tight.
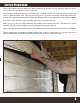
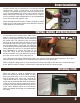
When you come to a door or window on the
house you will have to do some cutting. The first
thing you need to do is run J-trim around the
door or window. You should run J-trim on all
sides of the window. It is easy to get a good look
on the corners of the window when you notch the
J-trim so it fits nice. You may have to fur out the
window or shim depending on where the cuts are
made. Most windows have to be furred out
above and below the window to accommodate
the siding.