
Installation Instructions


Finishing Siding
7
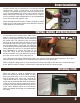
As you are installing the siding, be sure to
check periodically that the siding is level. This
can be done by placing a level on the siding.
When installing the siding on the wall make
sure to stagger the lap joints. Lap joints will be
much less noticeable if they are staggered in
different places than if they fall in the same
place. You should also run the laps away from
the view of sight. For instance, when standing
in your driveway the lap should be going away
from you. The best way to do this is to start your
siding on the corner wall furthest away from
your driveway.
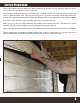
With the walls completed, you can now snap on
the outside corner cover.
The outside corner cover can run down past the
bottom of the corner if necessary. Slide one
side of the outside corner cover on the installed
outside corner base and pull it over to snap into
the other side.
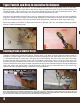
When you get to your last piece of siding you
may have to cut some of the top off in order for
it to fit into the J-channel. You may have to run
lath at the top of the wall to shim out the top of
the siding panel so it lays nicely inside the
J-channel. If this is needed, install a piece of
finish trim inside the J-channel. This is used to
lock the siding in place.
It is recommended to use a snap lock punch on
the partial piece of siding that is being installed
at the top of the wall. After you have punched
the siding piece, lock it into the installed finish trim.
Once you have completed one wall, begin
working on the next wall until you have all the
walls completed.