USER MANUAL / MANUAL DE INSTRUCCIONES 4 BURNER ELECTRIC RANGE ESTUFA ELECTRICA DE 4 QUEMADORES Model #: PRE2015GW / PRE2017GB / PRE2415GW / PRE2417GB Modelo #: PRE2015GW / PRE2017GB / PRE2415GW / PRE2417GB BEFORE USE, PLEASE READ AND FOLLOW ALL SAFETY RULES AND OPERATING INSTRUCTIONS.
TABLE OF CONTENTS Range Safety ......................................................................................................... 3 Important Safeguards ............................................................................................. 4 Anti-tip Bracket ....................................................................................................... 5 Parts and Features .................................................................................................
ELECTRIC RANGE SAFETY Your safety and the safety of others are very important. We have provided many important safety messages in this manual and on your appliance. Always read and obey all safety messages. This is the Safety Alert Symbol. This symbol alerts you to potential hazards that can kill or injure you and others. All safety messages will follow the Safety Alert Symbol and either the words “DANGER”, “WARNING” or “CAUTION”.
IMPORTANT SAFEGUARDS Before the appliance is used, it must be properly positioned and installed as described in this manual, so read the manual carefully. To reduce the risk of fire, electrical shock or injury when using the appliance, follow basic precaution, including the following: It is recommended that a separate circuit, serving only your appliance be provided. Use receptacles that cannot be turned off by a switch or pull chain.
ANTI-TIP BRACKET The range will not tip during normal use. However, the range can tip if you apply too much force or weight to the open door without the anti-tip bracket fastened down properly. To reduce the risk of tipping the appliance, the appliance must be secured by properly installed anti-tip devices packed with the appliance.
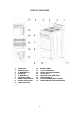
PARTS & FEATURES 1. 2. 3. 4. 5. 6. 7. 8. 9. OVEN VENT BACKSPLASH 6” BURNERS (3) COOKTOP 8” BURNER (1) CONTROL PANEL OVEN DOOR HANDLE GLASS OVEN DOOR LEVELING LEGS 10. 11. 12. 13. 14. 15. 16. 17.
IMPORTANT SAFETY INSTRUCTIONS WARNING To reduce the risk of fire, electrical shock, or injury when using the range, follow these basic precautions: Read all instructions before using the range. WARNING: TO REDUCE THE RISK OF TIPPING OF THE RANGE, THE RANGE MUST BE SECURED BY PROPERLY INSTALLED ANTI-TIP DEVICES.
Do Not Soak Removable Heating Elements – Heating elements should never be immersed in water. Do Not Cook on Broken Cook-top – If cook-top should break, cleaning solutions and spillovers may penetrate the broken cook-top and create a risk of electric shock. Contact a qualified technician immediately. Clean Cook-top With Caution – If a wet sponge or cloth is used to wipe spills on a hot cooking area, be careful to avoid steam burn.
INSTALLATION INSTRUCTIONS WARNING HAVE THIS RANGE INSTALLED BY A QUALIFIED INSTALLER. Improper installation, adjustment, alteration, or maintenance can cause injury or property damage. Consult a qualified installer, or service agency. IMPORTANT – SAVE FOR THE LOCAL ELECTRICAL INSPECTOR’S USE. BEFORE USING YOUR PREMIUM ELECTRIC RANGE Remove the exterior and interior packing.
IMPORTANT PRECAUTIONS AND RECOMMENDATIONS After having unpacked the range, check to ensure that it is not damaged, and the oven door closes correctly. In case of doubt, do not use it and consult your supplier or a professionally qualified technician. Packing elements (i.e. plastic bags, polystyrene foam, packing straps, etc.) should not be left around within easy reach of children, as these may cause serious injuries. The range has been thoroughly tested for safe and efficient operation.
INSTALLATION OF THE PREMIUM ELECTRIC RANGE Product Dimensions Model #:PRE2415GW/PRE2417GB Model #:PRE2015GW/PRE2017GB Installation Figure Model #:PRE2415GW/PRE2417GB Model #:PRE2015GW/PRE2017GB 10
The electric range must be installed by a qualified technician. Make sure you have everything necessary for correct installation. It is the installer’s responsibility to comply with installation clearances specified in the manual. Cabinet opening dimensions that are shown above must be used. Given dimensions are minimum clearances. The minimum spacings must be maintained between the appliance cooking surface and the horizontal surface above the cooking top.
ELECTRICAL CONNECTION The appliance must be properly installed and grounded by a qualified technician in accordance WARNING with the National Electrical Code ANSI/NFPA No. 70shock. (Latest and local electrical code Improper grounding can result in the risk of electrical If Edition) the power cord is damaged, have it requirements. Installation should be made by a licensed electrician. replaced by an authorized service center.
3-Wire Power Cord Installation Remove the Terminal Block Access Plate on the back of range by removing the 2 fixing screws. Assemble the strain relief in the hole on bracket. Insert the power cord through the strain relief and tighten. Allow enough slack to easily attach the cord terminals to the terminal block. Remove the 3 wire terminal nuts and washers from the terminal block. Plug the terminal holes of power cord.
ANTI-TIP BRACKET INSALLATION To reduce the risk of tipping the range by abnormal usage or improper door loading, the range must be secured by properly installing the anti-tip device packed with the appliance. Place the anti-tip bracket on the floor as shown figure. Anti-tip bracket can be installed on either right or left side. Make the locations of 2 holes of ant-tip bracket on the floor. Use a 5/16” masonry drill bit and insert plastic anchor. Secure bracket to floor using screws supplied.
OPERATING YOUR PREMIUM ELECTRIC RANGE CONTROL PANEL 1. Oven Function Selector Knob 5. Rear Right Burner Control Knob 2. Oven Thermostat Knob 6. Front Right Burner Control Knob 3. Front Left Burner Control Knob 7. Oven Power Indicator Light 4. Rear Left Burner Control Knob 8. Burners Power Indicator Light OVEN FUNCTION SELECTOR KNOB There are three functions – OVEN LIGHT, BAKE AND BROIL. To switch off the heating elements of oven turn the function selector to the setting position.
positions. The range of heat is increased by turning the knob to HI, decreased by turning the knob to LO. The solid dot in the surface unit mark shows which surface unit is activated by that knob. IMPORTANT: To switch on, always lightly press the control knob inwards then turn. COOKWARE TIPS The physical characteristics of pots and pans influence the performance of any cooking systems. Therefore, emphasis must be placed on the importance of using proper cookware.
OVEN THERMOSTAT This only sets the cooking temperature and does not switch the oven on. Rotate clockwise until the required temperature is reached (From WARM to 450°F). The power indicator light signals when the heat elements are switched or switched . Temperature Setting Table Knob Setting Temperature in °F Temperature in °C WARM 150 65 200 200 93 250 250 121 300 300 149 350 350 177 400 400 204 450 450 232 FUNCTION SELECTOR KNOB Rotate the knob clockwise to set the oven for one of the following functions.
Broil In this setting only, the upper element is switched . Heat is distributed by radiation. Use with the oven door closed and the thermostat can be set from WARM to 450°F. To broil, use the following steps: 1. Place the meat on the broil grid in broiler pan. Always use the grid so that the fat drips into the broiler pan, otherwise the juices may catch on fire. Do not broil without using the broiler pan. 2. Position the broiler pan on the second level from the top. 3.
CARE AND MAINTENANCE GENERAL INFORMATION CAUTION: Before any operation of cleaning and maintenance disconnect the appliance from the electrical supply. It is advisable to clean when the appliance is cold and especially for cleaning the enameled parts. Avoid leaving alkaline or acidic substances (lemon juice, vinegar, etc.) on the surfaces. Avoid using cleaning products with a chlorine or acidic base.
LIFT-UP COOKTOP You can access the area beneath of the cooktop for cleaning purposes by lifting the cooktop. To do: Hold the cooktop from front left and right corners of cooktop and pull it up. After lifting the cooktop high enough, set the support rod into place as shown. Leave the cooktop on the tip of support rod. Wipe with warm soapy water. Use a soapy steelwool pad on heavily soiled areas. To lower the cooktop, lift the cooktop holding from the front edge.
PROBLEMS WITH YOUR PREMIUM ELECTRIC RANGE? You can solve many common appliance problems easily, saving you the cost of a possible service call. Try the suggestions below to see if you can solve the problem before calling for service.
AVISOS DE SEGURIDAD Su seguridad y la de los demás son muy importantes. Hemos proporcionado muchos mensajes de seguridad importantes en este manual y en su equipo. Siempre lea y obedezca todos los mensajes de seguridad. Éste es el símbolo de alerta de seguridad. Este símbolo lo alerta sobre los peligros potenciales que pueden matarlo o herirlo a usted y a los demás. Todos los mensajes de seguridad seguirán el símbolo de alerta de seguridad y las palabras "PELIGRO", "ADVERTENCIA" o "PRECAUCIÓN".
MEDIDAS IMPORTANTES DE SEGURIDAD Antes de usar su artefacto, debe posicionarlo correctamente e instalarlo tal como se describe en este manual, asíque lea el manual cuidadosamente. Para reducir el riesgo de incendio, choque eléctrico o daño cuando use la cocina, siga las precauciones básicas, incluyendo las siguientes: PELIGRO Se recomienda usar un circuito separado, que sirva solamente para esta cocina. Use receptáculos que no se puedan apagar con un interruptor o cadena.
Instrucciones para electricidad a tierra – El artefacto debe ser instalado y conectado a tierra por un técnico calificado, de acuerdo con los Códigos Eléctricos Nacionales ANSI/NFPA No. 70 (última edición) y los códigos eléctricos locales establecidos. Partes de reemplazo – Solo use partes de reemplazo autorizadas cuando de mantenimiento a esta cocina. Las partes de reemplazo autorizadas se pueden conseguir en los distribuidores de partes autorizados. Contacte el centro de servicio más cercano.
PARTES Y CARACTERISTICAS 1. 2. 3. 4. 5. 6. 7. 8. 9. VENTILACIÓN DEL HORNO RESPALDAR QUEMADORES DE 6 "(3) COCINA QUEMADOR DE 8 "(1) PANEL DE CONTROL MANILLA DE LA PUERTA DEL HORNO PUERTA DE HORNO DE CRISTAL 10. 11. 12. 13. 14. 15. 16. 17.
MEDIDAS IMPORTANTES DE SEGURIDAD ADVERTENCIA Para reducir el riesgo de incendio, descarga eléctrica o lesiones al usar la cocina, siga estas precauciones básicas: • Lea todas las instrucciones antes de usar la cocina. • ADVERTENCIA: PARA REDUCIR EL RIESGO DE INCLINACIÓN DE LA COCINA, ESTA DEBE ESTAR SUJETA CON DISPOSITIVOS ANTI-INCLINACION INSTALADOS CORRECTAMENTE.
unidades de superficie adyacentes: para minimizar las quemaduras, la ignición de materiales inflamables y el derrame debido al contacto involuntario con el utensilio, el mango de un utensilio debe colocarse de manera que quede hacia adentro, y no se extiende a las unidades de superficie adyacentes. • No moje los elementos de calefacción extraíbles: los elementos de calefacción nunca deben sumergirse en agua.
INSTRUCCIONES DE INSTALACION ADVERTENCIA ESTA COCINA DEBE SER INSTALADA POR UN INSTALADOR CALIFICADO. La instalación, ajuste, alteración o mantenimiento inadecuados pueden causar lesiones o daños a la propiedad. Consulte a un instalador calificado o agencia de servicio. IMPORTANTE - GUARDE PARA EL USO DEL INSPECTOR ELÉCTRICO LOCAL. - Antes de usar su cocina eléctrica Retire el embalaje exterior e interior.
Precauciones y recomendaciones importantes Después de haber desempacado la cocina, verifique que no esté dañada y que la puerta del horno se cierre correctamente. En caso de duda, no lo use y consulte a su proveedor o un técnico calificado profesionalmente. Los elementos de embalaje (es decir, bolsas de plástico, espuma de poliestireno, cintas de embalaje, etc.) no deben dejarse al alcance de los niños, ya que pueden causar lesiones graves.
Si decide no usar la cocina por más tiempo (o decide sustituirla por un modelo más nuevo), antes de desecharla, se recomienda que deje de funcionar de manera apropiada de acuerdo con las reglamentaciones de salud y protección del medio ambiente, asegurando en particular, que todas las partes potencialmente peligrosas se vuelvan inofensivas, especialmente en relación con los niños que podrían jugar con aparatos viejos. Retire la puerta antes de desecharla para evitar que quede alguien pueda quedar atrapado.
Dimensiones de Instalación Model #:PRE2415GW/PRE2417GB Model #:PRE2015GW/PRE2017GB Esta cocina eléctrica debe ser instalada por un técnico calificado. Asegúrese de tener todo lo necesario para una instalación correcta. Es responsabilidad del instalador cumplir con las autorizaciones de instalación especificadas en el manual. Deben usarse las dimensiones de apertura del gabinete que se muestran arriba. Las dimensiones dadas son espacios mínimos.
CONEXIÓN ELECTRICA ADVERTENCIA Una conexión a tierra incorrecta puede ocasionar el riesgo de choque eléctrico. Si el cordón eléctrico se encuentra dañado, haga que un Centro de Servicio autorizado lo reemplace o o o o o o o o o El electrodoméstico debe ser propiamente instalado y conectado a tierra por un técnico calificado, de acuerdo con los Códigos Nacionales Eléctricos ANSI/NFPA No.70 (última edición) y los códigos eléctricos locales requeridos.
bloque terminal. Coloque el cordón por los agujeros del terminal. El cable a tierra o neutral del cordón eléctrico debe estar a la terminal neutral, que se encuentra en el centro del bloque terminal. Las puntas deben ser conectadas a los terminales exteriores. Coloque las arandelas y tuercas y ajústelas. Ensamble la placa de acceso del bloque Terminal.
correctamente con el soporte para evitar que la cocina se voltee, el cual viene incluido con la cocina. o Coloque el soporte para evitar que la cocina se voltee en el piso, tal como se muestra en la página 15. El soporte puede ser instalado tanto en el lado derecho como en el izquierdo. o Marque en el piso, el lugar donde coincidirán los dos agujeros del soporte. o Use un taladro de 5/16” e inserte un ancla de plástico. o Asegure el soporte al piso usando los tornillos que incluimos.
OPERANDO SU COCINA ELECTRICA PREMIUM PANEL DE CONTROL 1. 2. 3. 4. 5. 6. 7. 8.
USANDO LAS HORNILLAS Su cocina está equipada con cuatro hornillas de dos tamaños diferentes. Tres de ellas tienen 6” pulgadas y una de ellas tiene 8” pulgadas de tamaño. Los controles de estas hornillas son fácilmente operables. Simplemente presione y gire la perilla a la posición deseada. Cuando la hornilla reciba energía, la luz indicadora TOP se encenderá, no importa la temperatura que haya elegido o cuantas hornillas haya encendido a la vez.
USANDO EL HORNO Puede usar el horno para BAKE (hornear) y BROIL (asar). Por ese motivo, el horno tiene dos calentadores diferentes, los cuales son: - Calentador de BAKE 2100 W (calentador inferior) Calentador de BROIL 2000W (calentador superior) PRECAUCION: La puerta del horno se calienta mucho durante la operación. Mantenga a los niños alejados y lejos del alcance de la puerta. ADVERTENCIA: La puerta está caliente, use la manija para abrirla o cerrarla.
Bake (hornear) En esta función, solamente el calentador inferior se enciende. El calor se distribuye por convección natural. El control de temperatura puede ir desde WARM (tibio) hasta 450ºF. Mientras esté en uso, la luz indicadora está encendida. La luz indicadora se mantendrá encendida mientras que el horno está en operación. Para hornear, siga los siguientes pasos: 1. Coloque la rejilla en la posición correcta antes de encender el horno. 2. Gire la perilla de control a la posición BAKE 3.
REJILLA DEL HORNO La rejilla está diseñada con un dispositivo que permite que, cuando colocada correctamente, la rejilla parará antes de ser sacada completamente del riel del horno y no se volteará cuando saque los alimentos del horno, o los coloque. Cuando coloque recipientes en la rejilla, hálela hasta el tope en el riel. Coloque el recipiente en la rejilla y luego empuje la rejilla dentro del horno. Para sacar la rejilla del horno, hálela hacia usted, levante el frente y hálelo.
LIMPIANDO LA SUPERFICIE DE LA UNIDAD Y LOS PLATILLOS REFLECTORES Desconecte el suministro eléctrico A/C de la caja general o interruptor, verifique que la cocina esté apagada y que todas las hornillas estén apagadas y frías antes de mover nada. Luego retire todas las piezas incluyendo las hornillas y platillos reflectores.
GAVETA DE ALMACENAJE REMOVIBLE Para efectos de limpieza, puede remover la gaveta al halarlo hacia fuera hasta que ceda más, entonces levántelo. Nunca almacene ningún material inflamable en la gaveta. REEMPLAZANDO LA LUZ DEL HORNO Antes de empezar cualquier mantenimiento de las partes eléctricas, debe desconectar la cocina del suministro eléctrico. Deje que el horno y los calentadores se enfríen. Desconecte el suministro eléctrico. Retire la cubierta protectora.
La luz del horno no funciona. El horno no funciona. Los alimentos no se asan correctamente. Los alimentos no se hornean correctamente. El bombillo está suelto o está quemado. El interruptor de encender la luz del horno está roto. Puede tener un fusible quemado o el interruptor apagado. No usa la perilla de control correctamente. La perilla de control del horno no está en BROIL. La rejilla está en la posición incorrecta. El recipiente no es apropiado para asar.