
User Manual


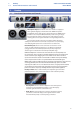


Table Of Contents
- 1 Overview
- 1.1 Introduction
- 1.2 Studio 192 and Studio 192 Mobile Hardware Features
- 1.3 UC Surface Features
- 1.4 Studio One Artist Features
- 1.5 What is in the Box
- 2 Hookup
- 2.1 Front Panel Connections and Controls
- 2.2 Back Panel Connections
- 2.3 Connection Diagrams
- 2.3.1 Studio 192
- 3.2.1 Studio 192 Mobile
- 3 Connecting to a Computer
- 3.1 Installation for Windows
- 3.2 Installation for Mac OS X
- 3.3 Using the Studio 192-series interfaces with Popular Audio Applications
- 3.4 Controlling Studio 192-Series Mic Preamps from your DAW
- 4 UC Surface Monitor Control Software
- 4.1 UC Surface Launch Window
- 4.2 UC Surface Mix Controls
- 4.2.1 Channel Controls
- 4.2.2 Channel Detail
- 4.3 Dynamics Processing and EQ
- 4.3.1 Dynamics Tab
- 4.3.2 EQ Tab
- 4.3.3 Fat Channel Presets
- 4.4 Adding Effects
- 4.4.1 Editing Effects and Effects Presets
- 4.4.2 Reverb and its Parameters
- 4.4.3 Delay and its Parameters
- 4.4.4 Reverb Effects Presets Library
- 4.4.5 Delay Effects Preset Library
- 4.4.6 Digital Effects Types
- 4.5 Main Options
- 4.6 Quick Controls: Talkback, Scenes, and More
- 4.6.1 Talkback
- 4.6.2 Quick Scenes, Mute Groups, and Scene Library
- 4.7 The Settings Page
- 4.7.1 Device Settings Tab: System Settings
- 5 Studio One Artist Quick Start
- 5.1 Installation and Authorization
- 5.2 Setting Up Studio One
- 5.2.1 Configuring Audio Devices
- 5.2.2 Configuring MIDI Devices
- 5.3 Creating a New Song
- 5.3.1 Configuring Your I/O
- 5.3.2 Creating Audio and MIDI Tracks
- 5.3.3 Recording an Audio Track
- 5.3.4 Adding Virtual Instruments and Effects
- 5.4 Monitor Mixing with Z-Mix
- 5.4.1 Z-Mix Functions
- 5.4.2 Punching In
- 6 Technical Information
- 6.1 Specifications
- 7 Warranty Information
- 7.1 How Consumer Law Relates To This Warranty

4
2 Hookup
2.1 Front Panel Connections and Controls
Studio 192 and Studio 192 Mobile
Owner’s Manual
2 Hookup
2.1 Front Panel Connections and Controls
Microphone inputs. Your Studio 192-series interface is equipped
with eight/two digitally controlled PreSonus XMAX microphone
preamplifiers for use with all types of microphones. The XMAX design
provides a Class A input buffer, followed by a dual-servo gain stage.
This arrangement results in ultra-low noise and wide gain control,
allowing you to boost signals without increasing background noise.
The six analog inputs on the rear panel of the Studio 192 feature
combo jacks. This convenient connector accepts either a ¼” phone plug
or an XLR plug. Mic Inputs 3-8 are located on the rear of the unit.
Instrument inputs. The ¼-inch TS connectors on Channels 1 and 2
are for use with instruments (guitar, bass, etc.). When an instrument
is plugged into the instrument input, the mic preamp is bypassed,
and the signal is routed to the instrument preamplifier stage.
Power User Tip: Active instruments are those that have an internal preamp or a
line-level output. Active instruments should be plugged into a line input rather than
into an instrument input. Plugging a line-level source into one of the instrument
inputs on the front of the Studio 192 and Studio 192 Mobile not only risks damage
to these inputs but also results in a very loud and often distorted audio signal.
Please note: As with any audio input device, plugging in a microphone or an instrument,
or turning phantom power on or off, will create a momentary spike in the audio
output of your Studio 192-series interface. Because of this, we highly recommend that
you turn down the channel trim before changing connections or turning phantom
power on or off. This simple step will add years to life of your audio equipment.
Preamp controls. These controls allow you to adjust the gain and enable
phantom power for every onboard microphone and instrument preamp.
• Preamp Gain: Use this control to adjust the level of microphone
preamps 1-8/2 and instrument preamps 1 and 2. The display
to the far right will show the current trim level.
• Next / Prev: Use these buttons to select the microphone preamp
you wish to control. The display to the right of the trim control
will show which preamp is currently being controlled.