Studio 2|4 24-Bit, 192 kHz USB 2.0 Audio Interface Owner’s Manual ® www.presonus.
Table of Contents 1 Overview — 1 1.1 Introduction — 1 1.2 What is in the Box — 1 1.3 Companion PreSonus Products — 2 2 Hookup — 3 2.1 Front-Panel Connections — 3 2.2 Back Panel Connections — 4 2.3 Connection Diagram — 5 3 Connecting to a Computer — 6 3.1 Installation for Windows — 6 3.1.1 Universal Control (Windows) — 6 3.1.2 Loopback Recording (Windows only) — 8 3.2 Installation for macOS — 9 3.
1 1.1 Studio 2|4 Owner’s Manual Overview Introduction 1 Overview 1.1 Introduction Thank you for purchasing a PreSonus® Studio 2|4 audio interface. PreSonus Audio Electronics, Inc., has designed the Studio 2|4 utilizing high-grade components to ensure optimum performance that will last a lifetime. Loaded with high-headroom, Class A microphone preamplifiers; robust metering, high-definition 24-bit, 192 kHz conversion; and more, the Studio 2|4 breaks new boundaries for music performance and production.
1 1.3 1.3 Overview Companion PreSonus Products Studio 2|4 Owner’s Manual Companion PreSonus Products Thanks for choosing PreSonus! As a solutions company, we believe the best way to take care of our customers (that’s you) is to ensure that you have the best possible experience from the beginning of your signal chain to the end. To achieve this goal, we’ve prioritized seamless integration throughout every design phase of these products from day one.
2 2.1 Studio 2|4 Owner’s Manual Hookup Front-Panel Connections 2 Hookup 2.1 Front-Panel Connections Microphone Inputs. Your Studio 2|4 interface is equipped with high-quality microphone preamplifiers for use with all types of microphones. The Studio 2|4 features XMAX-L solid-state microphone preamps that are optimized for bus powering. Both input channels on your Studio 2|4 interface are equipped with combo jacks. This convenient connector accepts either a ¼-inch phone plug or an XLR plug.
2 2.2 Studio 2|4 Owner’s Manual Hookup Back Panel Connections Input Gain Control. These knobs provide 50 dB of variable gain (0 to +50 dB for microphones, -15 to 35 dB for line/instrument). Mixer. The Mixer knob allows you to blend your input signals with the playback streams from your computer so that you can monitor your input signals without any latency (delay). If the knob is positioned at 12 o’clock, the input signal and the playback stream will be equally balanced.
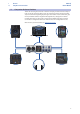
2 2.3 Studio 2|4 Owner’s Manual Hookup Connection Diagram MIDI I/O. This is the MIDI input and output connections. MIDI stands for “Musical Instrument Digital Interface.” However, MIDI can be used for many things other than instruments and sequencing. The MIDI inputs and outputs allow connection to a variety of MIDIequipped hardware, such as keyboard controllers, and can be used to send and receive MIDI Machine Control and MIDI Time Code.
3 3.1 3 Connecting to a Computer Installation for Windows Studio 2|4 Owner’s Manual Connecting to a Computer Before connecting your Studio 2|4 to a computer, please visit www. presonus.com to verify the latest system requirements. Note: The speed of your processor, amount of RAM, and capacity, size, and speed of your hard drives will greatly affect the overall performance of your recording system. A faster processor and more RAM can reduce signal latency (delay) and improve overall performance.
3 3.1 Studio 2|4 Owner’s Manual Connecting to a Computer Installation for Windows Sample Rate. Changes the sample rate. You can set the sample rate to 44.1, 48, 88.2, 96, 176.4, or 192 kHz. A higher sample rate will increase the fidelity of the recording but will increase the file size and the amount of system resources necessary to process the audio. Block Size. Sets the buffer size. From this menu, you can set the buffer size.
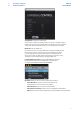
3 3.1 Studio 2|4 Owner’s Manual Connecting to a Computer Installation for Windows Settings Menu. Provide customization options to personalize your Universal Control experience. •• Always on Top. Keeps the Universal Control Launch window on top whether it is the currently active application or not. •• Run at Startup. Launches Universal Control automatically when your computer boots. •• Preferences. Sets language and appearance options (see below). •• Rescan Network.
3 3.2 Studio 2|4 Owner’s Manual Connecting to a Computer Installation for macOS When Loopback is enabled and “Dedicated Loopback Inputs” is selected, the audio from another application will be recorded on the last pair of driver inputs (3/4). Media Player Web Browser Etc. Power User Tip: When using either option, you will need to select Outputs 1 and 2 in the audio application your want to record.
3 3.3 Connecting to a Computer Using the Studio 2|4 with Popular Audio Applications Studio 2|4 Owner’s Manual Apple Logic Pro/Express 7+: 1. Launch Logic Pro/Express. 2. Go to Logic | Preferences | Audio. 3. Click on the Devices Tab. 4. On the Core Audio tab, check Enabled. 5. Select your Studio 2|4 from the device menu. 6. You will be asked if you’d like to relaunch Logic. Click “try (re)launch.” 7. Your Studio 2|4 features custom I/O labels for faster work flow.
4 4.1 Studio One Artist Quick Start Installation and Authorization 4 Studio 2|4 Owner’s Manual Studio One Artist Quick Start All PreSonus professional recording products come with Studio One Artist recording and production software. Whether you are about to record your first album or your fiftieth, Studio One Artist provides you with all of the tools necessary to capture and mix a great performance.
4 4.2 Studio One Artist Quick Start Setting Up Studio One Studio 2|4 Owner’s Manual Authorizing Studio One When Studio One is launched for the first time on your computer, it will communicate with your My PreSonus account and verify your registration. To ensure a seamless authorization process, make sure to download your installer to the computer on which you will be using it, and be sure that your computer is connected to the Internet when you launch the application for the first time.
4 4.2 Studio One Artist Quick Start Setting Up Studio One 4.2.1 Studio 2|4 Owner’s Manual Configuring Audio Devices In the middle of the Start page, you will see the Setup area. Studio One Artist automatically scans your system for all available drivers and selects a driver. By default, it will choose a PreSonus driver if one is available.
4 4.2 Studio One Artist Quick Start Setting Up Studio One Studio 2|4 Owner’s Manual Setting up an External MIDI Keyboard Controller from the Start Page A MIDI keyboard controller is a hardware device that is generally used for playing and controlling other MIDI devices, virtual instruments, and software parameters. In Studio One Artist, these devices are referred to as Keyboards, and they must be configured before they are available for use.
4 4.2 Studio 2|4 Owner’s Manual Studio One Artist Quick Start Setting Up Studio One 3. From the menu on the left, select your MIDI controller from the list of manufacturers and models. If you do not see your MIDI controller listed, select New Keyboard. At this point, you can customize the name of your keyboard by entering the manufacturer and device names. 4. You must specify which MIDI channels will be used to communicate with this keyboard. For most purposes, you should select all MIDI channels.
4 4.2 Studio One Artist Quick Start Setting Up Studio One Studio 2|4 Owner’s Manual Setting up an External MIDI Sound Module from the Start Page MIDI instrument controllers (keyboards, MIDI guitars, etc.) send musical information, in the form of MIDI data, to tone modules and virtual instruments, which respond by generating sound as instructed. Tone modules can be standalone sound devices or can be integrated into a MIDI instrument, such as a keyboard synthesizer.
4 4.3 Studio One Artist Quick Start Creating a New Song Studio 2|4 Owner’s Manual 4. In the Send To menu, select the MIDI interface output from which Studio One Artist will send MIDI data to your sound module. Click “OK” and close the External Devices window. You are now ready to start recording in Studio One Artist. The rest of this Quick Start Guide will go over how to set up a Song and will discuss some general workflow tips for navigating through the Studio One Artist environment. 4.
4 4.3 Studio One Artist Quick Start Creating a New Song Studio 2|4 Owner’s Manual 4.3.1 Configuring Your I/O 1. Click on Song | Song Setup to set your sample rate and resolution and configure your audio I/O. 2. Click on the Audio I/O Setup tab. 3. From the Inputs tab, you can enable any or all of the inputs on your PreSonus Studio 2|4 that you’d like to have available. We recommend that you create a mono input for each of the inputs on your interface.
4 4.3 Studio 2|4 Owner’s Manual Studio One Artist Quick Start Creating a New Song 4. Click on the Outputs tabs to enable any or all of the outputs on your Studio-series audio interface. In the lower right corner, you will see the Audition Select menu. This allows you to choose the output from which you will audition audio files prior to importing them into Studio One Artist. In general, you will want this to be the main output bus.
4 4.3 Studio 2|4 Owner’s Manual Studio One Artist Quick Start Creating a New Song •• Audio. Use this track type to record and playback audio files. •• Instrument. Use this track to record and playback MIDI data to control external MIDI devices or virtual instrument plug-ins. •• Automation. This track type lets you create automated parameter controls for your session. •• Folder. This track helps you to manage your session as well as to quickly edit multiple tracks at once.
4 4.3 Studio 2|4 Owner’s Manual Studio One Artist Quick Start Creating a New Song 4.3.4 Adding Virtual Instruments and Effects You can add plug-ins and instruments to your Song by dragging-and-dropping them from the browser. You can also drag an effect or group of effects from one channel to another, drag in customized effects chains, and instantly load your favorite virtual-instrument preset without ever scrolling through a menu. Opening the browser.
4 4.3 Studio One Artist Quick Start Creating a New Song Studio 2|4 Owner’s Manual Drag-and-Drop Audio and MIDI Files Audio and MIDI files can be quickly located, auditioned, and imported into your Song by dragging them from the file browser into the Arrange view. If you drag the file to an empty space, a new track will be created with that file placed at the position to which you dragged it. If you drag the file to an existing track, the file will be placed as a new part of the track.
5 5.1 Studio 2|4 Owner’s Manual Technical Information Specifications 5 Technical Information 5.1 Specifications General Sample Rates 44.1, 48, 88.2, 96, 176.4, or 192 kHz Converter Resolution 24 bit Converter Dynamic Range 108 dB Converter Dynamic Range 108 dB Microphone Inputs Maximum Level +10 dBu (balanced, min gain) Gain Range 50 dB Frequency Response 20Hz - 20kHz (+/- 0.1dB, min gain, 48kHz) Dynamic Range 106 dB (A-wtd, min gain) THD + N 0.
6 6.1 Studio 2|4 Owner’s Manual Warranty Information How Consumer Law Relates To This Warranty 6 Warranty Information PreSonus’ warranty obligations for this hardware product are limited to the terms set forth below: 6.1 How Consumer Law Relates To This Warranty THIS WARRANTY GIVES YOU SPECIFIC LEGAL RIGHTS, AND YOU MAY HAVE OTHER RIGHTS THAT VARY FROM STATE TO STATE (OR BY COUNTRY OR PROVINCE).
6 6.
6 6.1 Warranty Information How Consumer Law Relates To This Warranty Studio 2|4 Owner’s Manual How to Get Warranty Service (outside of USA) 1. You must have an active user account with PreSonus and your hardware must be on file with your account. If you do not have an account, please go to: https://my.presonus.com and complete the registration process. 2. Contact the Technical Support/Service Department for your region at www.presonus.
Dinner is Served Added bonus: PreSonus’ previously Top Secret recipe for… Red Beans and Rice Ingredients: •• •• •• •• •• •• •• •• •• •• 1 lb dried Red Kidney Beans 1 large onion (diced) 3 celery stalks (diced) 1 large green bell pepper (diced) 6-8 C vegetable stock 1 Tbs. Old Bay seasoning ½ fresh parsley 2 tsp. kosher salt 2 Tbs. olive oil 1 smoked ham hock (optional) Cooking instructions: 1. 2. Rinse red beans in cold water. In a pressure cooker, heat olive oil on medium high.
Studio 2|4 24-Bit, 192 kHz USB 2.0 Audio Interface Owner’s Manual ® 18011 Grand Bay Ct. • Baton Rouge, Louisiana 70809 USA• 1-225-216-7887 www.presonus.