
User's Manual
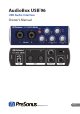


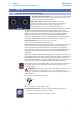
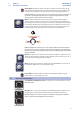
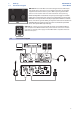
Table Of Contents
- 1 Overview
- 1.1 Introduction
- 1.2 Summary of AudioBox USB Hardware Features
- 1.3 Summary of Studio One Artist Software Features
- 1.4 What is in the Box
- 2 Hook-up
- 2.1 Front-Panel Connections and Controls
- 2.2 Rear-Panel Connections
- 2.3 Connection Diagram
- 3 Connecting to a Computer
- 3.1 Installation for Windows
- 3.1.1 Universal Control (Windows)
- 3.2 Installation for Mac OS X
- 3.3 Using the AudioBox USB96 with Popular Audio Applications
- 4 Studio One Artist Quick Start
- 4.1 Installation and Authorization
- 4.2 Setting Up Studio One
- 4.2.1 Configuring Audio Devices
- 4.2.2 Configuring MIDI Devices
- 4.3 Creating a New Song
- 4.3.1 Configuring Your Audio I/O
- 4.3.2 Creating Audio and Instrument Tracks
- 4.3.3 Recording an Audio Track
- 4.3.4 Adding Virtual Instruments and Effects
- 5 Technical Information
- 5.1 Specifications
- 6 Warranty Information
- 7.1 How Consumer Law Relates To This Warranty

Table of Contents
1 Overview — 1
1.1 Introduction — 1
1.2 Summary of AudioBox USB
Hardware Features — 1
1.3 Summary of Studio One Artist
Software Features — 1
1.4 What is in the Box — 2
2 Hook-up — 3
2.1 Front-Panel Connections and Controls — 3
2.2 Rear-Panel Connections — 4
2.3 Connection Diagram — 5
3 Connecting to a Computer — 6
3.1 Installation for Windows — 6
3.1.1 Universal Control (Windows) — 6
3.2 Installation for Mac OS X — 7
3.3 Using the AudioBox USB96
with Popular Audio Applications — 7
4 Studio One Artist Quick Start — 9
4.1 Installation and Authorization — 9
4.2 Setting Up Studio One — 10
4.2.1 Configuring Audio Devices — 11
4.2.2 Configuring MIDI Devices — 11
4.3 Creating a New Song — 15
4.3.1 Configuring Your Audio I/O — 16
4.3.2 Creating Audio
and Instrument Tracks — 17
4.3.3 Recording an Audio Track — 18
4.3.4 Adding Virtual Instruments
and Effects — 18
5 Technical Information — 21
5.1 Specifications — 21
6 Warranty Information — 22
7.1 How Consumer Law Relates
To This Warranty — 22