
User Manual


2 Getting Started
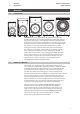
2.1 Level-Setting Procedure: AIR10, AIR12, and AIR15
AIR-Series Loudspeakers
Owner’s Manual
3
2 Getting Started
Before you begin, here are a few general rules of thumb:
• Always make sure your loudspeakers are powered off when making connections.
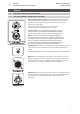
• Do not allow your inputs to clip. Watch for the LIMIT alert on
your loudspeaker’s display. This indicates that the inputs are
clipping, causing digital distortion, which sounds terrible.
Your PA and studio equipment should be powered on in the following order:
1. Sound sources (keyboards, direct boxes, microphones, etc.)
connected to your mixer
2. Mixer
3. AIR-series loudspeakers
When it’s time to power down, your system should be turned off in the reverse order.
Now that you know what not to do, let’s get some audio going! The following
level-setting tutorials cover best practices that can be applied to nearly every
application. The first tutorial covers level setting for the full-range models only;
the second tutorial describes proper level setting for a system that includes
one AIR-series subwoofer and two full-range AIR-series loudspeakers.
NOTE: Please review the AIR-series Application Guide at PreSonus.com
for complete safety information regarding flown installations.
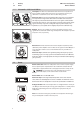
2.1 Level-Setting Procedure: AIR10, AIR12, and AIR15
1. With the power switch in the Off position, connect the IEC plug
to the IEC socket connection on the back of the loudspeaker
and plug it into a grounded AC outlet or surge protector.
2. Turn the level knobs fully counterclockwise, to the lowest position.
3. Connect your microphone or line-level source (such as a PreSonus
StudioLive® digital mixer) to either or both inputs. Both Mic and
Line level devices can be connected via XLR or 1/4” TRS.
Power User Tip: If you are running a stereo system, connect the
Left output of your mixer to the left loudspeaker’s line input, and
the Right output to the right loudspeaker’s line input.
4. Power on your line-level source.
5. Power on your AIR-series loudspeaker.
6. While speaking into a microphone or with audio playing through your line-level
source, turn the input level knob(s) until the display shows “Limit,” then turn it
down to just below that level. If you are using a microphone, be sure that you are
not standing too close to the loudspeaker, as doing so could result in feedback. If
you are not using both inputs, it is recommended that you leave the level knob
for the unused input in the fully counter-clockwise position so as not to introduce
noise into the signal path.
7. Turn the master output level control until you have
achieved a comfortable listening volume.
8. If you are using the input mixer of one loudspeaker to connect a microphone
and a line-level source, or if you are running a mono system, connect
the Mix Out from the loudspeaker to which your sources are connected
to the line input of the second loudspeaker and repeat steps 1-8.
Power User Tip: Make sure to set the line input level on both loudspeakers to unity.
This will keep the output level of both speakers the same and simplify gain staging.
-80 -60 -40 -20 0 10
DIRECT OUT
MIX OUT
M
I
C
L
I
N
E
-80 -60 -40 -20 0 10