
User Manual


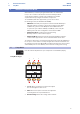

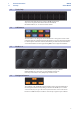
Table Of Contents
- 1 Overview
- 1.1 Introduction
- 1.2 Product Registration
- 1.3 What’s in the box
- 1.4 What’s in your MyPreSonus account
- 1.5 Companion PreSonus Products
- 1.6 Firmware Updates
- 2 Standard Controller Mode
- 2.1 Setup Mode
- 2.2 Pads
- 2.2.1 RGB Colors
- 2.2.2 Triggering Notes
- 2.2.3 Plus and Minus Pads
- 2.3 Touch Strip
- 2.4 A-H Buttons
- 2.5 Knobs 1-8
- 2.6 Navigation Buttons
- 2.7 Transport Buttons
- 2.8 Screen Controls
- 2.8.1 Instrument Mode
- 2.8.2 Song Mode
- 2.8.3 Editor Modes
- 2.8.4 User Mode
- 3 Advanced Studio One Integration
- 3.1 Controls
- 3.1.1 Pad Controllers
- 3.1.2 Touch Strip
- 3.1.3 A-H Buttons
- 3.1.4 Encoders
- 3.1.5 Navigation Buttons
- 3.1.6 Transport Buttons
- 3.1.7 Global Controls
- 3.2 Screen Controls
- 3.2.1 Instrument Mode
- 3.2.2 Song Mode
- 3.2.3 Editor Modes
- 3.2.4 User Mode
- 4 Advanced Ableton Live Integration
- 4.1 Control Functions
- 4.1.1 RGB Colors
- 4.1.2 Triggering Notes or Clips
- 4.1.3 Plus and Minus Pads
- 4.1.4 Touch Strip
- 4.1.5 A-H Buttons
- 4.1.6 Knobs 1-8
- 4.1.7 Navigation Buttons
- 4.1.8 Transport Buttons
- 4.2 Screen Controls
- 4.2.1 Instrument Mode
- 4.2.2 Song Mode
- 4.2.3 Editor Mode
- 4.2.4 User Mode
- 5 Studio One Artist Quick Start
- 5.1 Installation and Authorization
- 5.2 Setting Up Studio One
- 5.2.1 Configuring Audio Devices
- 5.2.2 Configuring MIDI Devices
- 5.3 Creating a New Song
- 5.3.1 Configuring Your Audio I/O
- 5.3.2 Creating Audio and Instrument Tracks
- 5.3.3 Recording an Audio Track
- 5.3.4 Adding Virtual Instruments and Effects

7
2 Standard Controller Mode
2.3 Touch Strip
ATOM SQ
Owner’s Manual
2.3 Touch Strip
The touch strip adds expressive control to ATOM SQ. The touch
strip can be assigned to musical functions like Pitch Bend,
Modulation Wheel, etc. See Section 2.8.4 for details.
2.4 A-H Buttons
The A-H buttons can change the current drum bank or change the current Octave
in Keyboard layout. In Keyboard layout, the A button is used as a momentary button
for Sustain (press and hold to Sustain). Alternatively, if Shift is held, the A-H buttons
send commands that can be assigned using MIDI Learn in supported software.
2.5 Knobs 1-8
The 8 main knobs can be used to control parameters in your software.
Power User Tip: These knobs have a velocity multiplier built in. The
faster they are turned, the more quickly they reach min or max.
2.6 Navigation Buttons
The Up, Down, Left, and Right navigation buttons to the left of the Shift button
will change their functions depending on which mode ATOM SQ is in. In MCU
or HUI modes, they can go to the next or previous track or control some Zoom
functions. In MIDI mode, these buttons can be freely assigned in your software.