ioStation 24c Audio Interface and Production Controller Owner’s Manual ® www.presonus.
Table of Contents 6.3 Transport Controls — 23 6.4 The Session Navigator — 24 6.5 Automation Controls — 25 1 Overview — 1 1.1 Introduction — 1 6.6 Bypass — 25 1.2 What’s in the Box? — 2 1.3 What’s in your My PreSonus Account — 3 7 Cubase / Nuendo (MCU) — 26 1.4 Firmware Updates — 3 7.1 Getting Started — 26 2 Hookup — 5 7.2 Channel Strip — 28 7.3 Transport Controls — 28 2.1 Back Panel Connections — 5 7.4 The Session Navigator — 29 2.2 Top-Panel — 6 7.
1 1.1 Overview Introduction 1 Overview 1.1 Introduction ioStation 24c Audio Interface and Production Controllers Owner’s Manual Thank you for purchasing the PreSonus® ioStation 24c audio interface and production controller.
1 1.2 Overview What’s in the Box? ioStation 24c Audio Interface and Production Controllers Owner’s Manual What’s in the Box? 1.2 Your ioStation 24c package contains the following: ioStation 24c audio interface/production controller Getting Started • Erste Schritte • Cómo empezar • Pour commencer • 开始 Go online to my.presonus. com and register your serial number.
1 1.3 1.3 Overview What’s in your My PreSonus Account ioStation 24c Audio Interface and Production Controllers Owner’s Manual What’s in your My PreSonus Account Once you register your ioStation 24c , you will be able to download the following: Studio One Artist recording software and content Universal Control (necessary for firmware updates) Visit http://my.presonus.com to register your ioStation 24c and download your software and license. 1.
1 1.4 Overview Firmware Updates ioStation 24c Audio Interface and Production Controllers Owner’s Manual Once installed, connect your ioStation 24c to your computer. Universal Control will alert you if there is new firmware available for your ioStation 24c. Clicking on the Update Firmware button will begin the update process. This process can take up to five minutes. At the end of the firmware update, you will be prompted to reboot your ioStation 24c.
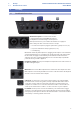
2 2.1 Hookup Back Panel Connections ioStation 24c Audio Interface and Production Controllers Owner’s Manual 2 Hookup 2.1 Back Panel Connections Mic/Ins/Line inputs Your ioStation 24c interface is equipped with high-quality XMAX microphone preamplifiers for use with all types of microphones. Both input channels on your ioStation 24c interface are equipped with combo jacks. This convenient connector accepts: • a ¼-inch line-level phone plug (for synthesizers, signal processors, etc.
2 2.2 2.2 Hookup Top-Panel ioStation 24c Audio Interface and Production Controllers Owner’s Manual Top-Panel Input Gain Controls. These knobs provide 80 dB of variable gain for Mic and Instrument; 40 dB of range for Line (-20 to +20) Clip Indicators. The red Clip LED will illuminate when your input signal reaches -0.5 dBFS. At this level, the signal will begin to overload the analog-to-digital converters and exhibit signs of clipping. Use the gain controls to keep the signal below this level. Line.
2 2.3 Hookup Connection Diagram ioStation 24c Audio Interface and Production Controllers Owner’s Manual Mix. The Mix knob allows you to blend your input signals with the playback streams from your computer so that you can monitor your input signals without any latency (delay). If the knob is positioned at 12 o’clock, the input signal and the playback stream will be equally balanced.
3 3.1 Connecting to a Computer Installation for Windows 3 ioStation 24c Audio Interface and Production Controllers Owner’s Manual Connecting to a Computer Before connecting your ioStation 24c to a computer, please visit www.presonus.com to verify the latest system requirements. Note: The speed of your processor, amount of RAM, and capacity, size, and speed of your hard drives will greatly affect the overall performance of your recording system.
3 3.1 Connecting to a Computer Installation for Windows ioStation 24c Audio Interface and Production Controllers Owner’s Manual Block Size. Sets the buffer size. From this menu, you can set the buffer size. Lowering the buffer size will lower latency; however, this will also increase performance demands on your computer. In general, you will want to set the buffer size as low as your system can safely support.
3 3.1 Connecting to a Computer Installation for Windows 3.1.2 ioStation 24c Audio Interface and Production Controllers Owner’s Manual Loopback Recording (Windows only) The Windows drivers for the ioStation 24c provides two virtual streams that allow you to record the output of one audio application in another application. Loopback can be useful in a variety of situations: • Recording the audio from a video game or YouTube video for a podcast or livestream.
3 3.2 3.2 Connecting to a Computer Installation for macOS ioStation 24c Audio Interface and Production Controllers Owner’s Manual Installation for macOS Your ioStation 24c is a class-compliant Core Audio device in macOS. No driver installation is necessary. 3.3 Using the ioStation 24c with Popular Audio Applications Complete setup instructions for Studio One Artist and a brief tutorial on its features can be found in Section 9 of this manual.
3 3.3 Connecting to a Computer UsingtheioStation24cwithPopularAudioApplications ioStation 24c Audio Interface and Production Controllers Owner’s Manual Avid Pro Tools 9+ 1. Launch Pro Tools. 2. Got to Setup | Hardware and select your ioStation 24c from the Peripherals list. Click OK. 3. Go to Setup | Playback Engine and select your ioStation 24c from the menu at the top of the window. Click OK. Cakewalk by Bandlab 1. Launch Cakewalk by Bandlab. 2. Go to Edit | Preferences 3.
4 4.1 Studio One Getting Started ioStation 24c Audio Interface and Production Controllers Owner’s Manual 4 Studio One 4.1 Getting Started Studio One By default, your ioStation 24c is configured for Studio One. No further device setup is required. If you have changed the ioStation’s Operation Mode and would like to return to using it with Studio One, press and hold the NEXT button while powering on, then press the Solo button to enable Studio One.
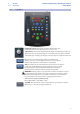
4 4.2 Studio One Channel Strip ioStation 24c Audio Interface and Production Controllers Owner’s Manual Set the Send To and Receive From fields to “ioStation 24c” Your ioStation 24c is now ready for use. 4.2 Channel Strip 1. Arm. Pressing the Arm button will allow you to arm track for recording the currently selected track in Studio One. Press with SHIFT to arm all tracks for recording. 2. Mute. Mutes the corresponding channel’s output signal. Press and hold to mute momentarily.
4 4.4 Studio One The Session Navigator ioStation 24c Audio Interface and Production Controllers Owner’s Manual 5. Fast Forward. Press and hold for continuous fast forward. 6. Record. Press to start recording at the current playbackcursor position for record-enabled tracks. 4.4 The Session Navigator The Session Navigator provides quick navigation and session controls. Each button alters the functions of the push-button encoder and the Next and Prev buttons on either side.
4 4.5 Studio One Automation Controls ioStation 24c Audio Interface and Production Controllers Owner’s Manual 6. Scroll / Zoom. Encoder controls timeline scrolling. Push the encoder to fit the timeline to the window size. Use the navigation buttons to scroll through the track list. Press SHIFT + Scroll to enable Zooming. While Zoom is active, encoder controls horizontal zooming. Navigation buttons control vertical zooming. Press the encoder to undo zooming in both directions. 7. Marker.
4 4.6 4.6 Studio One Control Link ioStation 24c Audio Interface and Production Controllers Owner’s Manual Control Link Click on the pull-down menu in the Control Link display to launch the ioStation 24c editor window. Right-click on any ioStation 24ccontrol and select “Assign Command” to customize your ioStation 24c.
5 5.1 Pro Tools (HUI) Getting Started ioStation 24c Audio Interface and Production Controllers Owner’s Manual 5 Pro Tools (HUI) 5.1 Getting Started ProTools (HUI) By default, the ioStation 24c is in Studio One operation mode. To switch to Pro Tools operation, press and hold the NEXT button while powering on your ioStation 24c, then press the Touch button to enable Pro Tools (HUI) operation.
5 5.2 5.2 Pro Tools (HUI) Channel Strip ioStation 24c Audio Interface and Production Controllers Owner’s Manual Channel Strip 1. Arm. Pressing the Arm button will allow you to arm the currently selected track for recording. Press with SHIFT to arm all tracks for recording. 2. Mute. Mutes the corresponding channel’s output signal. Press with SHIFT to clear mutes on the active bank. 4 3 2 3. Solo. Isolates the corresponding channel’s output signal in the mix.
5 5.4 5.4 Pro Tools (HUI) The Session Navigator ioStation 24c Audio Interface and Production Controllers Owner’s Manual The Session Navigator The Session Navigator provides quick navigation and session controls. Each button alters the functions of the push-button encoder and the Next and Prev buttons on either side. Pressing SHIFT + Prev will Undo the last action. Pressing SHIFT + Next will Redo the last action. 1 2 3 4 5 6 7 8 1. Link.
6 6.1 Logic (MCU) Getting Started ioStation 24c Audio Interface and Production Controllers Owner’s Manual 6 Logic (MCU) 6.1 Getting Started Logic (MCU) By default, the ioStation 24c is in Studio One operation mode. To switch to Logic operation, press and hold the NEXT button while powering on your ioStation 24c, then press the Mute button to enable Logic (MCU) operation. Once you have connected your ioStation 24c to your computer, launch Logic.
6 6.1 Logic (MCU) Getting Started ioStation 24c Audio Interface and Production Controllers Owner’s Manual 4. In the pop-up menu, go to New | Install… 5. From the list of devices, select Mackie Control. 6. Click Add. 7. Right-click on the Mackie Control in the Control Surface Setup and select Show/Hide Inspector. 8. In the Inspector, set the Input and Output ports to “ioStation 24c.” Your ioStation 24c is now ready to use.
6 6.2 6.2 Logic (MCU) Channel Strip ioStation 24c Audio Interface and Production Controllers Owner’s Manual Channel Strip 1. Arm. Pressing the Arm button will allow you to arm the currently selected track for recording. Press with SHIFT to arm all tracks for recording. 2. Mute. Mutes the corresponding channel’s output signal. Press with SHIFT for Mute Clear. 4 3 2 3. Solo. Isolates the corresponding channel’s output signal in the mix. Press with SHIFT for Solo Clear. 1 4. Bypass / Bypass All.
6 6.4 6.4 Logic (MCU) The Session Navigator ioStation 24c Audio Interface and Production Controllers Owner’s Manual The Session Navigator The Session Navigator provides quick navigation and session controls. Each button alters the functions of the push-button encoder and the Next and Prev buttons on either side. Pressing SHIFT + Prev will Undo the last action. Pressing SHIFT + Next will Redo the last action. 1 2 3 4 5 6 7 8 1. Link. Press to return to Arrangement. 2. Master.
6 6.5 6.5 Logic (MCU) Automation Controls ioStation 24c Audio Interface and Production Controllers Owner’s Manual Automation Controls 1 2 3 1. Touch / Latch. Engages Touch Automation on the currently selected track. Press the SHIFT and Touch buttons simultaneously to engage Latch Automation on the currently selected track. 2. Write / Trim. Engages Write Automation on currently selected track.
7 7.1 Cubase / Nuendo (MCU) Getting Started 7 Cubase / Nuendo (MCU) 7.1 Getting Started Cubase (MCU) ioStation 24c Audio Interface and Production Controllers Owner’s Manual By default, the ioStation 24c is in Studio One operation mode. To switch to Cubase / Nuendo operation, press and hold the NEXT button while powering on your ioStation 24c, then press the Bypass button to enable Cubase / Nuendo (MCU) operation.
7 7.1 Cubase / Nuendo (MCU) Getting Started ioStation 24c Audio Interface and Production Controllers Owner’s Manual 4. Set the MIDI Input and Output to “ioStation 24c.” 5. Click “Apply.” 6. Select MIDI Port Setup and make sure that “In All MIDI” box is unchecked and then click “OK.” 7. You will need to switch the Mackie Control device to Compatibility mode. To do this, select the Mackie Control from the Devices menu. 8. From the pop-up windows, select Cubase from the menu.
7 7.2 7.2 Cubase / Nuendo (MCU) Channel Strip ioStation 24c Audio Interface and Production Controllers Owner’s Manual Channel Strip 1. Arm. Pressing the Arm button will allow you to arm the currently selected track for recording. Press with SHIFT to arm all tracks for recording. 2. Mute. Mutes the corresponding channel’s output signal. Press and hold to mute momentarily. Press with SHIFT for Mute Clear. 4 3 2 3. Solo. Isolates the corresponding channel’s output signal in the mix.
7 7.4 7.4 Cubase / Nuendo (MCU) The Session Navigator ioStation 24c Audio Interface and Production Controllers Owner’s Manual The Session Navigator The Session Navigator provides quick navigation and session controls. Each button alters the functions of the push-button encoder and the Next and Prev buttons on either side. Pressing SHIFT + Prev will Undo the last action. Pressing SHIFT + Next will Redo the last action. 1 2 3 4 5 6 7 8 1. Link.
7 7.5 7.5 Cubase / Nuendo (MCU) Automation Controls ioStation 24c Audio Interface and Production Controllers Owner’s Manual Automation Controls 1 2 3 1. Touch / Latch. Press Touch to open the dialog prompt in Cubase to revert to the last saved version of your session. 2. Write / Trim. Engages Write Automation on the currently selected track. 3. Read / Off. Engages Read Automation on the currently selected track. Press again to turn automation off on the currently selected track.
8 8.1 Live (MCU) Getting Started ioStation 24c Audio Interface and Production Controllers Owner’s Manual 8 Live (MCU) 8.1 Getting Started Live (MCU) By default, the ioStation 24c is in Studio One operation mode. To switch to Live operation, press and hold the NEXT button while powering on your ioStation 24c, then press the Arm button to enable Live (MCU) operation.
8 8.2 8.2 Live (MCU) Channel Strip ioStation 24c Audio Interface and Production Controllers Owner’s Manual Channel Strip 1. Arm. Pressing the Arm button will allow you to arm the currently selected track. Press with SHIFT to arm the currently focused bank of tracks for recording. 2. Mute. Mutes the corresponding channel’s output signal. Press with SHIFT to clear all mutes for the currently focused bank. 4 3 2 3. Solo. Isolates the corresponding channel’s output signal in the mix.
8 8.4 8.4 Live (MCU) The Session Navigator ioStation 24c Audio Interface and Production Controllers Owner’s Manual The Session Navigator The Session Navigator provides quick navigation and session controls. Each button alters the functions of the push-button encoder and the Next and Prev buttons on either side. Pressing SHIFT + Prev will Undo the last action. Pressing SHIFT + Next will Redo the last action. 1 2 3 4 5 6 7 8 1. Link. Press to return to Arrangement. 2. Master.
8 8.5 8.5 Live (MCU) Automation Controls ioStation 24c Audio Interface and Production Controllers Owner’s Manual Automation Controls 1 2 3 1. Touch / Latch. Press to Show/Hide Browser. 2. Write / Trim. Press to toggle Clip and Device views. 3. Read / Off. Press to toggle Session and Arrangement views. 8.6 Bypass Bypass. Show/Hide detail view.
9 9.1 9 Studio One Artist Quick Start Installation and Authorization ioStation 24c Audio Interface and Production Controllers Owner’s Manual Studio One Artist Quick Start All registered ioStation 24c users receive Studio One Artist recording and production software. Whether you are about to record your first album or your fiftieth, Studio One Artist provides you with all of the tools necessary to capture and mix a great performance.
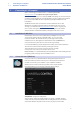
9 9.2 Studio One Artist Quick Start Setting Up Studio One ioStation 24c Audio Interface and Production Controllers Owner’s Manual Authorizing Studio One When Studio One is launched for the first time on your computer, it will communicate with your MyPreSonus account and verify your registration.
9 9.2 Studio One Artist Quick Start Setting Up Studio One 9.2.1 ioStation 24c Audio Interface and Production Controllers Owner’s Manual Configuring Audio Devices In the middle of the Start page, you will see the Setup area. Studio One Artist automatically scans your system for all available drivers and selects a driver. By default, it will choose a PreSonus driver if one is available. 1. Click on the Configure Audio Interface link to select your audio interface driver. 2.
9 9.2 Studio One Artist Quick Start Setting Up Studio One ioStation 24c Audio Interface and Production Controllers Owner’s Manual Setting up the ioStation 24c You can set up your ioStation 24c from the Setup area in the Start page. Before you begin, make sure your ioStation 24c is connected to one of your computer’s USB ports, is powered on, and set to Studio One mode. 1. Click on the Configure External Devices link in the Setup area on the Start page to launch the External Devices window. 2.
9 9.2 Studio One Artist Quick Start Setting Up Studio One ioStation 24c Audio Interface and Production Controllers Owner’s Manual In the Receive From and Send To drop-down menus, select “ioStation 24c.” 4. Click “OK.” Setting up a MIDI Keyboard controller A MIDI keyboard controller is a hardware device that is generally used for playing and controlling other MIDI devices, virtual instruments, and software parameters.
9 9.2 Studio One Artist Quick Start Setting Up Studio One ioStation 24c Audio Interface and Production Controllers Owner’s Manual 2. From the menu on the left, select your MIDI controller from the list of manufacturers and models. If you do not see your MIDI controller listed, select New Keyboard. At this point, you can customize the name of your keyboard by entering the manufacturer and device names. 3. You must specify which MIDI channels will be used to communicate with this keyboard.
9 9.2 Studio One Artist Quick Start Setting Up Studio One ioStation 24c Audio Interface and Production Controllers Owner’s Manual 1. In the External Devices window, click the Add button. 2. Select your device in the menu on the left. If your device is not listed, select New Instrument. At this point, you can customize the name of your keyboard by entering the manufacturer and device names. 3. Specify which MIDI channels will be used to communicate with this sound module.
9 9.3 9.3 Studio One Artist Quick Start Creating a New Song ioStation 24c Audio Interface and Production Controllers Owner’s Manual Creating a New Song Now that you’ve configured your audio and MIDI devices, let’s create a new Song. We’ll start by setting up your default audio I/O. 1. From the Start page, select “Create a New Song.” 2. In the New Song window, name your Song and choose the directory in which you’d like it saved. You’ll notice a list of templates on the left.
9 9.3 Studio One Artist Quick Start Creating a New Song 9.3.1 ioStation 24c Audio Interface and Production Controllers Owner’s Manual Configuring Your Audio I/O 1. Click on Song | Song Setup to set your sample rate and resolution and configure your audio I/O. 2. Click on the Audio I/O Setup tab. 3. From the Inputs tab, you can enable any or all of the inputs on your audio interface that you’d like to have available. We recommend that you create a mono input for each of the inputs on your interface.
9 9.3 Studio One Artist Quick Start Creating a New Song ioStation 24c Audio Interface and Production Controllers Owner’s Manual 4. Click on the Outputs tabs to enable any or all of the outputs on your audio interface. In the lower right corner, you will see the Audition Select menu. This allows you to choose the output from which you will audition audio files prior to importing them into Studio One Artist. In general, you will want this to be the main output bus.
9 9.3 Studio One Artist Quick Start Creating a New Song ioStation 24c Audio Interface and Production Controllers Owner’s Manual Folder. This track helps you to manage your session as well as to quickly edit multiple tracks at once. Power User Tip: If you would like to add an audio track for each of the available inputs, go to Track | Add Tracks for All Inputs.
9 9.3 Studio One Artist Quick Start Creating a New Song 9.3.4 ioStation 24c Audio Interface and Production Controllers Owner’s Manual Adding Virtual Instruments and Effects You can add plug-ins and instruments to your Song by dragging-and-dropping them from the browser. You can also drag an effect or group of effects from one channel to another, drag in customized effects chains, and instantly load your favorite virtual-instrument preset without ever scrolling through a menu.
9 9.3 Studio One Artist Quick Start Creating a New Song ioStation 24c Audio Interface and Production Controllers Owner’s Manual Drag-and-Drop Audio and MIDI Files Audio and MIDI files can be quickly located, auditioned, and imported into your Song by dragging them from the file browser into the Arrange view. If you drag the file to an empty space, a new track will be created with that file placed at the position to which you dragged it.
10 10.1 Appendix Operation Modes ioStation 24c Audio Interface and Production Controllers Owner’s Manual 10 Appendix 10.1 Operation Modes DAW Recommended Mode Ableton Live MCU (Live) Apple Logic MCU (Logic) Avid Pro Tools HUI MOTU Digital Performer MCU (Logic) PreSonus Studio One Studio One Steinberg Cubase MCU (Cubase) Steinberg Nuendo MCU (Cubase) MCU (Logic); If “ioStation 24c” is not listed as a supported device in your DAW, configure it as an Mackie Control Universal.
10 10.2 Appendix ioStation 24c MIDI Protocol 10.2.2 ioStation 24c Audio Interface and Production Controllers Owner’s Manual Fader Use MIDI pitch bend message to transmit fader moves and receive fader positions. Channel 0 is used to address the fader. Faders 10.2.3 Received E0, ll, hh Transmitted E0, ll, hh Low 7 bits ll High 7 bits hh Session Navigator Encoder Use CC messages to transmit increment and decrement values.
10 10.
Dinner is Served Added bonus: PreSonus’ previously Top Secret recipe for… Redfish Couvillion Ingredients: • • • • • • • • • • • ¼ C Vegetable oil ¼ C flour 1 onion diced 1 clove garlic minced 1 green pepper diced 3 celery stalks diced 1 14oz can diced tomatoes 1 bottle light beer 2 bay leaves 1 tsp thyme 2 lbs Redfish fillets Cooking Instructions: 1. 2. 3. 4. 5. 6. 7. In a heavy saucepan or large skillet, heat oil on medium high and slowly add flour a tablespoon at a time to create a roux.
ioStation 24c Audio Interface and Production Controller Owner’s Manual ® 18011 Grand Bay Ct. • Baton Rouge, Louisiana 70809 USA• 1-225-216-7887 www.presonus.