Monitor Station V2 Desktop Studio Control Center Owner’s Manual ® www.presonus.
Table of Contents 1 Overview — 1 1.1 Introduction — 1 1.2 Features — 2 1.3 What’s in the Box — 2 2 Getting Started — 3 2.1 Quick Start Guide — 3 2.1.1 Connecting the Monitor Station V2’s Power — 3 2.1.2 Connecting Devices to the Monitor Station V2’s Inputs — 4 2.1.3 3 Hookup — 14 3.1 The Back Panel — 14 Setting the Output Level of Your Audio Sources — 5 2.1.5 Connecting Speakers to the Monitor Station V2 — 6 2.1.6 Calibrating Your Speaker Levels — 7 2.1.7 Inputs — 14 3.1.
1 1.1 Overview Introduction 1 Overview 1.1 Introduction Monitor Station V2 Owner’s Manual Thank you for purchasing the Monitor Station V2. As with all PreSonus® products, it’s built with high-grade components to ensure optimum performance that lasts a lifetime. The Monitor Station V2 is based on the acclaimed Monitor Station, with a new ergonomic design that makes it even easier to use. It also features new input options for today’s engineers, producers, and artists.
1 1.2 Overview Features 1.2 Features Monitor Station V2 Owner’s Manual The Monitor Station V2 is outfitted with the key monitor-management features needed in a modern studio. High-quality components ensure that it doesn’t color the sound of your tracks and mixes. Its built-in Talkback mic makes communicating with your performers simple and painless.
Monitor Station V2 Owner’s Manual 2 2.1 Getting Started Quick Start Guide 2 Getting Started 2.1 Quick Start Guide The Monitor Station V2 Quick Start Guide will help get your Monitor Station V2 integrated with your system as quickly as possible. These step-by-step instructions are based on a typical studio environment; your setup will depend on your needs and applications.
2 2.1 Getting Started Quick Start Guide Monitor Station V2 Owner’s Manual 2.1.2 Connecting Devices to the Monitor Station V2’s Inputs 1. Zero the Monitor Station V2’s front-panel Main Output Level knob, the Cue Output knob, and the individual headphone Level knobs by turning them fully counterclockwise. 2. Connect your primary audio source (computer audio interface, mixer, or other stereo source) to the balanced ¼” TRS ST1 L/R inputs on the back of your Monitor Station V2. 3.
2 2.1 Getting Started Quick Start Guide Monitor Station V2 Owner’s Manual Digital audio device with S/PDIF output. Connect the source device’s S/PDIF output to the Monitor Station V2’s rear-panel RCA (coaxial) S/PDIF input. The Monitor Station V2 supports sample rates of 44.1, 48, 88.2, and 96 kHz. Note: The RCA and 1/8 analog Aux In jacks are summed and can be used at the same time. Control their volumes relative to each other using their individual output controls.
2 2.1 Monitor Station V2 Owner’s Manual Getting Started Quick Start Guide 5. Turn up the output level control of your primary audio source until the Monitor Station V2’s LED meter’s red 0 VU LED lights. Reality vs. Unity Gain: The master output fader or knob on many audio devices has a Unity Gain marking that shows the position at which the output’s level isn’t being raised or lowered and is therefore at its optimal position. This is usually marked as a “0” setting.
2 2.1 Getting Started Quick Start Guide Monitor Station V2 Owner’s Manual 2.1.6 Calibrating Your Speaker Levels Speaker calibration sets the output level of your speakers so that a specific level shown on the Monitor Station V2’s meter equals a specific acoustic level in your studio as measured in dB SPL. The meter level most typically used for calibration is 0 VU. Calibrating your speakers provides a few important benefits.
2 2.1 Getting Started Quick Start Guide Monitor Station V2 Owner’s Manual If you have multiple monitor systems connected to your Monitor Station V2, be sure to use exactly the same method for calibrating all of the systems. This will allow you to switch between them without experiencing disorienting volume changes as you compare your mixes and recordings on the different systems.
2 2.1 Getting Started Quick Start Guide Monitor Station V2 Owner’s Manual 4. On the Monitor Station V2, press the ST1 Main Source and Speaker A Speaker Select buttons so they light. Make sure no other sources or speakers are turned on. 5. In your DAW, or on your noise generator, pan the pink noise all the way to the left, since we’ll start by calibrating the left speaker. 6. Make sure your pink-noise source isn’t going through any signal processing so it’s as clean as possible. 7.
2 2.1 Getting Started Quick Start Guide Monitor Station V2 Owner’s Manual 2.1.7 Calibrate the Talkback Microphone 1. Zero the Main Output level, Talkback level, Cue output, individual headphone level, and Dim attenuation knobs by turning them fully counterclockwise. 2. Connect headphones to any one of the Phones outputs and select Cue as the source by pressing the corresponding Source button so that it latches in its down position. 3.
2 2.1 Getting Started Quick Start Guide Monitor Station V2 Owner’s Manual 2. Connect the inputs of the headphone amplifier to the Monitor Station V2’s Cue L/R Line Outputs. 3. Calibrate the device’s audio levels according to its user manual or visit its manufacturer’s Web site for information about the recommended calibration process.
2 2.2 Getting Started Basic Hookup Diagram 2.2 Basic Hookup Diagram Monitor Station V2 Owner’s Manual Here’s a typical Monitor Station V2 setup. In this example, the input sources are an audio interface, a CD player, a mobile phone, and a StudioLive AI-series mixer’s S/ PDIF digital output. Two monitoring systems for auditioning mixes are connected, along with a subwoofer. The Cue L/R outputs are connected to a headphonedistributing amplifier, and the Main L/R outputs are feeding a digital recorder.
2 2.3 Getting Started Advanced Modes 2.3 Advanced Modes Monitor Station V2 Owner’s Manual The Monitor Station V2 offers some powerful options that allow you to configure it for the way you like to work. You can set the operating mode of its: • Speaker Select buttons • Main and Cue Source buttons • LED meter Select the desired operating mode by pressing the appropriate button as you power up the Monitor Station V2.
Monitor Station V2 Owner’s Manual 3 3.1 Hookup The Back Panel 3 Hookup 3.1 The Back Panel 3.1.1 Inputs ST1 L/R: Connect the left and right channels of your primary stereo source to these balanced ¼” TRS jacks. ST2 L/R: Connect the left and right channels of your secondary stereo source to these balanced ¼” TRS jacks. S/PDIF: Connect a digital audio device with an S/PDIF output to this RCA digital input. The Monitor Station V2 supports sample rates of 44.1, 48, 88.2, and 96 kHz.
3 3.1 Monitor Station V2 Owner’s Manual Hookup The Back Panel Speaker B L/R Outputs: Connect your second poweredspeaker system to the balanced B L/R Speaker Outputs. Speaker C L/R Outputs: Connect your third powered-speaker system or subwoofer to the balanced C L/R Speaker Outputs. Speaker Output Trim A, B, and C: These trims fine-tune the levels of the speaker outputs. When possible, they should be set fully clockwise for Unity Gain. 3.1.
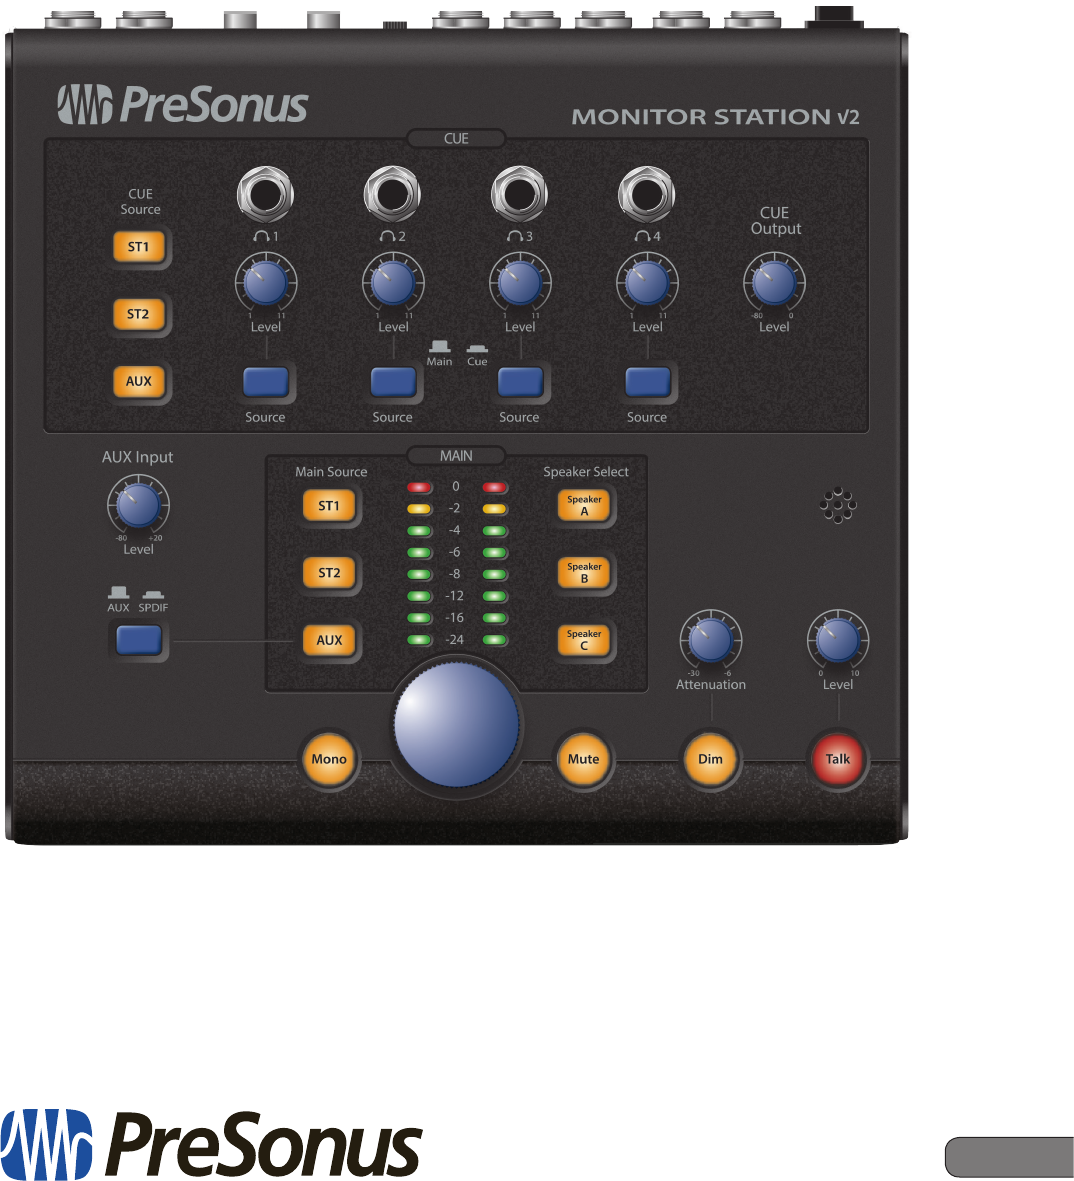
Monitor Station V2 Owner’s Manual 4 4.1 Controls The Front Panel 4 Controls 4.1 The Front Panel 4.1.1 Talkback The Monitor Station V2’s Talkback system allows you to speak through the Cue system to your performers. Talkback Microphone: The built-in electret condenser Talkback microphone is positioned just above the Talkback Level knob. Talkback Level Knob: This adjusts the gain level of the Talkback microphone preamplifier from +15 to +55 dB.
4 4.1 Monitor Station V2 Owner’s Manual Controls The Front Panel Press ST1 to select the audio input source connected to the rear-panel ST1 L/R Inputs. Press ST2 to select the audio input source connected to the rear-panel ST2 L/R Inputs. Press Aux to select the Aux or S/PDIF audio input source according to the setting of the Aux/SPDIF switch described in Section 4.1.3.
4 4.1 Monitor Station V2 Owner’s Manual Controls The Front Panel 4.1.5 Speaker Control Speaker Select Buttons: Press the Speaker A, B, or C button to turn on the corresponding monitoring system. The Speaker Select buttons provide a great way to quickly compare your mix on different sets of reference monitors by switching between them. We recommend calibrating your monitors as described in Section 2.1.
5 5.1 Resources Audio Specifications 5 Resources 5.1 Audio Specifications Monitor Station V2 Owner’s Manual Audio Inputs Internal Talkback Microphone Gain Range +15 to +55 dB Type electret condenser Sensitivity -42 dB Stereo 1 and Stereo 2 Inputs Type ¼” TRS Active Balanced Input Impedance (Balanced) 10 kΩ S/N Ratio (1 kHz @ +10 dBu, Unity Gain) >100 dB THD+N (unwtd, 1 kHz @ 0 dBu Output, Unity Gain) <0.005% Frequency Response (±0.
5 5.1 Monitor Station V2 Owner’s Manual Resources Audio Specifications Cue Cue Level Range -80 dB to 0 dB Dim Attenuation (Talkback activated) -20 dB Headphones Type ¼” TRS Active Stereo Maximum Output (60 Ω load) 150 mW / channel Frequency Response (±1.0 dB) 10 Hz to 50 kHz Power Power Supply Type External DC Transformer/Internal Line Input Connector Type Barrel, 5.5 mm outside diameter, 2.
5 5.2 Resources Frequently Asked Questions 5.2 Frequently Asked Questions Monitor Station V2 Owner’s Manual Why can’t I hear the Talkback microphone? Only headphones whose Source switch is in the Cue (down) position can hear the Talkback microphone. Why do I see levels on the LED meter but I can’t hear anything through the speakers? The LED meter measures the Monitor Station V2’s input, so seeing a level is only half the story. •• Connect and calibrate your speakers according to Section 2.1.6.
5 5.4 Resources PreSonus Limited Warranty 5.4 PreSonus Limited Warranty Monitor Station V2 Owner’s Manual PreSonus Audio Electronics, Inc., warrants this product to be free of defects in material and workmanship for a period of one year from the date of original retail purchase. This warranty is enforceable only by the original retail purchaser. To be protected by this warranty, the purchaser must complete and return the enclosed warranty card within 14 days of purchase.
Dinner is Served Added bonus: PreSonus’ previously Top Secret recipe for… Chicken and Andouille Gumbo Ingredients: •• •• •• •• •• •• •• •• •• •• •• •• •• •• •• •• 1 C All-Purpose flour ¾ C Vegetable Oil 1 large onion (diced) 1 small onion (quartered) 6 celery stalks (diced) 1 large green bell pepper (diced) 3 cloves garlic (2 minced, 1 whole) 1 lb link Andouille sausage 4 Chicken leg quarters 4 qt water 4 bay leaves 1 tsp thyme 1 tsp Old Bay seasoning 1-2 C frozen okra, sliced ¼ C fresh parsley, minced 6-
Monitor Station V2 Desktop Studio Control Center Owner’s Manual ® 18011 Grand Bay Ct. • Baton Rouge, Louisiana 70809 USA• 1-225-216-7887 www.presonus.