
User Manual


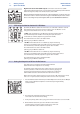

Table Of Contents
- 1 Overview
- 1.1 Introduction
- 1.2 Features
- 1.3 What’s in the Box
- 2 Getting Started
- 2.1 Quick Start Guide
- 2.1.1 Connecting the Monitor Station V2’s Power
- 2.1.2 Connecting Devices to the Monitor Station V2’s Inputs
- 2.1.3 Calibrating the Monitor Station V2’s LED Meter
- 2.1.4 Setting the Output Level of Your Audio Sources
- 2.1.5 Connecting Speakers to the Monitor Station V2
- 2.1.6 Calibrating Your Speaker Levels
- 2.1.7 Calibrate the Talkback Microphone
- 2.1.8 Connect the Cue Outputs
- 2.1.9 Connect the Main Outputs
- 2.2 Basic Hookup Diagram
- 2.3 Advanced Modes
- 2.3.1 Speaker Select Modes
- 2.3.2 Main and Cue Source Modes
- 2.3.3 Input LED Meter Modes
- 2.3.4 Reset All Modes to the Factory Default
- 3 Hookup
- 3.1 The Back Panel
- 3.1.1 Inputs
- 3.1.2 Speaker Outputs
- 3.1.3 Line Outputs
- 3.1.4 Power
- 4 Controls
- 4.1 The Front Panel
- 4.1.1 Talkback
- 4.1.2 Cue Control
- 4.1.3 Aux Control
- 4.1.4 Main Source Control
- 4.1.5 Speaker Control
- 4.1.6 Main Level Controls
- 5 Resources
- 5.1 Audio Specifications
- 5.2 Frequently Asked Questions
- 5.3 Troubleshooting
- 5.4 PreSonus Limited Warranty

2 Getting Started
2.1 Quick Start Guide
Monitor Station V2
Owner’s Manual
5
Digital audio device with S/PDIF output. Connect the source device’s S/PDIF
output to the Monitor Station V2’s rear-panel RCA (coaxial) S/PDIF input. The Monitor
Station V2 supports sample rates of 44.1, 48, 88.2, and 96 kHz.
Note:
The RCA and 1/8 analog Aux In jacks are summed and can be used at the same time.
Control their volumes relative to each other using their individual output controls. Switch
between the analog Aux inputs and digital S/PDIF inputs as described in Section 4.1.3.
2.1.3 Calibrating the Monitor Station V2’s LED Meter
By default, the Monitor Station V2’s LED meters are calibrated so that the red 0 VU
LED illuminates when the selected source signals reach +10 dBu. This can be
changed so that 0 VU references +4, +10, or +18 dBu.
+4 dBu. 0 VU should reference +4 dBu if any of your monitoring devices
has a maximum input of +4 dBu or if none of your input devices has
a maximum (or nominal) output level greater than +4 dBu.
Press and hold the Cue Source ST1 button while
powering on your Monitor Station V2.
+10 dBu. 0 VU should reference +10 dBu if any of your monitoring
devices has a maximum input of +10 dBu or if none of your input devices
has a maximum (or nominal) output level greater than +10 dBu.
Press and hold the Cue Source ST2 button while
powering on your Monitor Station V2.
+18 dBu. 0 VU should reference +18 dBu if any of your monitoring
devices has a maximum input of +18 dBu or if none of your input devices
has a maximum (or nominal) output level greater than +18 dBu.
Press and hold the Cue Source Aux button while
powering on your Monitor Station V2.
2.1.4 Setting the Output Level of Your Audio Sources
Your audio sources sound their best through the Monitor
Station V2 when their outputs are set correctly.
To optimally set the output level of an audio source, the source should
be able to produce a 1 kHz sine-wave test tone, either by playing one
back or by generating it from an internal oscillator. You can nd and
download free test tone audio les from the internet if necessary.
When using a test tone, make sure there’s no processing—EQ, compression, reverb,
and so on—in your test tone’s audio path so the tone is as clean as possible.
1. Zero the Monitor Station V2’s front-panel Main Output Level knob, the Cue Output
knob, and the individual headphone Level knobs by turning them fully
counterclockwise.
2. Turn down the outputs of the primary audio source
connected to ST1 to their lowest setting.
3. From your primary audio source, play your 1 kHz sine-wave tone at a level of 0 dB.
4. On the Monitor Station V2, press the ST1 Main Source button
so that it lights to select the primary audio source; make sure
that no other Main Source buttons are turned on.