
User Manual

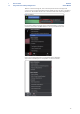
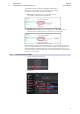

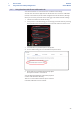
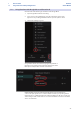
Table Of Contents
- 1 Overview
- 1.1 Introduction
- 1.2 What is in the Box
- 1.3 What is in your MyPreSonus account
- 1.3.1 Step 1: Register Revelator
- 1.3.2 Step 2: Download and Install Universal Control
- 1.3.3 Step 3: Download and Install Studio One Artist (Optional)
- 1.3.4 Step 4: Download and Install Studio Magic (Optional)
- 2 Connections and Controls
- 2.1 Basic hookup
- 2.2 Standalone controls
- 2.2.1 Setting the Microphone Level
- 2.2.2 Setting Headphone level
- 2.2.3 Setting Monitor level
- 2.2.4 Selecting Presets
- 2.2.5 Removing Revelator from its Base
- 3 Universal Control
- 3.1 The Launch Window
- 3.1.1 Launch Window Menu Items
- 3.2 Using Your Revelator with Popular Applications
- 3.2.1 Using Revelator for System Audio
- 3.2.2 Using Revelator for Skype
- 3.2.3 Using Revelator for Zoom
- 3.2.4 Using Revelator for Google Meets
- 3.2.5 Using Revelator for OBS
- 3.2.6 Using Revelator on Chromebook
- 3.2.7 Using Revelator with Zoom on Chromebook
- 3.2.8 Using Revelator with Google Meet on Chromebook
- 3.2.9 Using Revelator with iOS/iPadOS devices
- 3.2.10 Using Revelator with Android devices
- 4 Presets, Fat Channel, and Voice Effects
- 4.1 Preset Management
- 4.1.1 Changing Preset Button Slots
- 4.1.2 Storing New Presets
- 4.2 Fat Channel and Voice FX
- 4.2.1 High Pass Filter (HPF)
- 4.2.2 Gate
- 4.2.3 Compressor (Comp)
- 4.2.4 Equalizer (EQ)
- 4.2.5 Limiter
- 4.2.6 Voice FX
- 4.3 Reverb
- 5 Mixing and Loopback Audio
- 5.1 What is Loopback Audio?
- 5.2 Mixer Controls
- 5.2.1 Microphone Channel Controls
- 5.2.2 Mixer Channel Controls
- 5.2.3 Main Output Controls and Mix Selection
- 5.3 Feedback Loops are Bad
- 6 Advanced Features and Customization Tools
- 6.1 Settings Menu
- 6.2 Advanced Fat Channel and Voice Effects Controls
- 6.2.1 High Pass Filter
- 6.2.2 Noise Gate
- 6.2.3 Compressor
- 6.2.4 Changing the Signal Chain
- 6.2.5 Equalizer
- 6.2.6 Limiter
- 6.2.7 Voice FX
- 7 Studio One Artist Quick Start Guide
- 7.1 Installation and Authorization
- 7.2 Setting Up Studio One
- 7.2.1 Configuring Audio Devices
- 7.2.2 Configuring MIDI Devices
- 7.3 Creating a New Song
- 7.3.1 Configuring Your I/O
- 7.3.2 Creating Audio and Instrument Tracks
- 7.3.3 Recording an Audio Track
- 7.3.4 Adding Virtual Instruments and Effects
- 8 Resources
- 8.1 Gain Staging 101: Begin at the Beginning
- 8.2 Microphone Tips and Tricks
- 8.2.1 Handling Noise
- 8.2.2 How Close is Too Close?
- 8.2.3 Problematic Pronunciation
- 8.2.4 Putting it All Together
- 8.3 Technical Specifications

18
3 Universal Control
3.2 Using Your Revelator with Popular Applications
Revelator
Owner’s Manual
Power User Tip: When this option is selected, the sliders in Zoom will not have any effect
on the Speaker output or Microphone Input gain, as these are controlled by the Revelator
itself—either by the on-board controls and/or through the Universal Control software.
Mac users will see that the sliders do not move and will snap back to the zero position
indicating that these controls in Zoom are disabled.
3. Scroll down and click on Advanced.
4. In Zoom’s Advanced Audio settings menu, please populate the
checkboxes and the drop-down menu with the settings shown below.