
User Manual
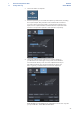


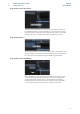

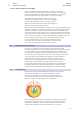


Table Of Contents
- 1 Overview
- 1.1 Introduction
- 1.2 What is in the Box
- 1.3 What is in your MyPreSonus account
- 1.3.1 Step 1: Register Revelator
- 1.3.2 Step 2: Download and Install Universal Control
- 1.3.3 Step 3: Download and Install Studio One Artist (Optional)
- 1.3.4 Step 4: Download and Install Studio Magic (Optional)
- 2 Connections and Controls
- 2.1 Basic hookup
- 2.2 Standalone controls
- 2.2.1 Setting the Microphone Level
- 2.2.2 Setting Headphone level
- 2.2.3 Setting Monitor level
- 2.2.4 Selecting Presets
- 2.2.5 Removing Revelator from its Base
- 3 Universal Control
- 3.1 The Launch Window
- 3.1.1 Launch Window Menu Items
- 3.2 Using Your Revelator with Popular Applications
- 3.2.1 Using Revelator for System Audio
- 3.2.2 Using Revelator for Skype
- 3.2.3 Using Revelator for Zoom
- 3.2.4 Using Revelator for Google Meets
- 3.2.5 Using Revelator for OBS
- 3.2.6 Using Revelator on Chromebook
- 3.2.7 Using Revelator with Zoom on Chromebook
- 3.2.8 Using Revelator with Google Meet on Chromebook
- 3.2.9 Using Revelator with iOS/iPadOS devices
- 3.2.10 Using Revelator with Android devices
- 4 Presets, Fat Channel, and Voice Effects
- 4.1 Preset Management
- 4.1.1 Changing Preset Button Slots
- 4.1.2 Storing New Presets
- 4.2 Fat Channel and Voice FX
- 4.2.1 High Pass Filter (HPF)
- 4.2.2 Gate
- 4.2.3 Compressor (Comp)
- 4.2.4 Equalizer (EQ)
- 4.2.5 Limiter
- 4.2.6 Voice FX
- 4.3 Reverb
- 5 Mixing and Loopback Audio
- 5.1 What is Loopback Audio?
- 5.2 Mixer Controls
- 5.2.1 Microphone Channel Controls
- 5.2.2 Mixer Channel Controls
- 5.2.3 Main Output Controls and Mix Selection
- 5.3 Feedback Loops are Bad
- 6 Advanced Features and Customization Tools
- 6.1 Settings Menu
- 6.2 Advanced Fat Channel and Voice Effects Controls
- 6.2.1 High Pass Filter
- 6.2.2 Noise Gate
- 6.2.3 Compressor
- 6.2.4 Changing the Signal Chain
- 6.2.5 Equalizer
- 6.2.6 Limiter
- 6.2.7 Voice FX
- 7 Studio One Artist Quick Start Guide
- 7.1 Installation and Authorization
- 7.2 Setting Up Studio One
- 7.2.1 Configuring Audio Devices
- 7.2.2 Configuring MIDI Devices
- 7.3 Creating a New Song
- 7.3.1 Configuring Your I/O
- 7.3.2 Creating Audio and Instrument Tracks
- 7.3.3 Recording an Audio Track
- 7.3.4 Adding Virtual Instruments and Effects
- 8 Resources
- 8.1 Gain Staging 101: Begin at the Beginning
- 8.2 Microphone Tips and Tricks
- 8.2.1 Handling Noise
- 8.2.2 How Close is Too Close?
- 8.2.3 Problematic Pronunciation
- 8.2.4 Putting it All Together
- 8.3 Technical Specifications

59
7 Studio One Artist Quick Start Guide
7.3 Creating a New Song
Revelator
Owner’s Manual
7.3.2 Creating Audio and Instrument Tracks
1. In the upper left corner of the Arrange window, you will notice
several buttons. The button furthest to the right is the Add Tracks
button. Click on this button to open the Add Tracks window.
2. In the Add Tracks window, you can customize the track name and
color, add a preset rack of effects, and set the physical source for
the input and output of your audio tracks. Most important, you
can select the number and type of tracks you’d like to create.
• Audio. Use this track type to record and playback audio files.
• Instrument. Use this track to record and playback MIDI data to
control external MIDI devices or virtual instrument plug-ins.
• Automation. This track type lets you create automated
parameter controls for your session.
• Folder. This track helps you to manage your session as
well as to quickly edit multiple tracks at once.
Power User Tip: If you would like to add an audio track for each of the available inputs,
go to Track | Add Tracks for All Inputs.
Mute
Custom
Track
Color
ST/Mono
Audio Input
Source Select
Solo
Rec
Arm
Monitor
Track
Name
Meter
Note: Instrument tracks are nearly identical to audio tracks. The Input Source list for
Instrument tracks lists available external MIDI devices as well as any virtual instruments
that have been added to the Song.