
User Manual
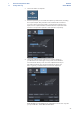


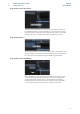


Table Of Contents
- 1 Overview
- 1.1 Introduction
- 1.2 What is in the Box
- 1.3 What is in your MyPreSonus account
- 1.3.1 Step 1: Register Revelator
- 1.3.2 Step 2: Download and Install Universal Control
- 1.3.3 Step 3: Download and Install Studio One Artist (Optional)
- 1.3.4 Step 4: Download and Install Studio Magic (Optional)
- 2 Connections and Controls
- 2.1 Basic hookup
- 2.2 Standalone controls
- 2.2.1 Setting the Microphone Level
- 2.2.2 Setting Headphone level
- 2.2.3 Setting Monitor level
- 2.2.4 Selecting Presets
- 2.2.5 Removing Revelator from its Base
- 3 Universal Control
- 3.1 The Launch Window
- 3.1.1 Launch Window Menu Items
- 3.2 Using Your Revelator with Popular Applications
- 3.2.1 Using Revelator for System Audio
- 3.2.2 Using Revelator for Skype
- 3.2.3 Using Revelator for Zoom
- 3.2.4 Using Revelator for Google Meets
- 3.2.5 Using Revelator for OBS
- 3.2.6 Using Revelator on Chromebook
- 3.2.7 Using Revelator with Zoom on Chromebook
- 3.2.8 Using Revelator with Google Meet on Chromebook
- 3.2.9 Using Revelator with iOS/iPadOS devices
- 3.2.10 Using Revelator with Android devices
- 4 Presets, Fat Channel, and Voice Effects
- 4.1 Preset Management
- 4.1.1 Changing Preset Button Slots
- 4.1.2 Storing New Presets
- 4.2 Fat Channel and Voice FX
- 4.2.1 High Pass Filter (HPF)
- 4.2.2 Gate
- 4.2.3 Compressor (Comp)
- 4.2.4 Equalizer (EQ)
- 4.2.5 Limiter
- 4.2.6 Voice FX
- 4.3 Reverb
- 5 Mixing and Loopback Audio
- 5.1 What is Loopback Audio?
- 5.2 Mixer Controls
- 5.2.1 Microphone Channel Controls
- 5.2.2 Mixer Channel Controls
- 5.2.3 Main Output Controls and Mix Selection
- 5.3 Feedback Loops are Bad
- 6 Advanced Features and Customization Tools
- 6.1 Settings Menu
- 6.2 Advanced Fat Channel and Voice Effects Controls
- 6.2.1 High Pass Filter
- 6.2.2 Noise Gate
- 6.2.3 Compressor
- 6.2.4 Changing the Signal Chain
- 6.2.5 Equalizer
- 6.2.6 Limiter
- 6.2.7 Voice FX
- 7 Studio One Artist Quick Start Guide
- 7.1 Installation and Authorization
- 7.2 Setting Up Studio One
- 7.2.1 Configuring Audio Devices
- 7.2.2 Configuring MIDI Devices
- 7.3 Creating a New Song
- 7.3.1 Configuring Your I/O
- 7.3.2 Creating Audio and Instrument Tracks
- 7.3.3 Recording an Audio Track
- 7.3.4 Adding Virtual Instruments and Effects
- 8 Resources
- 8.1 Gain Staging 101: Begin at the Beginning
- 8.2 Microphone Tips and Tricks
- 8.2.1 Handling Noise
- 8.2.2 How Close is Too Close?
- 8.2.3 Problematic Pronunciation
- 8.2.4 Putting it All Together
- 8.3 Technical Specifications

62
8 Resources
8.1 Gain Staging 101: Begin at the Beginning
Revelator
Owner’s Manual
8 Resources
8.1 Gain Staging 101: Begin at the Beginning
It may seem counterintuitive to boost the signal closest to its source and cut it
later in the signal path if it is too loud, but this is precisely the best way to get
a noise- and feedback-free recording. That said, you don’t want to gain it up
too much at the beginning either. If you find that you must cut the signal at
every component that sits after the input-trim stage to avoid distortion, you’ve
probably set the trim too high. Then, and only then, should you gain it down.
Step 1: Setting the Microphone Gain
First, press and hold the Monitor button on your Revelator until it lights green.
Turn the Volume knob for your Revelator clockwise while speaking into the
microphone. Watching for the signal/clip indicator to turn red, then back it down
until the indicator is green only. When you’ve stopped speaking the knob will go
dark.
Step 2: Setting the EQ and Dynamics
After you have set the input gain, you can use your channel EQ to
sculpt your source. The more bands your EQ offers, the more control
you will have, but you’ll also add more potential for improper gain
staging, so use with caution. This is also true with compression.
To set the EQ, you will need to adjust both the channel and the
main faders to 0.0 dB. (AKA “unity.”) This is just for the purposes of
dialing in the sound you want. You’ll dial in the mix next.
Often, when people are new to using an equalizer, they listen for what
is missing from their source signal and try to boost it in. But that’s
not always the best solution. Sometimes removing the frequencies
that are drowning out the ones you want works best.
Dynamics processors can be difficult to work with at first, because they both reduce
gain and amplify it. Let’s take a look at a compressor for a moment. A compressor
works by lowering the dynamic range—and by extension, the gain—of a signal,
but it also gives you a make-up gain control that allows you to get some of that
back. If you apply a lot of gain reduction to a signal, then boost it too far with the
make-up gain, your sound can get very unwieldy very fast. As with an EQ, only
compress a signal as much as you need to (unless you’re using it for a creative
effect), and only gain it back up as far as you have to for it to cut through your mix.
Monitor
HOLD
Volume
(push to mute)