Sceptre™ S6 / S8 CoActual™ Active Studio Monitors Owner’s Manual ® www.presonus.
Sceptre™ S6 and S8 Owner’s Manual Table of Contents 1.0 Overview — 1 2.2 Hookup Diagrams — 5 1.1 Introduction — 1 2.2.1 Basic Setup — 5 1.2 Summary of Sceptre S6/S8 Features — 2 2.2.2 Advanced Setup with Speaker Switching — 6 1.3 What is in the Box — 2 3 Tutorials — 7 3.1 Monitor Placement — 7 3.2 Connections — 8 3.3 Input Level Setting — 8 3.4 Equalizer Setting Suggestions — 9 3.5 Acoustic Space Setting Suggestions — 10 4 Resources — 11 4.
1.0 1.1 Sceptre™ S6 and S8 Owner’s Manual Overview Introduction 1.0 Overview 1.1 Introduction Thank you for purchasing the PreSonus® Sceptre™ S6/S8 CoActual™ active studio monitor. PreSonus Audio Electronics has designed the S6 and S8 utilizing highgrade components to ensure optimum performance that will last a lifetime.
1.0 1.2 Overview Summary of Sceptre S6/S8 Features 1.
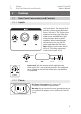
2 2.1 Sceptre™ S6 and S8 Owner’s Manual Hookup Rear Panel Connections and Controls 2 Hookup 2.1 Rear Panel Connections and Controls 2.1.1 Inputs Line-level Inputs. The Sceptre S6/S8 provides a choice of two balanced inputs: XLR and ¼” TRS. These inputs accept a line-level signal from your audio source and feed that signal to the monitor’s built-in power amplifiers. When both balanced connections are in use, the TRS input supersedes the XLR input.
2 2.1 Hookup Rear Panel Connections and Controls Sceptre™ S6 and S8 Owner’s Manual Power Switch: This is the On/Off switch. The power status is indicated by an LED on the front of the cabinet. Note: The input-power voltage is set internally at the factory to correspond with the country to which your Sceptre monitor was shipped. Do not use your Sceptre monitor in a country that uses a different standard voltage than is used in the country where you purchased your Sceptre S6 or S8. 2.1.
2.2 2.2.1 Hookup Diagrams Basic Setup Sceptre™ S6 and S8 Owner’s Manual Hookup Diagrams 2.2 2.2.
2.2 2.2.2 Sceptre™ S6 and S8 Owner’s Manual Hookup Diagrams Advanced Setup with Speaker Switching 2.2.
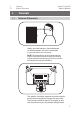
3 3.1 Sceptre™ S6 and S8 Owner’s Manual Tutorials Monitor Placement 3 Tutorials 3.1 Monitor Placement Ideally, near-field monitors should be placed so that the tweeters are at the same height as your ears when you are mixing. NOTE: The unique design of the Sceptre monitors requires that they be placed vertically. Positioning Sceptre monitors horizontally will result in incorrect horn dispersion and reduced fidelity.
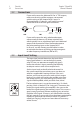
3 3.2 Sceptre™ S6 and S8 Owner’s Manual Tutorials Connections 3.2 Connections If your audio source has balanced XLR or ¼” TRS outputs, make sure the wiring of those outputs corresponds with the wiring of the Sceptre S6/S8’s inputs as illustrated below. If it doesn’t, you’ll need “crossover” cables that reverse the two signal conductors.
3 3.4 Tutorials Equalizer Setting Suggestions Sceptre™ S6 and S8 Owner’s Manual If setting the input gain to Unity is unsatisfactory, you can try different settings, but remember that it’s better to avoid settings above U if possible. PreSonus included these settings in case nothing else will work but any noise in the signal will be amplified if the control is set higher than U.
3 3.5 Tutorials Acoustic Space Setting Suggestions Sceptre™ S6 and S8 Owner’s Manual The HP Filter control rolls off the low frequencies below the specified frequency (60, 80, or 100 Hz) at a slope of -24 dB/ octave. Engage this control if you are using a subwoofer in conjunction with the Sceptre S6/S8 monitors, and set it to the same frequency as the crossover to the subwoofer. If you’re not using a subwoofer, set the control to Linear. 3.
4 4.1 Resources Technical Specifications 4 Resources 4.1 Technical Specifications Sceptre™ S6 and S8 Owner’s Manual INPUTS (S6 and S8) 1- Balanced XLR 1- Balanced ¼” TRS PERFORMANCE Frequency Response (-3 dB) S6 S8 52 Hz – 20 kHz 46 Hz – 20 kHz Frequency Response (-10 dB) S6 S8 42 Hz – 23 kHz 38 Hz – 23 kHz Crossover Frequency S6 S8 2.2 kHz 2.
4 4.1 Resources Technical Specifications Sceptre™ S6 and S8 Owner’s Manual Input Impedance S6 S8 10 kΩ 10 kΩ USER CONTROLS Volume Range S6 and S8 A-type taper HF Control S6 and S8 Linear,+1, -1.5, -4 dB Low Cut S6 and S8 Linear, 60, 80 Hz, 100 Hz Acoustic Space S6 and S8 Linear, -1.
4 4.1 Sceptre™ S6 and S8 Owner’s Manual Resources Troubleshooting 4.1 Troubleshooting No power. First ensure that your Sceptre S6/S8 is plugged in. If it’s connected to a power conditioner, verify that the power conditioner is turned on and functioning. If so, yet there is still no power to the monitor, contact PreSonus for a repair. No audio.
4 4.2. Resources PreSonus Limited Warranty Sceptre™ S6 and S8 Owner’s Manual distributor for your region for warranty repairs. All inquiries must be accompanied by a description of the problem. All authorized returns must be sent to the PreSonus repair facility postage prepaid, insured, and properly packaged. PreSonus reserves the right to update any unit returned for repair. PreSonus reserves the right to change or improve the design of the product at any time without prior notice.
4 4.2. Resources PreSonus Limited Warranty ™ Sceptre Dinner S6is and Served S8 Owner’s Manual Added bonus: PreSonus’ previously Top Secret recipe for… Rice Dressing Ingredients: •• •• •• •• •• •• •• •• •• •• •• •• 1lb ground beef 1 lb chopped chicken liver 1 onion (diced) 2 green peppers (diced) 4-6 celery stalks (diced) 2 garlic cloves (minced) ¼ C. chopped fresh parsley 3 C. chicken stock 6 C. cooked rice 1 Tbs. oil Salt and pepper to taste Cayenne pepper to taste Cooking Instructions: 1. 2. 3.
Sceptre™ S6 / S8 CoActual™ Active Studio Monitors Owner’s Manual 7257 Florida Boulevard • Baton Rouge, ® Louisiana 70806 USA • 1-225-216-7887 www.presonus.