
User Manual


3 Tutorials
3.2 Connections
Sceptre
™
S6 and S8
Owner’s Manual
8
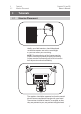
3.2 Connections
If your audio source has balanced XLR or ¼” TRS outputs,
make sure the wiring of those outputs corresponds
with the wiring of the Sceptre S6/S8’s inputs as
illustrated below. If it doesn’t, you’ll need “crossover”
cables that reverse the two signal conductors.
If your audio source has only unbalanced outputs,
connect each of them to a DI (direct-injection) box,
which typically has an unbalanced input and a balanced
output, and connect the DI box’s balanced output to
the corresponding input on the Sceptre S6/S8.
In all cases, use the shortest possible cables in order
to minimize the chance of picking up electromagnetic
or radio-frequency interference (EMI or RFI).
3.3 Input Level Setting
The Input Level control determines the level of the
input signal before it is sent to the built-in power
amp. This lets you attenuate or amplify the signal’s
level at the monitor’s input, providing the flexibility
to adapt to various audio source output levels.
Set the Input Level so that all other level controls in
the system needn’t be turned way up or way down to
achieve a comfortable listening volume. If you set it
too low, you’ll have to crank your audio source’s output
level way up, which will increase the audible noise from
the source signal. If you set it too high, any noise in the
signal will be amplified, which you don’t want, either!
The best place to start is to set the control at its 12 o’clock
position, which is labeled “U” for “unity gain.” That means the
level of the signal reaching the amplifier is the same as the
level of the signal entering the monitor’s input. This ensures a
good, strong signal level without amplifying any noise that
might be in the signal. Of course, you should make sure that
the gain controls in your audio source have been optimized for
maximum signal level and minimum noise. This process is
called “gain staging,” and you can learn about it from many
online sources.
Sleeve:
Ground
Ring:
[-]
Tip:
[+]
12
3
Ground
XLR TRS
[-]
[+]