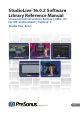
StudioLive™ 16.0.2 Software Library Reference Manual Universal Control with UC Surface | QMix™-UC for iOS® and Android™ | Capture™ 2 Studio One® Artist Studio One Artist UC Surface Capture Universal Control QMix-UC ® www.presonus.
Table of Contents 1 Overview — 1 1.1 Introduction — 1 1.2 About This Manual — 1 1.3 Technical Support — 2 1.4 Summary StudioLive Software Library Features — 2 1.4.1 UC Surface — 2 1.4.2 QMix™ UC for iPhone®, iPod touch®, and Android devices — 2 5 UC Surface Mix Control Software — 16 5.1 UC Surface Mix Controls — 16 5.1.1 5.2 Channel Controls — 18 Fat Channel Controls — 19 5.2.1 Input Controls — 19 5.2.2 Mix Detail — 20 5.2.3 Noise Gate — 20 5.2.4 Compressor — 21 1.4.
7 Capture — 39 8 Studio One Artist Quick Start — 68 7.1 Installation Instructions — 39 8.1 Installation and Authorization — 68 7.1.1 macOS — 39 8.2 Setting Up Studio One — 69 7.1.2 Windows — 40 7.2 7.3 Start Page — 41 8.2.2 Configuring MIDI Devices — 71 Tagging and Organizing a Session — 41 7.2.2 Creating a Session — 42 8.3.1 Configuring Your I/O — 75 7.2.3 Open a Session — 43 8.3.2 Creating Audio and MIDI Tracks — 77 7.2.4 Audio Device and Sample Rate — 44 8.3.
1 1.1 StudioLive™ Software Library Reference Manual Overview Introduction 1 Overview 1.1 Introduction Studio One Artist UC Surface Capture Universal Control QMix-UC The StudioLive™ 16.0.2 USB mixer comes with a powerful software library that includes Capture™ and Studio One® Artist. In addition, PreSonus UC Surface editor/librarian/remote-control software for macOS® and Windows® is a free download from the PreSonus.
1 1.2 StudioLive™ Software Library Reference Manual Overview About This Manual 1.2 About This Manual We suggest that you use this manual to familiarize yourself with the features and correct connection procedures for your StudioLive 16.0.2 USB Software Library before trying to connect your StudioLive to your computer, iPad, or mobile device. This will help you avoid problems during installation and setup. Throughout this manual you will find Power User Tips.
1 1.4 Overview Summary StudioLive Software Library Features 1.4.2 StudioLive™ Software Library Reference Manual QMix™ UC for iPhone®, iPod touch®, and Android devices QMix-UC provides performers with wireless control over their monitor (aux) mixes onstage and in the recording studio from their mobile devices. 1.4.3 •• Provides wireless control over StudioLive 16.0.2 USB mixers connected to UC Surface for macOS or Windows. •• Remote-control aux mixes on any StudioLive on the same network.
1 1.4 Overview Summary StudioLive Software Library Features 1.4.4 StudioLive™ Software Library Reference Manual Studio One Artist All PreSonus audio interfaces include PreSonus Studio One Artist recording software, which comes with over 6 GB of plug-ins, loops, and samples, giving you everything you need for music recording and production. The Studio One Artist Quick Start Guide is located in Section 8 of this manual. You will find a complete user manual inside the Studio One Artist Help menu.
2 2.1 2 Connecting to a Computer Installation for Windows StudioLive™ Software Library Reference Manual Connecting to a Computer The Universal Control installer includes the ASIO/WDM (Windows) and Core Audio (macOS) drivers for StudioLive mixers, as well as the UC Surface application. We made this installer as simple and easy to follow as possible, and it will take you through each step of the installation process.
2 2.2 2.2 Connecting to a Computer Installation for macOS StudioLive™ Software Library Reference Manual Installation for macOS The UC Surface installer will take you through each step of the installation process. Please read each message carefully, and be especially careful that you do not connect your StudioLive too soon. 1. After launching the installer, you will be directed to the Welcome screen. Click “Continue” and follow the onscreen instructions. 2.
2 2.4 2.4 Connecting to a Computer Using the StudioLive with Popular Audio Applications StudioLive™ Software Library Reference Manual Using the StudioLive with Popular Audio Applications Below are basic driver-setup instructions for several popular audio applications. Complete setup instructions for PreSonus Studio One Artist and a brief tutorial on its features are located in Section 8 of this manual.
2 2.5 Connecting to a Computer Digital Sends and Returns StudioLive™ Software Library Reference Manual Avid Pro Tools 9+ 1. Launch Pro Tools. 2. Got to Setup | Hardware and select StudioLive 16.0.2 USB from the Peripherals list. Click OK. 3. Go to Setup | Playback Engine and select StudioLive 16.0.2 USB from the menu at the top of the window. Click OK. Cakewalk Sonar 6+ 1. Launch Sonar. 2. Go to Options | Audio... and click on the Advanced tab. 3. Change the Driver Mode to “ASIO.” 4.
2 2.6 Connecting to a Computer Using Plug-In Effects as Inserts 2.5.2 StudioLive™ Software Library Reference Manual Digital Returns Each StudioLive input is hard-coded to receive its respective digital return. The DAW Outputs in your recording application route these playback streams to their respective channels on the StudioLive (that is, the software’s Output 1 always goes to StudioLive Channel 1 digital return and so on).
2 2.6 Connecting to a Computer Using Plug-In Effects as Inserts StudioLive™ Software Library Reference Manual 3. Once you have the routing set up in Studio One, drag-and-drop the Beat Delay plug-in onto your track and record-enable it. Software monitoring will be enabled automatically. 4. To enable the Digital Return on Channel 4 of your StudioLive, first press the USB multimode button. 5. Press the multimode button on Channel 4.
3 3.1 3 StudioLive™ Software Library Reference Manual Networking Your Remote Devices Connecting your Computer to your Network Networking Your Remote Devices In order to use your mobile devices to remote control your StudioLive 16.0.2 USB mixer, you must first connect it to a Mac or Windows computer via USB with Universal Control installed and running. The computer running Universal Control must then be connected to the same network as your mobile devices. This section will cover networking proceedures.
3 3.2 3.2 Networking Your Remote Devices Connecting your iPad to your Network StudioLive™ Software Library Reference Manual Connecting your iPad to your Network 1. Tap on the Settings icon in your iPad. 2. Tap on “Wi-Fi.” 3. Under “Choose a Network,” find the same network to which your computer is connected. Tap the network to select it. 4. Enter the password when prompted and tap Join. 5. Tap on the menu arrow to the right of the desired network’s name to open its network settings. 6.
4 4.1 4 Universal Control Universal Control Launch Window StudioLive™ Software Library Reference Manual Universal Control Universal Control is a powerful hardware management application for all PreSonus® interface products. It allows you to manage any PreSonus interface product connected to your computer or your computer’s network. 4.1 Universal Control Launch Window When Universal Control is launched, you will see the Launch Window.
4 4.1 StudioLive™ Software Library Reference Manual Universal Control Universal Control Launch Window Settings Menu. Provide customization options to personalize your Universal Control experience. •• Always on Top. Keeps the Universal Control Launch window on top whether it is the currently active application or not. •• Run at Startup. Launches Universal Control automatically when your computer boots. •• Preferences. Sets language and appearance options (see below). •• Rescan Network.
4 4.2 4.2 Universal Control TUIO Setup (macOS) StudioLive™ Software Library Reference Manual TUIO Setup (macOS) TUIO allows multi-touch displays to connect to macOS. If you would like to use a multi-touch display with your Apple computer, check the box next to “Enable TUIO.” Once enabled, you must set the UDP port to match the value set by your multitouch display’s driver. By default, the UDP port is set to 3333. This is the most common value and it is unlikely that you will need to change this value.
5 5.1 5 UC Surface Mix Control Software UC Surface Mix Controls StudioLive™ Software Library Reference Manual UC Surface Mix Control Software UC Surface is a powerful software application that provides control of channel, subgroup, aux, and bus levels; Fat Channel parameters; aux mixes; effects; and graphic EQs. It also provides a visual overview of your StudioLive settings so that you can see, adjust, and organize them.
5 5.1 UC Surface Mix Control Software UC Surface Mix Controls StudioLive™ Software Library Reference Manual The Mix Selection button for every mix is visible only when the Mixes tab is active. Copy Mix Copying the current mix allows you to quickly set up multiple mixes. 1. To copy a mix to any other mix, press the Copy Mix button. 2. Click on the desired destination mix(es). 3. Click Paste to paste the mix or click Cancel to stop the operation.
5 5.1 UC Surface Mix Control Software UC Surface Mix Controls StudioLive™ Software Library Reference Manual Main Fader The fader(s) to the right of the Mix Select buttons always control(s) the Main mix level. 5.1.1 Channel Controls 1 2 3 4 5 1. Fat Channel Select. Opens the Fat Channel controls for the channel/mix. This microview displays an overview of the EQ curve you set in the Fat Channel. See Section 5.2 for more information about the Fat Channel section and its functions. 2. Solo Button.
5 5.2 StudioLive™ Software Library Reference Manual UC Surface Mix Control Software Fat Channel Controls 5.2 Fat Channel Controls Every input and bus on your StudioLive mixer is equipped with Fat Channel dynamics processing and filtering. The revolutionary Fat Channel is the heart of the StudioLive. The Fat Channel makes dynamics, routing, and panning for every input and output on the StudioLive available at the touch of a Select button.
5 5.2 StudioLive™ Software Library Reference Manual UC Surface Mix Control Software Fat Channel Controls 5.2.2 Mix Detail When a mix is selected, the following controls will be available at the far left of the Fat Channel: 1 2 1. High-Pass Filter Controls. Sets the High-Pass Filter Frequency Threshold and engages / disengages the High-Pass Filter for currently selected channel. 2. Link Mix. Links the selected mix to the one adjacent to create a stereo bus. 5.2.
5 5.2 UC Surface Mix Control Software Fat Channel Controls 5.2.4 StudioLive™ Software Library Reference Manual Compressor To view the controls for the Compressor, click on the Compressor tab. 1 2 3 4 5 6 7 1. Compressor On/Off. Turns the Compressor On and Off for the selected channel. 2. Compressor Graph. This graph shows the point at which the compressor threshold affects the signal. You can use this graph to adjust the threshold or use the dedicated Threshold control (#3). 3. Compressor Response.
5 5.2 UC Surface Mix Control Software Fat Channel Controls StudioLive™ Software Library Reference Manual Equalizer 5.2.5 To view the controls for the parametric EQ, click on the Equalizer tab. 1 2 3 4 5 6 1. EQ Frequency. Adjusts the center frequency of each band. 2. EQ Gain. Sets level of the center frequency from -15 to +15 dB. 3. EQ Graph. This graph shows overall EQ curve. 4. High Shelf EQ On/Off. Enabling the High Shelf button turns the High band into a shelving EQ.
5 5.3 UC Surface Mix Control Software Graphic EQ StudioLive™ Software Library Reference Manual Graphic EQ 5.3 To the left of the Fat Channel, you will find the GEQ button. This opens up the graphic EQ for the Main bus. In general, graphic EQ settings are created prior to a live show and are not adjusted after that. However, minor adjustments sometimes must be made later. UC Surface makes this quick and easy. 1 2 3 1. GEQ On/Off. By default, all graphic EQs are disabled.
5 5.5 StudioLive™ Software Library Reference Manual UC Surface Mix Control Software Scenes and Presets Scenes and Presets 5.5 The presets button in UC Surface is a contextual function that follows the currently selected mode: Fat Channel presets, GEQ presets, FX presets, or Mix Scene. Fat Channel Presets 5.5.1 While the Fat Channel is active, this button launches the Fat Channel presets menu. To close the menu and reopen the mixer view, simply click the button again. 1 2 3 4 5 6 7 8 1.
5 5.5 StudioLive™ Software Library Reference Manual UC Surface Mix Control Software Scenes and Presets GEQ Presets 5.5.2 While the GEQ View button is active, the Preset button launches the GEQ Presets menu. To close the menu and reopen the mixer view, simply click the button again. 1 2 3 4 1. Recall. Loads the current preset to the selected bus. 2. Store. Creates a GEQ preset from the currently selected bus GEQ’s settings. 3. Preset Manager.
5 5.5 StudioLive™ Software Library Reference Manual UC Surface Mix Control Software Scenes and Presets 3. Preset Manager. Displays presets that are stored locally on the device running UC Surface and presets stored locally on the mixer. See Section 5.5.5 for more information. 4. Copy/Paste. To copy the effects settings to another effects bus, simply click on Copy; from the banner at the top of the window, select the bus to which you’d like to load the settings; and click Paste. 5.5.
5 5.6 UC Surface Mix Control Software Quick Panel Functions StudioLive™ Software Library Reference Manual To sync every preset or scene, click or touch the Sync all button. You can copy individual presets and scenes to and from your mixer’s memory by simply dragging dropping them between the Mixer and Local sections of the Library Management area. You can also select presets individually and use the arrow buttons to transfer them to and from your mixer’s memory. 5.
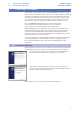
5 5.7 UC Surface Mix Control Software The Settings Page 5.7 StudioLive™ Software Library Reference Manual The Settings Page The Settings page allows you to customize your StudioLive mixer and UC Surface, allowing you to create a flexible mix system for your application.
5 5.7 UC Surface Mix Control Software The Settings Page StudioLive™ Software Library Reference Manual When setting permissions for UC Surface users, you will choose between giving full access to all mix functions or providing limited access to just a few aux-mix functions. In most cases, one iPad will be configured as frontof-house (FOH), and the others will be configured as aux mixes. UC Surface Mix Permissions. Sets the level of functionality in UC Surface. •• None.
5 5.7 UC Surface Mix Control Software The Settings Page StudioLive™ Software Library Reference Manual 2. Enter the 5-digit numeric passcode you would like to use. 3. To make the mixer able to be locked, enable Device is Lockable. 4. Click Set Lockout save the passcode. Locking Your Mixer Once the passcode has been set, you can lock or unlock your mixer any time by navigating to Page 5 of the System menu on your mixer. Press the Select buttons that correspond to the 5-digit code you saved.
5 5.7 UC Surface Mix Control Software The Settings Page StudioLive™ Software Library Reference Manual 5.7.1.3 Firmware UC Surface allows you to view the currently installed firmware version on your StudioLive mixer as well as the version of UC Surface you are running. This is the same information that’s displayed on the last page of the System menu. 5.7.1.4 System Settings The System Settings area allows you to customize your StudioLive mixer. 1 2 3 4 5 6 1. Solo PFL.
5 5.7 UC Surface Mix Control Software The Settings Page 5.7.2 StudioLive™ Software Library Reference Manual MIDI Control Tab The StudioLive 16.0.2 USB can be remotely controlled with a DAW, a MIDI footswitch, a MIDI keyboard, and an assortment of other MIDI control devices. The MIDI Control Tab allows you turn MIDI Control Mode on as well as select on which MIDI channels the StudioLive will be controlled, and which MIDI Control Change messages will be used.
5 5.7 UC Surface Mix Control Software The Settings Page 5.7.3 StudioLive™ Software Library Reference Manual Backup Tab From the Backup tab, you can create a snapshot of every preset and setting on your StudioLive 16.0.2 USB mixer by clicking on the Backup button. To Restore your mixer to an earlier state, simply select the desired backup file and click the Restore button.
6 5.7 6 QMix-UC for Mobile Devices The Settings Page StudioLive™ Software Library Reference Manual QMix-UC for Mobile Devices QMix-UC for iOS (iPhone and iPod touch) and Android™ puts each musician’s monitor (aux) mix in their own hands. With QMix-UC, you can adjust each StudioLive channel’s aux-send level to taste and can create up to four groups of channels that you simultaneously control with the amazing Wheel of Me.
6 6.1 6.1 StudioLive™ Software Library Reference Manual QMix-UC for Mobile Devices Aux Mix Page Aux Mix Page The Aux Mix page shows the send level for each channel on each aux to which your device has access. It corresponds directly to the aux mixes on your StudioLive and has been streamlined to show only the send levels. To open the Aux Mix page, simply hold your mobile device in Landscape view: 1 2 3 4 5 6 7 7 8 1. Home. Returns to the Start page and the available device list. 2.
6 6.1 QMix-UC for Mobile Devices Aux Mix Page 6.1.1 StudioLive™ Software Library Reference Manual Channel Grouping Channel grouping is a great way to easily manage your mix. Creating a group will let you organize groups of channels and manage the overall volume of the entire group without changing the relative level of each channel in the group.
6 6.2 QMix-UC for Mobile Devices Wheel of Me StudioLive™ Software Library Reference Manual To manage your Group masters, flip your mobile device to Portrait mode and swipe to the third screen. This will open the Group Masters view and allow you to control the overall level of each group in your mix. To rename a group and give it a customized label, tap on the default name (Group 1, Group 2, etc.). This will open the keyboard and allow you to name the group masters. 6.
6 6.3 QMix-UC for Mobile Devices Settings Page StudioLive™ Software Library Reference Manual To select your “Me” channels, swipe to the left. From the Me page, you can identify which channels are yours in any aux mix. For example, if you sing backup vocals and play bass, you probably want to hear more of those channels, so you would identify those channels as “Me.
7 7.1 StudioLive™ Software Library Reference Manual Capture Installation Instructions 7 Capture PreSonus® Capture™ is a multitrack digital-audio recording application designed to make recording with StudioLive™ mixers quick and easy. With the look and feel of a digital multitrack hard-disk recorder, it is instantly familiar.
7 7.1 Capture Installation Instructions StudioLive™ Software Library Reference Manual 3. Once Capture has been copied to your hard drive, it is ready to use. Simply open your Application folder and double-click on the Capture 2 icon. 7.1.2 Windows The Windows installer for Capture was designed with easy-to-follow onscreen instructions to make the installation process quick and simple. 1. When you launch the Capture.exe file, a Welcome Screen will launch.
7 7.2 StudioLive™ Software Library Reference Manual Capture Start Page 7.2 Start Page You will be taken to the Start page when Capture is launched. The Start page allows you to create a new Session, open a Session stored on your computer, view recent Sessions, and verify that your StudioLive is properly communicating with its driver. In addition, you can begin recording instantly by just clicking the Record Now button. 7.2.
7 7.2 StudioLive™ Software Library Reference Manual Capture Start Page 7.2.2 Creating a Session Below the Name Scheme fields, you will find the New Session button. Click on the New Session button to create an empty Session. Power User Tip: A Session is a Capture file in which you record, arrange, and edit your audio files. Session files should not be confused with audio files. Think of a Capture Session as you would a StudioLive scene.
7 7.2 StudioLive™ Software Library Reference Manual Capture Start Page You can choose a different file location by clicking on the Browse button and browsing to a new location. The last known save location will appear as the default the next time you create a new Session. Power User Tip: The Name Scheme fields have been added to Capture to help keep your Sessions organized and to make your archived library of live performances more easily searchable.
7 7.2 StudioLive™ Software Library Reference Manual Capture Start Page 7.2.4 Audio Device and Sample Rate Capture was created for use with PreSonus StudioLive-series mixers and fully functions only with that device. The Audio Device menu displays the currently selected audio driver. When a StudioLive is connected, you should select “PreSonus” from the Audio Device list.
7 7.2 StudioLive™ Software Library Reference Manual Capture Start Page •• Device Block Size. This displays the buffer size. In general, the higher the buffer size is set, the more stable your recording environment will be. •• Sample Rate. The Sample Rate menu is also found on the Start page. See Section 7.2.4 for information. •• Record Format. The Record Format menu allows you to choose the bit-depth of the recorded audio. You can select 16bit WAV, 24-bit WAV, or 32-bit floating-point WAV.
7 7.2 StudioLive™ Software Library Reference Manual Capture Start Page File Handling Options As discussed in Section 7.2.1, Capture provides an assortment of useful tools to organize and label Capture Sessions. •• Storage Location. By default, all Capture Sessions are stored in the Capture subfolder in your Documents folder. You can set a new default location by clicking on the “Change…” link. This will launch a browser window, allowing you to find a new location for your Capture Sessions.
7 7.3 7.3 StudioLive™ Software Library Reference Manual Capture The Session Page The Session Page Capture features a single-window user interface so you don’t need to manage multiple windows and views. When a new Session is created, or an existing Session is opened, you will be taken to the Session page. This page contains all of the necessary tools to record and edit multitrack audio. Capture takes full advantage of the StudioLive’s bidirectional digital transport bus and hardwired configuration.
7 7.3 StudioLive™ Software Library Reference Manual Capture The Session Page An additional stereo track will also be added to the Session for recording the Main Mix. It is possible to process each StudioLive mixer input channel with the Fat Channel before the input signal is routed to Capture. To do this, engage the Post button in the Fat Channel for each channel in your StudioLive mixer. This routes the signal post-EQ and post-dynamics processing. 7.3.
7 7.3 StudioLive™ Software Library Reference Manual Capture The Session Page 7.3.2 Transport The Transport is located in the top left corner of the Session page. It contains all the functions you need to navigate through your Session. Stop. Stops playback. Play. Starts playback at the current playback-cursor position. Record. Starts recording at the current playback-cursor position. Session Lock.
7 7.3 StudioLive™ Software Library Reference Manual Capture The Session Page 7.3.3 Time Display The Time Display provides you with critical information about your recording. Session Name. Displays the name of the current Session. Record Duration. Displays how long the current Session has been recording. Cursor Time. Displays the current timeline position of the playback cursor. Remaining Time.
7 7.3 StudioLive™ Software Library Reference Manual Capture The Session Page Locate Selection To jump the playback cursor to the beginning of any audio event, press L on the keyboard or select Session>Locate Selection. 7.3.6 Editing Tools In the upper right corner, you will see four editing-tool buttons. These tools will determine the function of your mouse during editing. Power User Tip: The audio-editing process can be unforgiving.
7 7.3 Capture The Session Page StudioLive™ Software Library Reference Manual Dragging the event up or down will move the event to another track. When dragging an event from one track to another (up or down), the position of the event will be constrained within an automatic snapping range to make it easy to keep the event at the same time position. To defeat this snapping, hold Shift while dragging the event up or down. Rearrange Tracks.
7 7.3 StudioLive™ Software Library Reference Manual Capture The Session Page Select Multiple Events. Multiple events can be selected in order to edit them all at once, with a single action. To select multiple events with the Arrow tool, do one of the following: •• Click outside of the range of an event and then drag over any other events; a gray box will be drawn while you drag over the target-selection area.
7 7.3 StudioLive™ Software Library Reference Manual Capture The Session Page To select multiple, discontiguous ranges across any event, on any track, hold the [Shift] key while using the Range tool. Continue to hold [Shift] and use the Arrow tool to select whole events. For instance, when using the Arrow tool, if you press and hold [Ctrl], you get the Range tool.
7 7.3 StudioLive™ Software Library Reference Manual Capture The Session Page 7.3.6.6 Looping To loop the playback of any range of your Capture Session, do one of the following: •• Loop Selection. Select an event with the Arrow tool or select a range with the Range tool. Go to Session>Loop Selection or press P on your keyboard. This will create a loop the exact length of the selected audio event. The range will be indicated by a bar drawn in the timeline, with flags at both ends. •• Custom Loop Range.
7 7.3 StudioLive™ Software Library Reference Manual Capture The Session Page 7.3.7 Meter Bridge Capture provides input and output metering when a track is being recorded or played back. These peak-style meters at the bottom of the Session page feature clip indicators for each input into Capture from the StudioLive mixer. Record Arm. Below each meter, you will find another Record Arm button. This button provides the same functionality as the Record Arm button in the Track column. See Section 7.3.
7 7.3 StudioLive™ Software Library Reference Manual Capture The Session Page Markers are also helpful when exporting your Session to individual mixes or for editing in another recording application. Power User Tip: We highly recommend that markers be inserted during the recording of a live performance, as the markers will make the rest of the production process much easier. The Marker List. The Marker List button is located above the editing tools on the right side of the Session page.
7 7.4 Capture Recording a Session in Capture StudioLive™ Software Library Reference Manual Marker List. At the bottom of the Marker List, you will find three buttons. Adding Markers. Click on Add Marker to add a marker at the current playback-cursor position. When a Marker is added to the Marker List, the Name field automatically becomes editable. Enter a new name and hit Enter. This name can be edited later by double-clicking on it. Moving Markers.
7 7.5 Capture Virtual Soundcheck StudioLive™ Software Library Reference Manual The Auxiliary Stereo Track in Capture is a stereo track intended to be used to record a stereo mix from your StudioLive. This mix can be recorded while recording the individual input channels so that a mix is available immediately after a live show, or you can use this track to route your final studio mixes through the StudioLive. Arming Tracks. To record to an audio track, the track must be recordenabled, or “armed.
7 7.5 Capture Virtual Soundcheck StudioLive™ Software Library Reference Manual 3. Capture will automatically search your computer for Sessions and will open a list from which you can choose a Session to use for Virtual Soundcheck. 4. Select the Session you would like to use and click “OK.” 5. The saved Capture Session will open.
7 7.6 Capture Remote Controlling Capture from UC Surface StudioLive™ Software Library Reference Manual 6. Press the USB Multimode button on your StudioLive 16.0.2 USB. 7. Press every the multimode buttons on Channels 1 - 15/16. 8. Press Play in Capture and dial in your mix. 9. When you have finished setting up your mix, click the Virtual Soundcheck Mode button again to exit.
7 7.7 StudioLive™ Software Library Reference Manual Capture Importing and Exporting Audio Files 1 2 3 4 5 6 7 8 9 10 11 12 13 14 15 1. Add Marker 2. Delete Marker 3. Next/Prev Marker Navigation 4. Stop 5. Play 6. Record 7. Session Lock 8. Recording Length 9. Individual Track Arm 10. Curser Position 11. Disk Time 12. Close Session 13. Loop 14. Virtual Soundcheck 15. Arm All 7.7 Importing and Exporting Audio Files 7.7.
7 7.7 Capture Importing and Exporting Audio Files StudioLive™ Software Library Reference Manual 2. Browse to the desired file and click on it to select it. 3. Click on Open to import the file into your Session. 4. An audio event for the imported file will be created and placed on the currently selected track in your Session, at the current playback-cursor position.
7 7.7 Capture Importing and Exporting Audio Files StudioLive™ Software Library Reference Manual Location. In the top section of the Export Tracks menu, select a location and name for the audio file. Click on the Browse button to choose a file location. Double-click on the filename, type in a new name, and then press Enter to choose a name for the file.
7 7.8 Capture Mixing Your Capture Sessions 7.8 Mixing Your Capture Sessions 7.8.1 Creating a Mix in Capture StudioLive™ Software Library Reference Manual You can’t mix directly in Capture; instead, you mix with the StudioLive. The individual outputs of each audio track in Capture are hardwired to the digital returns for each corresponding input channel on the StudioLive mixer.
7 7.8 Capture Mixing Your Capture Sessions 7.8.4 StudioLive™ Software Library Reference Manual Mixing a Capture Session in a Different Recording Application For users who wish to mix their Capture Session in a DAW other than Studio One, there are several ways in which to import your Capture Session. Save a Capture Session as OpenTL Many audio-recording programs can open OpenTL (Open Track List) files.
7 7.9 StudioLive™ Software Library Reference Manual Capture Capture Key Commands 7.
8 8.1 8 Studio One Artist Quick Start Installation and Authorization StudioLive™ Software Library Reference Manual Studio One Artist Quick Start All PreSonus professional recording products come with Studio One Artist recording and production software. Whether you are about to record your first album or your fiftieth, Studio One Artist provides you with all of the tools necessary to capture and mix a great performance.
8 8.2 Studio One Artist Quick Start Setting Up Studio One •• StudioLive™ Software Library Reference Manual Mac users: Drag the Studio One Artist application into the Applications folder on your Mac hard drive. Authorizing Studio One When Studio One is launched for the first time on your computer, it will communicate with your My PreSonus account and verify your registration.
8 8.2 Studio One Artist Quick Start Setting Up Studio One 8.2.1 StudioLive™ Software Library Reference Manual Configuring Audio Devices 1. In the middle of the Start page, you will see the Setup area. Studio One Artist automatically scans your system for all available drivers and selects a driver. By default, it will choose a PreSonus driver if one is available. 2.
8 8.2 Studio One Artist Quick Start Setting Up Studio One 8.2.2 StudioLive™ Software Library Reference Manual Configuring MIDI Devices From the External Devices window in Studio One Artist, you can configure your MIDI keyboard controller, sound modules, and control surfaces. This section will guide you through setting up your MIDI keyboard controller and sound modules. Please consult the Reference Manual located within Studio One for complete setup instructions for other MIDI devices.
8 8.2 Studio One Artist Quick Start Setting Up Studio One StudioLive™ Software Library Reference Manual 2. Click the Add button. This will launch the Add Device window. 3. From the menu on the left, select your MIDI controller from the list of manufacturers and models. If you do not see your MIDI controller listed, select New Keyboard. At this point, you can customize the name of your keyboard by entering the manufacturer and device names. 4.
8 8.2 Studio One Artist Quick Start Setting Up Studio One StudioLive™ Software Library Reference Manual 7. If this is the only keyboard that you will use to control your external synthesizers and virtual instruments, you should check the box next to Default Instrument Input. This will automatically assign your keyboard to control all MIDI devices in Studio One Artist. 8. Click OK.
8 8.3 Studio One Artist Quick Start Creating a New Song StudioLive™ Software Library Reference Manual 2. Select your device in the menu on the left. If your device is not listed, select New Instrument. At this point you can customize the name of your keyboard by entering the manufacturer and device names. 3. Specify which MIDI channels will be used to communicate with this sound module. For most purposes, you should select all MIDI channels.
8 8.3 Studio One Artist Quick Start Creating a New Song StudioLive™ Software Library Reference Manual 2. In the New Song window, name your Song and choose the directory in which you’d like it saved. From the Interfaces tab, you can select custom templates for your StudioLive mixer that will set all configuration and I/O settings for you. The rest of section will describe creating a Song from an empty session. 3. Select Empty Song from the Templates list.
8 8.3 Studio One Artist Quick Start Creating a New Song StudioLive™ Software Library Reference Manual 3. From the Inputs tab, you can enable any or all of the inputs on your StudioLive mixer that you’d like to have available. We recommend that you create a mono input for each of the inputs on your interface. If you plan on recording in stereo, you should also create a few stereo inputs. You can give each input a custom name by simply clicking on the default name. Press the TAB key to edit the next name.
8 8.3 StudioLive™ Software Library Reference Manual Studio One Artist Quick Start Creating a New Song 8.3.2 Creating Audio and MIDI Tracks 1. In the upper left corner of the Arrange window, you will notice several buttons. The button furthest to the right is the Add Tracks button. Click on this button to open the Add Tracks window. 2.
8 8.3 Studio One Artist Quick Start Creating a New Song 8.3.3 StudioLive™ Software Library Reference Manual Recording an Audio Track 1. To begin recording, create an audio track from the Add Tracks window, set its input to Input 1 on your StudioLive mixer. 2. Connect a microphone to Channel 1 on your StudioLive 16.0.2 USB. 3. Select Record Enable on the track. Turn up the Input 1 level on your mixer while speaking/singing into the microphone.
8 8.3 Studio One Artist Quick Start Creating a New Song 8.3.4 StudioLive™ Software Library Reference Manual Adding Virtual Instruments and Effects You can add plug-ins and instruments to your Song by dragging-and-dropping them from the browser. You can also drag an effect or group of effects from one channel to another, drag in customized effects chains, and instantly load your favorite virtual-instrument preset without ever scrolling through a menu. Opening the browser.
8 8.4 Studio One Artist Quick Start Remote Controlling your StudioLive 16.0.2 USB from Studio One StudioLive™ Software Library Reference Manual Drag-and-drop effects. To add a plug-in effect to a track, click the Effects button in the browser and select the plug-in or one of its presets in the effects browser. Drag-and-drop the selection over the track to which you would like to add the effect. 8.3.
8 8.4 Studio One Artist Quick Start Remote Controlling your StudioLive 16.0.2 USB from Studio One 8.4.1 StudioLive™ Software Library Reference Manual Configuring StudioLive 16.0.2 as a MIDI Device To configure your StudioLive 16.0.2 for control by Studio One Artist, you must first add the StudioLive as an external device. 1. From the Studio One Artist Start page, click on the External Devices link. 2. Click on the Add button. 3. Select New Instrument. 4. In the Device Name field, enter “StudioLive.
8 8.4 Studio One Artist Quick Start Remote Controlling your StudioLive 16.0.2 USB from Studio One 8.4.2 StudioLive™ Software Library Reference Manual Recalling Scenes and Presets In our example, you have to set different MIDI channels to recall Scenes, FXA Presets, and FXB Presets. These are the MIDI channels on which Studio One will send Program Change messages for each function. 1. In Studio One, create a new Song and then create an Instrument track. 2. In the Output menu, select “StudioLive CH 1.
8 8.4 Studio One Artist Quick Start Remote Controlling your StudioLive 16.0.2 USB from Studio One 8.4.3 StudioLive™ Software Library Reference Manual Controlling FXA, FXB, and Main Output Levels 1. In Studio One, select the Paint tool. 2. Using the Paint tool, draw a MIDI region several bars long. 3. Set the MIDI channel for the Instrument track to 4. 4. In the Track menu, select “Add Automation Track.” 5. From the Automation Track Inspector, click on the Parameter menu and select “Add/Remove. 6.
8 8.4 Studio One Artist Quick Start Remote Controlling your StudioLive 16.0.2 USB from Studio One StudioLive™ Software Library Reference Manual 7. Scroll through the MIDI Control Change list until you find Controls 40-42. 8. Select these controls and click Add. 9. Click Close. 10. Select Control 42 from the parameter pull-down menu on the automation track. 11. Using your Paint tool, draw an automation curve. 12. Press Play to hear Studio One control the main output level of your StudioLive.
8 8.4 Studio One Artist Quick Start Remote Controlling your StudioLive 16.0.2 USB from Studio One StudioLive™ Software Library Reference Manual 3. Set the MIDI channel for the Instrument track to 4. 4. In the Track menu, select “Add Automation Track.” 5. From the Automation Track Inspector, click on the Parameter menu and select “Add/Remove. 6. From the Automation window, select “External Devices > CH4.” 7.
8 8.4 Studio One Artist Quick Start Remote Controlling your StudioLive 16.0.2 USB from Studio One StudioLive™ Software Library Reference Manual 8. Click Close. 9. Select Sustain Pedal On/Off from the Parameter pulldown menu on the automation track. 10. Using your Pencil tool, draw an “ON” message that lasts for several bars. Note that the FXA/FXB assignment to the main bus is a simple toggle, so when it receives its CC message, the button will be put into the opposite of its current state.
Dinner is Served Added bonus: PreSonus’ previously Top Secret recipe for… Jambalaya Ingredients: •• •• •• •• •• •• •• •• •• •• •• •• 5 lbs link andouille sausage 3 lbs boneless chicken 2 lbs ground beef 3 lbs onions (yellow or purple) 2 stalks of celery 1 lb bell peppers (green or red) 1 batch green onions 3 lbs rice Tony Chachere’s Cajun Seasoning 1 bottle chicken stock concentrate (or 3 cubes chicken bullion) 1 can Rotel tomatoes with chilies, diced (regular hot) Tabasco sauce Cooking Instructions: 1.
StudioLive™ Software Library Reference Manual Universal Control with UC Surface | QMix™-UC for iOS® and Android™ | Capture™ 2 Studio One® Artist Studio One Artist UC Surface Capture Universal Control QMix-UC ® 18011 Grand Bay Ct. • Baton Rouge, Louisiana 70809 USA• 1-225-216-7887 www.presonus.