
User manual
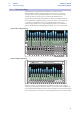
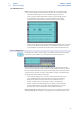
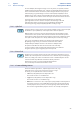
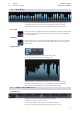
Table Of Contents
- 1 Overview
- 1.1 Introduction
- 1.2 About This Manual
- 1.3 Technical Support
- 1.4 Summary StudioLive Software Library Features
- 1.4.1 UC Surface
- 1.4.2 QMix™ UC for iPhone®, iPod touch®, and Android devices
- 1.4.3 Capture
- 1.4.4 Studio One Artist
- 2 Connecting to a Computer
- 2.1 Installation for Windows
- 2.2 Installation for macOS
- 2.3 Using the StudioLive as an Audio Interface
- 2.4 Using the StudioLive with Popular Audio Applications
- 2.5 Digital Sends and Returns
- 2.5.1 Channel Digital Sends
- 2.5.2 Digital Returns
- 2.5.3 Main Digital Return
- 2.6 Using Plug-In Effects as Inserts
- 3 Networking Your Remote Devices
- 3.1 Connecting your Computer to your Network
- 3.2 Connecting your iPad to your Network
- 3.3 Connecting your iPhone/iPod touch to your Network
- 4 Universal Control
- 4.1 Universal Control Launch Window
- 4.2 TUIO Setup (macOS)
- 5 UC Surface Mix Control Software
- 5.1 UC Surface Mix Controls
- 5.1.1 Channel Controls
- 5.2 Fat Channel Controls
- 5.2.1 Input Controls
- 5.2.2 Mix Detail
- 5.2.3 Noise Gate
- 5.2.4 Compressor
- 5.2.5 Equalizer
- 5.2.6 Limiter
- 5.3 Graphic EQ
- 5.4 Adding Effects
- 5.4.1 Editing Effects
- 5.5 Scenes and Presets
- 5.5.1 Fat Channel Presets
- 5.5.2 GEQ Presets
- 5.5.3 FX Presets
- 5.5.4 Scenes
- 5.5.5 Preset and Scene Management
- 5.6 Quick Panel Functions
- 5.6.1 Talkback
- 5.6.2 Fader Locate
- 5.6.3 FX Mutes
- 5.7 The Settings Page
- 5.7.1. Device Settings Tab
- 5.7.2 MIDI Control Tab
- 5.7.3 Backup Tab
- 6 QMix-UC for Mobile Devices
- 6.1 Aux Mix Page
- 6.1.1 Channel Grouping
- 6.2 Wheel of Me
- 6.3 Settings Page
- 7 Capture
- 7.1 Installation Instructions
- 7.1.1 macOS
- 7.1.2 Windows
- 7.2 Start Page
- 7.2.1 Tagging and Organizing a Session
- 7.2.2 Creating a Session
- 7.2.3 Open a Session
- 7.2.4 Audio Device and Sample Rate
- 7.2.5 Options Menu
- 7.3 The Session Page
- 7.3.1 Track Column
- 7.3.2 Transport
- 7.3.3 Time Display
- 7.3.4 Timeline Ruler
- 7.3.5 Navigating the Session
- 7.3.6 Editing Tools
- 7.3.7 Meter Bridge
- 7.3.8 Markers and the Marker List
- 7.4 Recording a Session in Capture
- 7.5 Virtual Soundcheck
- 7.6 Remote Controlling Capture from UC Surface
- 7.7 Importing and Exporting Audio Files
- 7.7.1 Importing Audio Files into Capture
- 7.7.2 Export Audio Files
- 7.8 Mixing Your Capture Sessions
- 7.8.1 Creating a Mix in Capture
- 7.8.2 Exporting Your Final Mix to an Audio File
- 7.8.3 Mixing a Capture Session in Studio One
- 7.8.4 Mixing a Capture Session in a Different Recording Application
- 7.9 Capture Key Commands
- 8 Studio One Artist Quick Start
- 8.1 Installation and Authorization
- 8.2 Setting Up Studio One
- 8.2.1 Configuring Audio Devices
- 8.2.2 Configuring MIDI Devices
- 8.3 Creating a New Song
- 8.3.1 Configuring Your I/O
- 8.3.2 Creating Audio and MIDI Tracks
- 8.3.3 Recording an Audio Track
- 8.3.4 Adding Virtual Instruments and Effects
- 8.3.5 Drag-and-Drop Audio and MIDI Files
- 8.4 Remote Controlling your StudioLive 16.0.2 USB from Studio One
- 8.4.1 Configuring StudioLive 16.0.2 as a MIDI Device
- 8.4.2 Recalling Scenes and Presets
- 8.4.3 Controlling FXA, FXB, and Main Output Levels
- 8.4.4 Assigning/Unassigning FXA and FXB to the Main Bus

50
7 Capture
7.3 The Session Page
StudioLive™ Software
Library Reference Manual
7.3.3 Time Display
The Time Display provides you with critical information about your recording.
Session Name. Displays the name of the current Session.
Record Duration. Displays how long the current Session has been recording.
Cursor Time. Displays the current timeline position of the playback cursor.
Remaining Time. Displays the remaining time that can be recorded, based on the
size of the available storage left on the hard drive to which you are recording.
7.3.4 Timeline Ruler
At the top of the Session Editor, you will find the Timeline
Ruler. This displays time increments in seconds.
As mentioned in Section 7.2.5, you can set the Timeline Ruler to sync to
your computer’s clock or to an external MIDI Time Code source.
7.3.5 Navigating the Session
Zooming
You can zoom in and out of your Session, with respect to time, in the Session
Edit window, so that you can look at the entire length of the Session or
just view a small region of time to make accurate edits. You can also zoom
in and out with respect to the size of the audio files in your Session.
To zoom, do one of the following:
• To zoom in or out, click-and-drag left or right on the Horizontal Zoom scroll bar
in the lower right-hand corner of the Edit window.
• Press [Ctrl]/[Cmd]+[+] on the keyboard to zoom in slightly. Press
[Ctrl]/[Cmd]+[-] on the keyboard to zoom out slightly.
• Click inside the Timeline Ruler at any point in time
and drag down or up to zoom in or out.
• In the lower left-hand corner of the Edit window, you will find the vertical-zoom
controls. These controls increase or decrease the height of the tracks and audio
files.
Scrolling
To scroll left and right through time in your Session, click-and-drag
the horizontal scroll bar near the bottom of the Edit window.
You can also scroll through your Session by clicking and
dragging the Timeline Ruler left or right.