
User manual
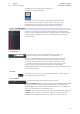
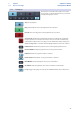
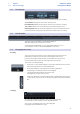
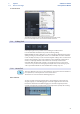
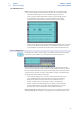
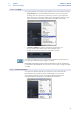
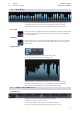
Table Of Contents
- 1 Overview
- 1.1 Introduction
- 1.2 About This Manual
- 1.3 Technical Support
- 1.4 Summary StudioLive Software Library Features
- 1.4.1 UC Surface
- 1.4.2 QMix™ UC for iPhone®, iPod touch®, and Android devices
- 1.4.3 Capture
- 1.4.4 Studio One Artist
- 2 Connecting to a Computer
- 2.1 Installation for Windows
- 2.2 Installation for macOS
- 2.3 Using the StudioLive as an Audio Interface
- 2.4 Using the StudioLive with Popular Audio Applications
- 2.5 Digital Sends and Returns
- 2.5.1 Channel Digital Sends
- 2.5.2 Digital Returns
- 2.5.3 Main Digital Return
- 2.6 Using Plug-In Effects as Inserts
- 3 Networking Your Remote Devices
- 3.1 Connecting your Computer to your Network
- 3.2 Connecting your iPad to your Network
- 3.3 Connecting your iPhone/iPod touch to your Network
- 4 Universal Control
- 4.1 Universal Control Launch Window
- 4.2 TUIO Setup (macOS)
- 5 UC Surface Mix Control Software
- 5.1 UC Surface Mix Controls
- 5.1.1 Channel Controls
- 5.2 Fat Channel Controls
- 5.2.1 Input Controls
- 5.2.2 Mix Detail
- 5.2.3 Noise Gate
- 5.2.4 Compressor
- 5.2.5 Equalizer
- 5.2.6 Limiter
- 5.3 Graphic EQ
- 5.4 Adding Effects
- 5.4.1 Editing Effects
- 5.5 Scenes and Presets
- 5.5.1 Fat Channel Presets
- 5.5.2 GEQ Presets
- 5.5.3 FX Presets
- 5.5.4 Scenes
- 5.5.5 Preset and Scene Management
- 5.6 Quick Panel Functions
- 5.6.1 Talkback
- 5.6.2 Fader Locate
- 5.6.3 FX Mutes
- 5.7 The Settings Page
- 5.7.1. Device Settings Tab
- 5.7.2 MIDI Control Tab
- 5.7.3 Backup Tab
- 6 QMix-UC for Mobile Devices
- 6.1 Aux Mix Page
- 6.1.1 Channel Grouping
- 6.2 Wheel of Me
- 6.3 Settings Page
- 7 Capture
- 7.1 Installation Instructions
- 7.1.1 macOS
- 7.1.2 Windows
- 7.2 Start Page
- 7.2.1 Tagging and Organizing a Session
- 7.2.2 Creating a Session
- 7.2.3 Open a Session
- 7.2.4 Audio Device and Sample Rate
- 7.2.5 Options Menu
- 7.3 The Session Page
- 7.3.1 Track Column
- 7.3.2 Transport
- 7.3.3 Time Display
- 7.3.4 Timeline Ruler
- 7.3.5 Navigating the Session
- 7.3.6 Editing Tools
- 7.3.7 Meter Bridge
- 7.3.8 Markers and the Marker List
- 7.4 Recording a Session in Capture
- 7.5 Virtual Soundcheck
- 7.6 Remote Controlling Capture from UC Surface
- 7.7 Importing and Exporting Audio Files
- 7.7.1 Importing Audio Files into Capture
- 7.7.2 Export Audio Files
- 7.8 Mixing Your Capture Sessions
- 7.8.1 Creating a Mix in Capture
- 7.8.2 Exporting Your Final Mix to an Audio File
- 7.8.3 Mixing a Capture Session in Studio One
- 7.8.4 Mixing a Capture Session in a Different Recording Application
- 7.9 Capture Key Commands
- 8 Studio One Artist Quick Start
- 8.1 Installation and Authorization
- 8.2 Setting Up Studio One
- 8.2.1 Configuring Audio Devices
- 8.2.2 Configuring MIDI Devices
- 8.3 Creating a New Song
- 8.3.1 Configuring Your I/O
- 8.3.2 Creating Audio and MIDI Tracks
- 8.3.3 Recording an Audio Track
- 8.3.4 Adding Virtual Instruments and Effects
- 8.3.5 Drag-and-Drop Audio and MIDI Files
- 8.4 Remote Controlling your StudioLive 16.0.2 USB from Studio One
- 8.4.1 Configuring StudioLive 16.0.2 as a MIDI Device
- 8.4.2 Recalling Scenes and Presets
- 8.4.3 Controlling FXA, FXB, and Main Output Levels
- 8.4.4 Assigning/Unassigning FXA and FXB to the Main Bus

51
7 Capture
7.3 The Session Page
StudioLive™ Software
Library Reference Manual
Locate Selection
To jump the playback cursor to the beginning of any audio event,
press L on the keyboard or select Session>Locate Selection.
7.3.6 Editing Tools
In the upper right corner, you will see four editing-tool buttons. These
tools will determine the function of your mouse during editing.
Power User Tip: The audio-editing process can be unforgiving. Small inaccuracies when
splitting, moving, or performing other actions on recorded audio can lead to unwanted
results. As simple as it may seem, the act of listening while editing is often overlooked. For
instance, when sizing the edges of a vocal part to remove unwanted sounds between
words, it is tempting to make the edits based on the visual representation of the
waveform. While this may work sometimes, it is much better to listen as you size the
events to be sure you are not removing any critical part of the vocals. Listening to your
edits as you make them will save time and frustration in nearly every case.
7.3.6.1 Arrow Tool
This is the default tool for access to most functions. Click on the Arrow tool button or
press [number 1] on the keyboard to select the Arrow tool.
The Arrow tool can be used for the following purposes:
Move an Event.
To move an audio event using the Arrow tool, click anywhere on the event and
drag left, right, up, or down. Dragging the event left or right will move the event
backward or forward in time. When dragging an event left or right beyond the
viewable arrangement, hold [Space Bar] on the keyboard to speed up the scrolling.