
User manual
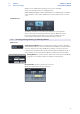
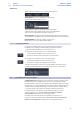

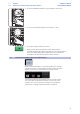
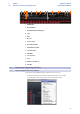
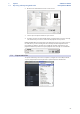
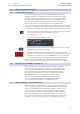
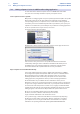
Table Of Contents
- 1 Overview
- 1.1 Introduction
- 1.2 About This Manual
- 1.3 Technical Support
- 1.4 Summary StudioLive Software Library Features
- 1.4.1 UC Surface
- 1.4.2 QMix™ UC for iPhone®, iPod touch®, and Android devices
- 1.4.3 Capture
- 1.4.4 Studio One Artist
- 2 Connecting to a Computer
- 2.1 Installation for Windows
- 2.2 Installation for macOS
- 2.3 Using the StudioLive as an Audio Interface
- 2.4 Using the StudioLive with Popular Audio Applications
- 2.5 Digital Sends and Returns
- 2.5.1 Channel Digital Sends
- 2.5.2 Digital Returns
- 2.5.3 Main Digital Return
- 2.6 Using Plug-In Effects as Inserts
- 3 Networking Your Remote Devices
- 3.1 Connecting your Computer to your Network
- 3.2 Connecting your iPad to your Network
- 3.3 Connecting your iPhone/iPod touch to your Network
- 4 Universal Control
- 4.1 Universal Control Launch Window
- 4.2 TUIO Setup (macOS)
- 5 UC Surface Mix Control Software
- 5.1 UC Surface Mix Controls
- 5.1.1 Channel Controls
- 5.2 Fat Channel Controls
- 5.2.1 Input Controls
- 5.2.2 Mix Detail
- 5.2.3 Noise Gate
- 5.2.4 Compressor
- 5.2.5 Equalizer
- 5.2.6 Limiter
- 5.3 Graphic EQ
- 5.4 Adding Effects
- 5.4.1 Editing Effects
- 5.5 Scenes and Presets
- 5.5.1 Fat Channel Presets
- 5.5.2 GEQ Presets
- 5.5.3 FX Presets
- 5.5.4 Scenes
- 5.5.5 Preset and Scene Management
- 5.6 Quick Panel Functions
- 5.6.1 Talkback
- 5.6.2 Fader Locate
- 5.6.3 FX Mutes
- 5.7 The Settings Page
- 5.7.1. Device Settings Tab
- 5.7.2 MIDI Control Tab
- 5.7.3 Backup Tab
- 6 QMix-UC for Mobile Devices
- 6.1 Aux Mix Page
- 6.1.1 Channel Grouping
- 6.2 Wheel of Me
- 6.3 Settings Page
- 7 Capture
- 7.1 Installation Instructions
- 7.1.1 macOS
- 7.1.2 Windows
- 7.2 Start Page
- 7.2.1 Tagging and Organizing a Session
- 7.2.2 Creating a Session
- 7.2.3 Open a Session
- 7.2.4 Audio Device and Sample Rate
- 7.2.5 Options Menu
- 7.3 The Session Page
- 7.3.1 Track Column
- 7.3.2 Transport
- 7.3.3 Time Display
- 7.3.4 Timeline Ruler
- 7.3.5 Navigating the Session
- 7.3.6 Editing Tools
- 7.3.7 Meter Bridge
- 7.3.8 Markers and the Marker List
- 7.4 Recording a Session in Capture
- 7.5 Virtual Soundcheck
- 7.6 Remote Controlling Capture from UC Surface
- 7.7 Importing and Exporting Audio Files
- 7.7.1 Importing Audio Files into Capture
- 7.7.2 Export Audio Files
- 7.8 Mixing Your Capture Sessions
- 7.8.1 Creating a Mix in Capture
- 7.8.2 Exporting Your Final Mix to an Audio File
- 7.8.3 Mixing a Capture Session in Studio One
- 7.8.4 Mixing a Capture Session in a Different Recording Application
- 7.9 Capture Key Commands
- 8 Studio One Artist Quick Start
- 8.1 Installation and Authorization
- 8.2 Setting Up Studio One
- 8.2.1 Configuring Audio Devices
- 8.2.2 Configuring MIDI Devices
- 8.3 Creating a New Song
- 8.3.1 Configuring Your I/O
- 8.3.2 Creating Audio and MIDI Tracks
- 8.3.3 Recording an Audio Track
- 8.3.4 Adding Virtual Instruments and Effects
- 8.3.5 Drag-and-Drop Audio and MIDI Files
- 8.4 Remote Controlling your StudioLive 16.0.2 USB from Studio One
- 8.4.1 Configuring StudioLive 16.0.2 as a MIDI Device
- 8.4.2 Recalling Scenes and Presets
- 8.4.3 Controlling FXA, FXB, and Main Output Levels
- 8.4.4 Assigning/Unassigning FXA and FXB to the Main Bus

61
7 Capture
7.6 Remote Controlling Capture from UC Surface
StudioLive™ Software
Library Reference Manual
6. Press the USB Multimode button on your StudioLive 16.0.2 USB.
7. Press every the multimode buttons on Channels 1 - 15/16.
8. Press Play in Capture and dial in your mix.
9. When you have finished setting up your mix, click the Virtual
Soundcheck Mode button again to exit. This will remove the audio from
the session and disengage all the digital returns on your StudioLive,
leaving the track labels in both Capture and on your mixer.
7.6 Remote Controlling Capture from UC Surface
When your StudioLive mixer is connected via USB to your computer
and Universal Control, a Capture button will appear in the UC Surface
Quick Access Panel once your StudioLive is synced to Capture.
Selecting this button will show Capture controls in the Fat Channel
area of UC Surface. From within UC Surface, you can create a new
Capture session, load a previously recording session, add markers,
arm tracks for recording, and perform a virtual soundcheck.