
User manual
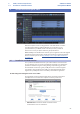
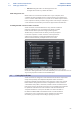
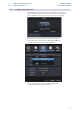
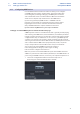


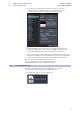
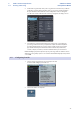
Table Of Contents
- 1 Overview
- 1.1 Introduction
- 1.2 About This Manual
- 1.3 Technical Support
- 1.4 Summary StudioLive Software Library Features
- 1.4.1 UC Surface
- 1.4.2 QMix™ UC for iPhone®, iPod touch®, and Android devices
- 1.4.3 Capture
- 1.4.4 Studio One Artist
- 2 Connecting to a Computer
- 2.1 Installation for Windows
- 2.2 Installation for macOS
- 2.3 Using the StudioLive as an Audio Interface
- 2.4 Using the StudioLive with Popular Audio Applications
- 2.5 Digital Sends and Returns
- 2.5.1 Channel Digital Sends
- 2.5.2 Digital Returns
- 2.5.3 Main Digital Return
- 2.6 Using Plug-In Effects as Inserts
- 3 Networking Your Remote Devices
- 3.1 Connecting your Computer to your Network
- 3.2 Connecting your iPad to your Network
- 3.3 Connecting your iPhone/iPod touch to your Network
- 4 Universal Control
- 4.1 Universal Control Launch Window
- 4.2 TUIO Setup (macOS)
- 5 UC Surface Mix Control Software
- 5.1 UC Surface Mix Controls
- 5.1.1 Channel Controls
- 5.2 Fat Channel Controls
- 5.2.1 Input Controls
- 5.2.2 Mix Detail
- 5.2.3 Noise Gate
- 5.2.4 Compressor
- 5.2.5 Equalizer
- 5.2.6 Limiter
- 5.3 Graphic EQ
- 5.4 Adding Effects
- 5.4.1 Editing Effects
- 5.5 Scenes and Presets
- 5.5.1 Fat Channel Presets
- 5.5.2 GEQ Presets
- 5.5.3 FX Presets
- 5.5.4 Scenes
- 5.5.5 Preset and Scene Management
- 5.6 Quick Panel Functions
- 5.6.1 Talkback
- 5.6.2 Fader Locate
- 5.6.3 FX Mutes
- 5.7 The Settings Page
- 5.7.1. Device Settings Tab
- 5.7.2 MIDI Control Tab
- 5.7.3 Backup Tab
- 6 QMix-UC for Mobile Devices
- 6.1 Aux Mix Page
- 6.1.1 Channel Grouping
- 6.2 Wheel of Me
- 6.3 Settings Page
- 7 Capture
- 7.1 Installation Instructions
- 7.1.1 macOS
- 7.1.2 Windows
- 7.2 Start Page
- 7.2.1 Tagging and Organizing a Session
- 7.2.2 Creating a Session
- 7.2.3 Open a Session
- 7.2.4 Audio Device and Sample Rate
- 7.2.5 Options Menu
- 7.3 The Session Page
- 7.3.1 Track Column
- 7.3.2 Transport
- 7.3.3 Time Display
- 7.3.4 Timeline Ruler
- 7.3.5 Navigating the Session
- 7.3.6 Editing Tools
- 7.3.7 Meter Bridge
- 7.3.8 Markers and the Marker List
- 7.4 Recording a Session in Capture
- 7.5 Virtual Soundcheck
- 7.6 Remote Controlling Capture from UC Surface
- 7.7 Importing and Exporting Audio Files
- 7.7.1 Importing Audio Files into Capture
- 7.7.2 Export Audio Files
- 7.8 Mixing Your Capture Sessions
- 7.8.1 Creating a Mix in Capture
- 7.8.2 Exporting Your Final Mix to an Audio File
- 7.8.3 Mixing a Capture Session in Studio One
- 7.8.4 Mixing a Capture Session in a Different Recording Application
- 7.9 Capture Key Commands
- 8 Studio One Artist Quick Start
- 8.1 Installation and Authorization
- 8.2 Setting Up Studio One
- 8.2.1 Configuring Audio Devices
- 8.2.2 Configuring MIDI Devices
- 8.3 Creating a New Song
- 8.3.1 Configuring Your I/O
- 8.3.2 Creating Audio and MIDI Tracks
- 8.3.3 Recording an Audio Track
- 8.3.4 Adding Virtual Instruments and Effects
- 8.3.5 Drag-and-Drop Audio and MIDI Files
- 8.4 Remote Controlling your StudioLive 16.0.2 USB from Studio One
- 8.4.1 Configuring StudioLive 16.0.2 as a MIDI Device
- 8.4.2 Recalling Scenes and Presets
- 8.4.3 Controlling FXA, FXB, and Main Output Levels
- 8.4.4 Assigning/Unassigning FXA and FXB to the Main Bus

73
8 Studio One Artist Quick Start
8.2 Setting Up Studio One
StudioLive™ Software
Library Reference Manual
7. If this is the only keyboard that you will use to control your external
synthesizers and virtual instruments, you should check the box
next to Default Instrument Input. This will automatically assign your
keyboard to control all MIDI devices in Studio One Artist.
8. Click OK.
If you have a sound module that you’d like to connect, leave the External
Devices window open and proceed to the next part of this section.
If not, you can close the window and skip to the next section.
Setting up an external MIDI sound module from the Start page.
MIDI instrument controllers (keyboards, MIDI guitars, etc.) send musical information
in the form of MIDI data to tone modules and virtual instruments, which respond
by generating sound, as instructed. Tone modules can be standalone sound devices
or can be integrated into a MIDI instrument, such as a keyboard synthesizer. Studio
One Artist refers to all tone generators as Instruments. Once you have set up your
MIDI keyboard controller, take a moment to configure your sound module.
Make sure you have connected the MIDI In of your external
sound module to the MIDI Out of your MIDI interface.
1. In the External Devices window, click the Add button.